Plugins
Plugins are part of the off-chain logic, and are implemented inside the blockchain client.
In other words, a plugin will never change the state of the blockchain itself, contrary to modules, which hold the on-chain logic of the blockchain client.
Creating a Plugin
Lisk provides an extremely simple and user-friendly method to create a plugin using Lisk Commander. By executing the following command in a terminal, a plugin can be created and registered to a blockchain client.
lisk generate:plugin NAME_OF_PLUGIN|
For more practical guidance on how to create a new plugin, check out the guide How to create a plugin. If you wish to view an example of a fully implemented plugin, check out the following examples:
|
Each plugin can have a set of files for defining the schemas, types, and endpoints of a plugin. By default, Lisk Commander only creates the plugin’s class file such as example_plugin.ts, and registers it into the plugins.ts file. The structure of the plugins folder can be similar to the one displayed below:
src/
├── plugins/
│   ├── example/
│   │   ├── example_plugin.ts
│   │   ├── types.ts
│   │   ├── endpoint.ts
│   │   └── schemas.ts
│   └── faucet/
│   │   ├── faucet_plugin.ts
│   │   ├── types.ts
│   │   ├── endpoint.ts
│   │   └── schemas.ts
└── plugins.ts
It’s worth noting that the directory structure of a plugin can be customized as per the requirement of the Lisk application. The separation of types, schemas, and endpoints is purely made to segregate different parts of a plugin.
As mentioned earlier, a part of the plugin’s bootstrapping process is to create a new class such as the ExamplePlugin in the example_plugin.ts file.
For a plugin to work correctly, it is mandatory to include the following functions, nodeModulePath(), load(), and unload().
These functions are automatically created during the bootstrapping process.
The following code snippet below shows a bare-bone plugin class:
import { BasePlugin } from 'lisk-sdk';

export class ExamplePlugin extends BasePlugin {

	public name: 'example';
	//Mandatory
	public get nodeModulePath(): string {
		return __filename;
	}

	//Mandatory
	public async load(): Promise<void> {}

	//Mandatory
	public async unload(): Promise<void> {}

}
Once a plugin is bootstrapped, it is registered inside the plugins.ts file automatically by the Lisk Commander.
import { Application } from 'lisk-sdk';
import { ExamplePlugin } from "./plugins/example/example_plugin";

export const registerPlugins = (app: Application): void => {
    app.registerPlugin(new ExamplePlugin());
};
Plugin Anatomy
Every plugin must extend from the BasePlugin class.
The BasePlugin class provides a basic skeleton for what is required of a plugin.
For more information, check out the base_plugin.ts file on GitHub.
Every plugin has three essential parts:
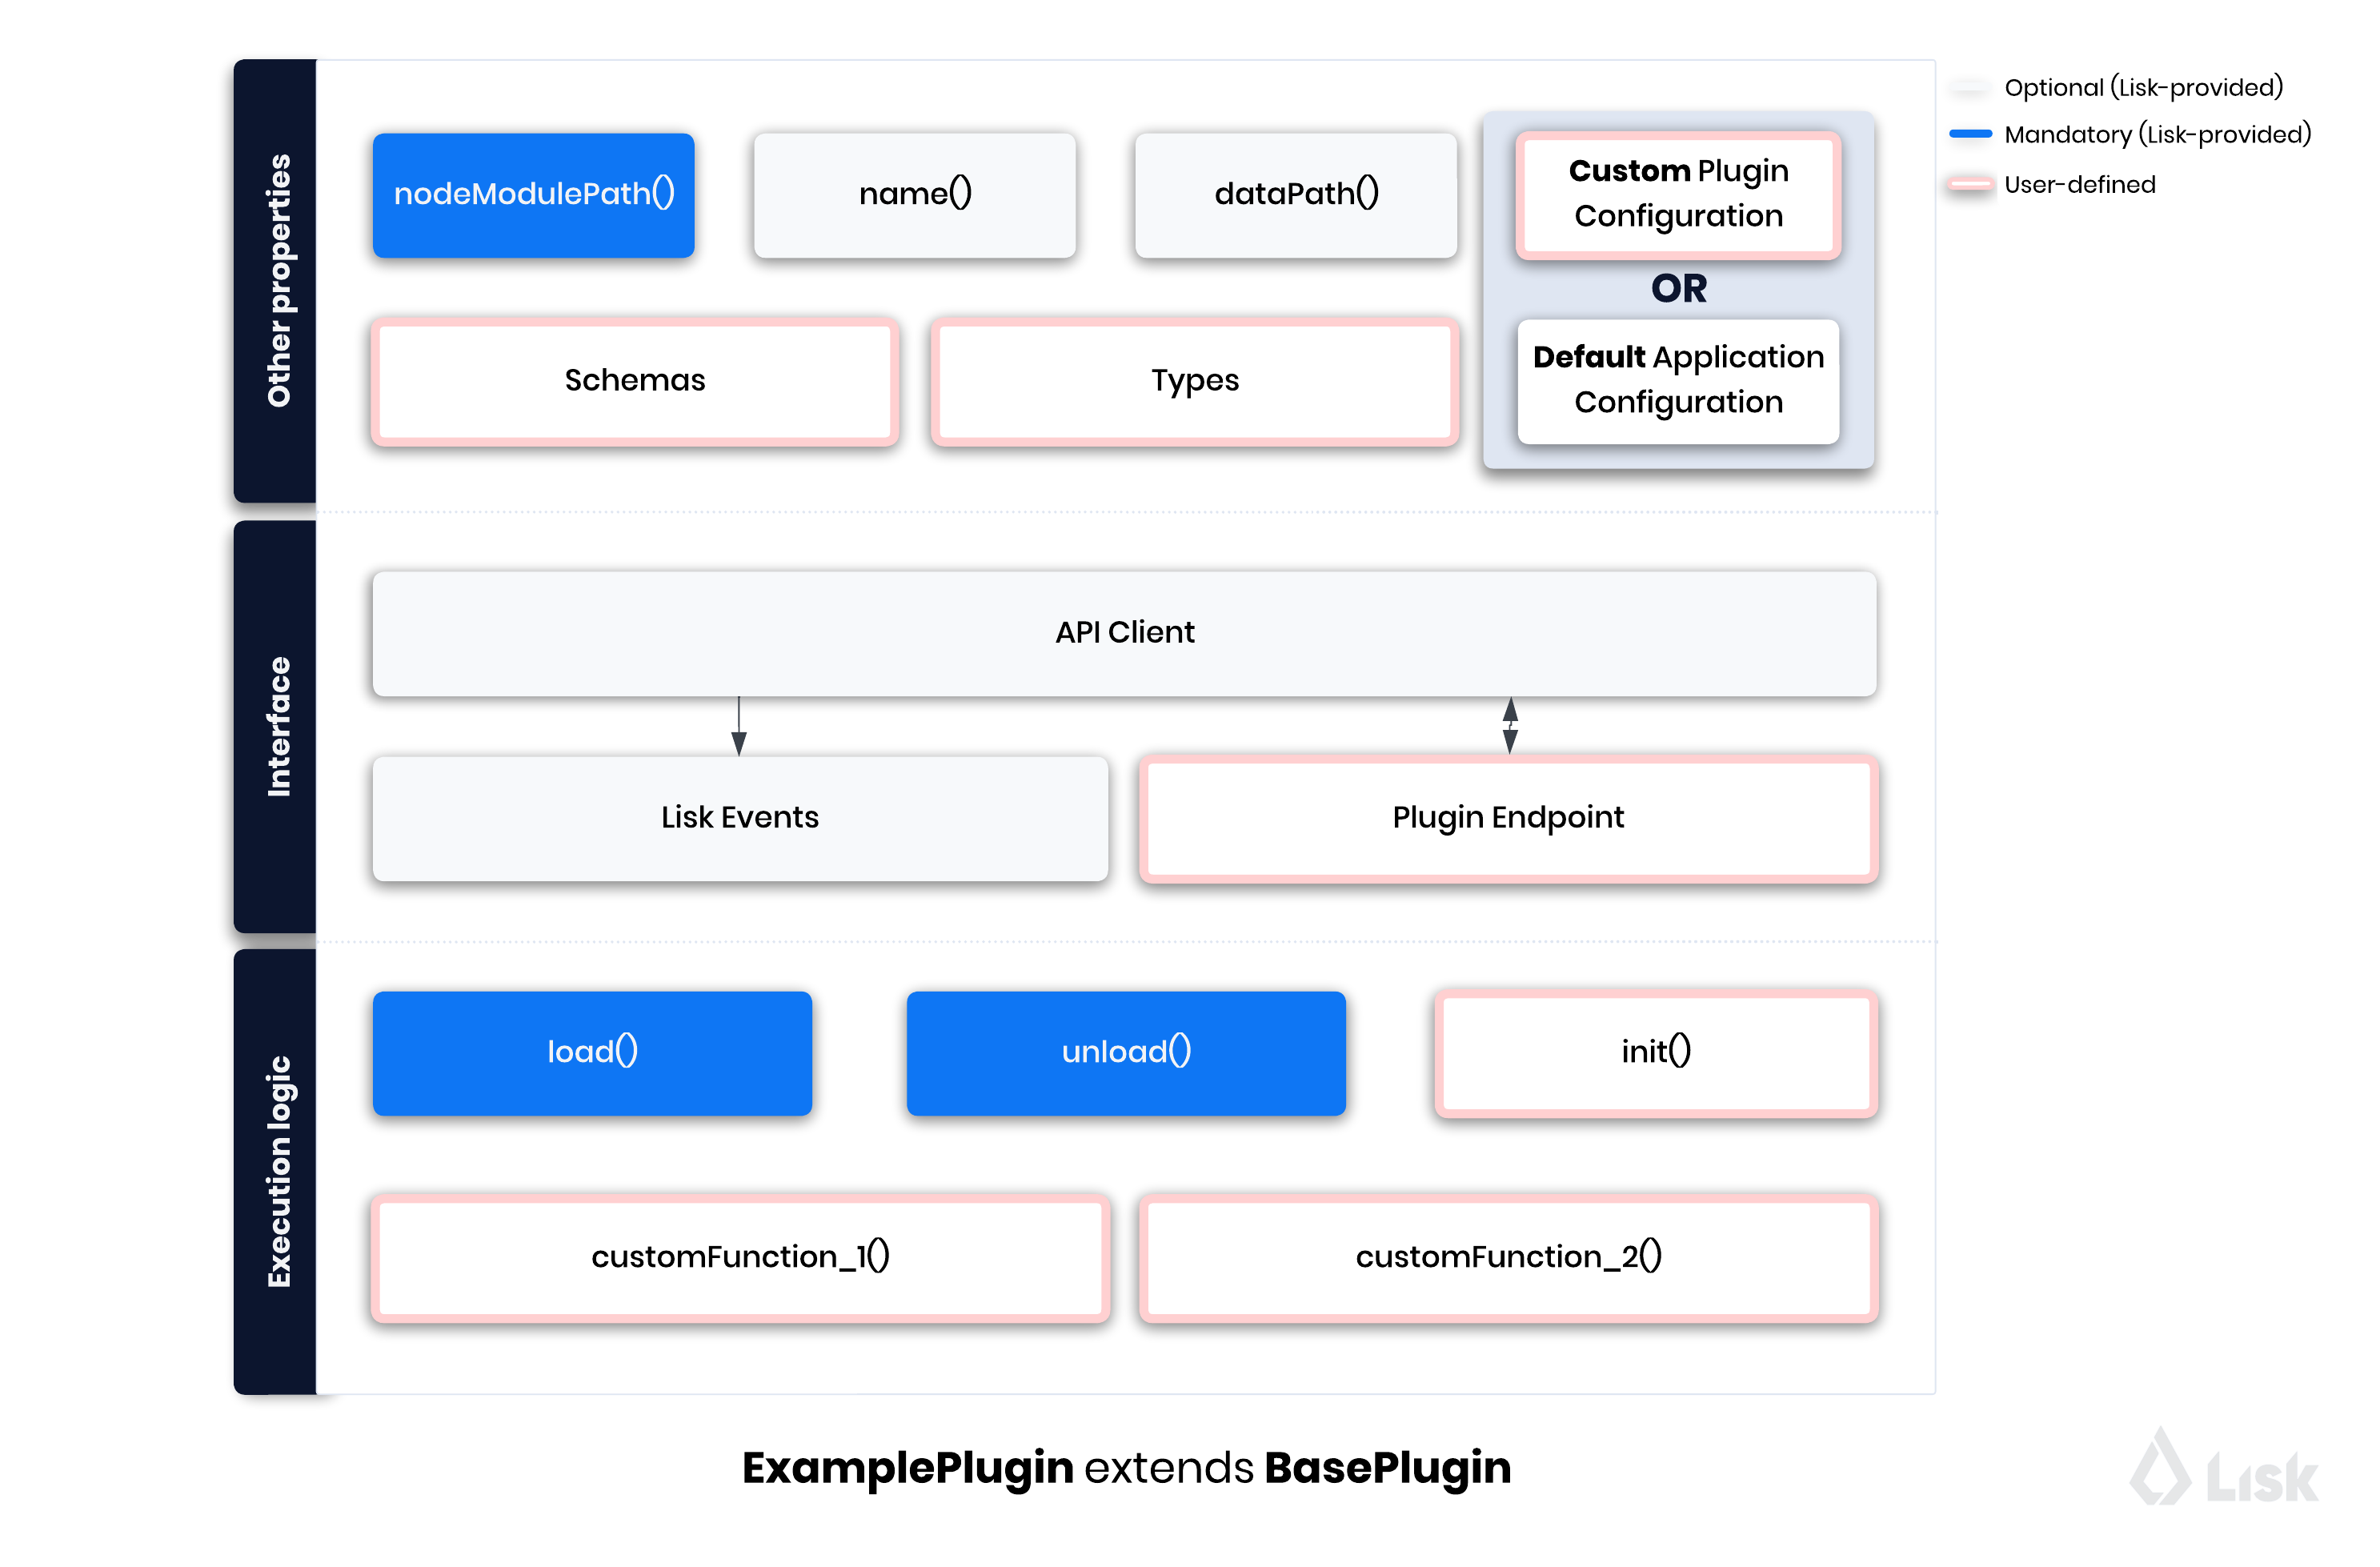
Execution Logic
The execution logic consists of functions that execute the business logic for a plugin.
By default, a bootstrapped plugin has the load() and unload() functions.
Additional functions can be added if needed, and all the functions have access to the methods and properties defined in the BasePlugin class.
The aforementioned can be accessed using this.variable or this.function() from within the plugin class.
load()
The load() method will be invoked by the controller to load the plugin.
It contains the plugin logic that is executed when the plugin is loaded in the blockchain client.
It can be used to retrieve, mutate, store and/or publish data in a specific manner, depending on the purpose of the plugin.
public async load(): Promise<void> {
    const app = express();
    app.get('/api/config', (_req, res) => {
        const config = {
            applicationUrl: this.config.applicationUrl,
            amount: this.config.amount,
            tokenPrefix: this.config.tokenPrefix,
            captchaSitekey: this.config.captchaSitekey,
            logoURL: this.config.logoURL,
            faucetAddress: this._state.publicKey
                ? cryptography.address.getLisk32AddressFromPublicKey(this._state.publicKey)
                : undefined,
        };
        res.json(config);
    });
    app.use(express.static(join(__dirname, '../../build')));
    this._server = app.listen(this.config.port, this.config.host);
}
unload()
The unload() method will be invoked by the controller to unload the plugin correctly.
It is executed on node shutdown.
public async unload(): Promise<void> {
    return new Promise((resolve, reject) => {
        this._server.close(err => {
            if (err) {
                reject(err);
                return;
            }
            resolve();
        });
    });
}
Interface
Plugins can…
| View the "Interfaces" section of the Communication page to see an overview of the different interfaces and their accessibility in modules, plugins, and external services. |
Endpoints
Endpoints are functions that can be invoked via Remote-Procedure-Calls (RPC) by other plugins and external services, to request data from a plugin.
The endpoints of a plugin should be defined in the Endpoint class.
The Endpoint class usually resides in the endpoint.ts file inside each plugin’s directory and it inherits from the BasePluginEndpoint class.
For more information, check out the base_plugin_endpoint.ts file on GitHub.
A sample endpoint class and one of its endpoints are available in the following code snippet below:
export class Endpoint extends BasePluginEndpoint {

    // ...

    public async authorize(context: PluginEndpointContext): Promise<{ result: string }> {
		validator.validate(authorizeParamsSchema, context.params);
		const { enable, password } = context.params;
		try {
			const parsedEncryptedPassphrase = cryptography.encrypt.parseEncryptedMessage(
				this._config.encryptedPassphrase,
			);
			const passphrase = await cryptography.encrypt.decryptMessageWithPassword(
				parsedEncryptedPassphrase,
				password as string,
				'utf-8',
			);
			const { publicKey } = cryptography.legacy.getPrivateAndPublicKeyFromPassphrase(passphrase);
			this._state.publicKey = enable ? publicKey : undefined;
			this._state.passphrase = enable ? passphrase : undefined;
			const changedState = enable ? 'enabled' : 'disabled';
			return {
				result: `Successfully ${changedState} the faucet.`,
			};
		} catch (error) {
			throw new Error('Password given is not valid.');
		}
	}

    // ...
}
Events
A plugin can subscribe to RPC events emitted by the blockchain. To subscribe to an event, see How to subscribe to events.
Other properties
nodeModulePath()
Whenever a plugin is bootstrapped with the Lisk Commander, a nodeModulePath() function is created automatically.
This function returns the path of the plugin.ts file.
The plugin.ts file contains information on all the plugins registered with a blockchain client.
public get nodeModulePath(): string {
    return __filename;
}
name()
The name() function returns the name of the Plugin.
It is inherited from the BasePlugin class.
The plugin name is used for routing RPC requests to or from the plugin.
public get name(): string {
    const name = this.constructor.name.replace('Plugin', '');
    return name.charAt(0).toLowerCase() + name.substr(1);
}
dataPath()
Lisk stores the node’s data in the ~/.lisk/CLIENT_NAME directory.
public get dataPath(): string {
    const dirs = systemDirs(this.appConfig.system.dataPath);
    return join(dirs.plugins, this.name, 'data');
}
Plugin configuration
A plugin can have its own set of configurations that are passed to it as shown in the following code snippet below:
import { BasePlugin, PluginInitContext, cryptography } from 'lisk-sdk';
import { configSchema } from './schemas'; //Configuration Schema
import { FaucetPluginConfig, State } from './types'; // Types Object
import { Endpoint } from './endpoint';

// A plugin with Custom Plugin configuration needs a configuration schema and types objects.
export class FaucetPlugin extends BasePlugin<FaucetPluginConfig> { //Config Type Object
    public configSchema = configSchema; //Schema Object

}
Each custom configuration’s schema and type of values must be defined for each plugin and should be passed to the plugin class.
Plugin schemas
A schema of a plugin contains the structural information of the data accepted by a plugin.
A schema can be for a custom configuration or for a specific kind of data that must be passed to a plugin to accommodate the business logic.
Schemas are passed to the plugin class and are later verified by the Lisk framework.
Usually, schemas are present inside the schemas.ts file located inside a plugin’s folder.
The contents of the schemas.ts file are described below:
export const configSchema = {
	$id: '#/plugins/liskFaucet/config',
	type: 'object',
	properties: {
		port: {
			type: 'integer',
			minimum: 1,
			maximum: 65535,
		},
		host: {
			type: 'string',
			format: 'ip',
		},
		encryptedPassphrase: {
			type: 'string',
			format: 'encryptedPassphrase',
			description: 'Encrypted passphrase of the genesis account',
		},
		applicationUrl: {
			type: 'string',
			format: 'uri',
			description: 'URL to connect',
		},
		fee: {
			type: 'string',
			description: 'The transaction fee used to faucet an account',
		},
		amount: {
			type: 'string',
			description: 'Number of tokens to fund an account per request',
		},
		tokenPrefix: {
			type: 'string',
			description: 'The token prefix associated with your application',
		},
		logoURL: {
			type: 'string',
			format: 'uri',
			description: 'The URL of the logo used on the UI',
		},
		captchaSecretkey: {
			type: 'string',
			description: 'The re-captcha secret key',
		},
		captchaSitekey: {
			type: 'string',
			description: 'The re-captcha site key',
		},
	},
	required: ['encryptedPassphrase', 'captchaSecretkey', 'captchaSitekey'],
	default: {
		port: 4004,
		host: '127.0.0.1',
		applicationUrl: 'ws://localhost:8080/ws',
		fee: '0.1',
		amount: '100',
		tokenPrefix: 'lsk',
	},
};

export const fundParamsSchema = {
	$id: '/lisk/faucet/fund',
	type: 'object',
	required: ['address'],
	properties: {
		address: {
			type: 'string',
			format: 'hex',
		},
		token: {
			type: 'string',
		},
	},
};
Types
All the types of variables used by a plugin are usually defined in the types.ts file.
Whilst schemas describe the outline and structure of the data, the types.ts file contains the definitions of all the variables that are used by a plugin.
export interface FaucetPluginConfig {
	port: number;
	host: string;
	encryptedPassphrase: string;
	captchaSitekey: string;
	captchaSecretkey: string;
	applicationUrl: string;
	fee: string;
	amount: string;
	tokenPrefix: string;
	captchaSecret: string;
	logoURL?: string;
}

export interface State {
	publicKey?: Buffer;
	passphrase?: string;
}