Cashback
A simple application which rewards the users for sending tokens. The Cashback reward tokens are freshly minted, and in turn increase the absolute amount of tokens within the network.
The Cashback application implementation steps are described below:
-
Steps 1-5 describes the node-side implementation of the blockchain application.
-
Step 6 shows how to interact with the network from the (blockchain) client-side using a node script.
-
Step 7 explains how to override specific config values.
| Please see the full code example of the Cashback App on Github. |
1. Installation & setup
Firstly, create the root folder for the Cashback application and initialize the project:
mkdir cashback (1)
cd cashback (2)
npm init --yes (3)| 1 | Create the root folder for the blockchain application. |
| 2 | Navigate into the root folder. |
| 3 | Initialize the manifest file of the project. |
The next step is to install the lisk-sdk package and add it to the project’s dependencies.
Supported platforms
-
Ubuntu 16.04 (LTS) x86_64
-
Ubuntu 18.04 (LTS) x86_64
-
MacOS 10.13 (High Sierra)
-
MacOS 10.14 (Mojave)
Dependencies
| Dependencies | Version |
|---|---|
Node.js |
10.17.0 |
PostgreSQL |
10+ |
Redis (optional) |
5+ |
Python |
2 |
| If some of the dependencies are missing, please go to Lisk SDK - Pre-Install and follow the pre-installation steps for the SDK. |
npm install --save lisk-sdk@2.3.9 (1)
npm install --save @liskhq/lisk-validator @liskhq/lisk-cryptography @liskhq/lisk-transactions @liskhq/lisk-constants (2)| 1 | Install the Lisk SDK as a dependency for the node server side. |
| 2 | Install Lisk Elements dependencies for the client side scripts. |
|
It is necessary to create a database before starting.
The default database name is lisk_dev, so for the development purposes, a command |
Please note: It is important to start with a fresh database.
For the system-wide Postgres installation:
psql -c "DROP DATABASE lisk_dev"
psql -c "CREATE DATABASE lisk_dev OWNER lisk"
If you have installed Postgres with Docker, please run the following commands:
docker exec -ti lisk_sdk_db psql -h localhost -U lisk -d postgres -c "DROP DATABASE lisk_dev"
docker exec -ti lisk_sdk_db psql -h localhost -U lisk -d postgres -c "CREATE DATABASE lisk_dev OWNER lisk"
Create the file index.js, which will hold the logic to initialize and start the blockchain application.
2. Configure the application
The next step is to provide the basic information about the application to be built.
Open the file index.js that was created with the previous step, and insert the following code:
const { Application, genesisBlockDevnet, configDevnet } = require('lisk-sdk'); (1)

configDevnet.app.label = 'cashback-blockchain-app'; (2)
//configDevnet.components.storage.user = '<username>'; (3)
// configDevnet.components.storage.password = 'password'; (4)

const app = new Application(genesisBlockDevnet, configDevnet); (5)

app (6)
    .run()
    .then(() => app.logger.info('App started...'))
    .catch(error => {
        console.error('Faced error in application', error);
        process.exit(1);
});| See the complete file on Github: cashback/index.js. |
| 1 | Require application class, the default genesis block and the default config for the application.
The necessary dependencies from the lisk-sdk package are required.
The most important one is the Application class, which is used in <5> shown above to create the application instance.
The application instance will start the whole application at the bottom of index.js. |
| 2 | Set the name of the blockchain application. |
| 3 | In case a different user than 'lisk' was used to access the database lisk_dev, it is necessary to update the username in the config. |
| 4 | Uncomment this and replace password with the new password. |
| 5 | The application instance is created. By sending the parameters for the genesis block and the configuration template, the application is configured with the most basic configurations to start the network. |
| 6 | The code block below starts the application and does not need to be changed. |
If it is required to change any of the values for configDevnet, please see the full list of configurations for Lisk SDK and overwrite them as described in step 7
|
After adding the code block above, save and close index.js.
At this point it is now possible to start both the node and network, in order to to verify that the setup was successful:
node index.js | npx bunyan -o shortnode index.js will start the node, and | npx bunyan -o short will pretty-print the logs in the console.
If everything is correct, the following logs will be displayed:
$ node index.js | npx bunyan -o short
14:01:39.384Z  INFO lisk-framework: Booting the application with Lisk Framework(0.1.0)
14:01:39.391Z  INFO lisk-framework: Starting the app - cashback-blockchain-app
14:01:39.392Z  INFO lisk-framework: Initializing controller
14:01:39.392Z  INFO lisk-framework: Loading controller
14:01:39.451Z  INFO lisk-framework: Old PID: 7707
14:01:39.452Z  INFO lisk-framework: Current PID: 7732
14:01:39.467Z  INFO lisk-framework: Loading module lisk-framework-chain:0.1.0 with alias "chain"
14:01:39.613Z  INFO lisk-framework: Event network:bootstrap was subscribed but not registered to the bus yet.
14:01:39.617Z  INFO lisk-framework: Event network:bootstrap was subscribed but not registered to the bus yet.
14:01:39.682Z  INFO lisk-framework: Modules ready and launched
14:01:39.683Z  INFO lisk-framework: Event network:event was subscribed but not registered to the bus yet.
14:01:39.684Z  INFO lisk-framework: Module ready with alias: chain(lisk-framework-chain:0.1.0)
14:01:39.684Z  INFO lisk-framework: Loading module lisk-framework-network:0.1.0 with alias "network"
14:01:39.726Z  INFO lisk-framework: Blocks 1886
14:01:39.727Z  INFO lisk-framework: Genesis block matched with database
14:01:39.791Z ERROR lisk-framework: Error occurred while fetching information from 127.0.0.1:5000
14:01:39.794Z  INFO lisk-framework: Module ready with alias: network(lisk-framework-network:0.1.0)
14:01:39.795Z  INFO lisk-framework: Loading module lisk-framework-http-api:0.1.0 with alias "http_api"
14:01:39.796Z  INFO lisk-framework: Module ready with alias: http_api(lisk-framework-http-api:0.1.0)
14:01:39.797Z  INFO lisk-framework:
  Bus listening to events [ 'app:ready',
    'app:state:updated',
    'chain:bootstrap',
    'chain:blocks:change',
    'chain:signature:change',
    'chain:transactions:change',
    'chain:rounds:change',
    'chain:multisignatures:signature:change',
    'chain:multisignatures:change',
    'chain:delegates:fork',
    'chain:loader:sync',
    'chain:dapps:change',
    'chain:registeredToBus',
    'chain:loading:started',
    'chain:loading:finished',
    'network:bootstrap',
    'network:event',
    'network:registeredToBus',
    'network:loading:started',
    'network:loading:finished',
    'http_api:registeredToBus',
    'http_api:loading:started',
    'http_api:loading:finished' ]
14:01:39.799Z  INFO lisk-framework:
  Bus ready for actions [ 'app:getComponentConfig',
    'app:getApplicationState',
    'app:updateApplicationState',
    'chain:calculateSupply',
    'chain:calculateMilestone',
    'chain:calculateReward',
    'chain:generateDelegateList',
    'chain:updateForgingStatus',
    'chain:postSignature',
    'chain:getForgingStatusForAllDelegates',
    'chain:getTransactionsFromPool',
    'chain:getTransactions',
    'chain:getSignatures',
    'chain:postTransaction',
    'chain:getDelegateBlocksRewards',
    'chain:getSlotNumber',
    'chain:calcSlotRound',
    'chain:getNodeStatus',
    'chain:blocks',
    'chain:blocksCommon',
    'network:request',
    'network:emit',
    'network:getNetworkStatus',
    'network:getPeers',
    'network:getPeersCountByFilter' ]
14:01:39.800Z  INFO lisk-framework: App started...
14:01:39.818Z  INFO lisk-framework: Validating current block with height 1886
14:01:39.819Z  INFO lisk-framework: Loader->validateBlock Validating block 10258884836986606075 at height 1886
14:01:40.594Z  INFO lisk-framework: Lisk started: 0.0.0.0:4000
14:01:40.600Z  INFO lisk-framework: Verify->verifyBlock succeeded for block 10258884836986606075 at height 1886.
14:01:40.600Z  INFO lisk-framework: Loader->validateBlock Validating block succeed for 10258884836986606075 at height 1886.
14:01:40.600Z  INFO lisk-framework: Finished validating the chain. You are at height 1886.
14:01:40.601Z  INFO lisk-framework: Blockchain ready
14:01:40.602Z  INFO lisk-framework: Loading 101 delegates using encrypted passphrases from config
14:01:40.618Z  INFO lisk-framework: Forging enabled on account: 8273455169423958419L
14:01:40.621Z  INFO lisk-framework: Forging enabled on account: 12254605294831056546L
14:01:40.624Z  INFO lisk-framework: Forging enabled on account: 14018336151296112016L
14:01:40.627Z  INFO lisk-framework: Forging enabled on account: 2003981962043442425L
[...]
To stop the blockchain process, press CTRL+C.
3. Create a new transaction type
To create a new custom transaction type , such as CashbackTransaction please see the description shown below.
This extends the pre-existing transaction type TransferTransaction.
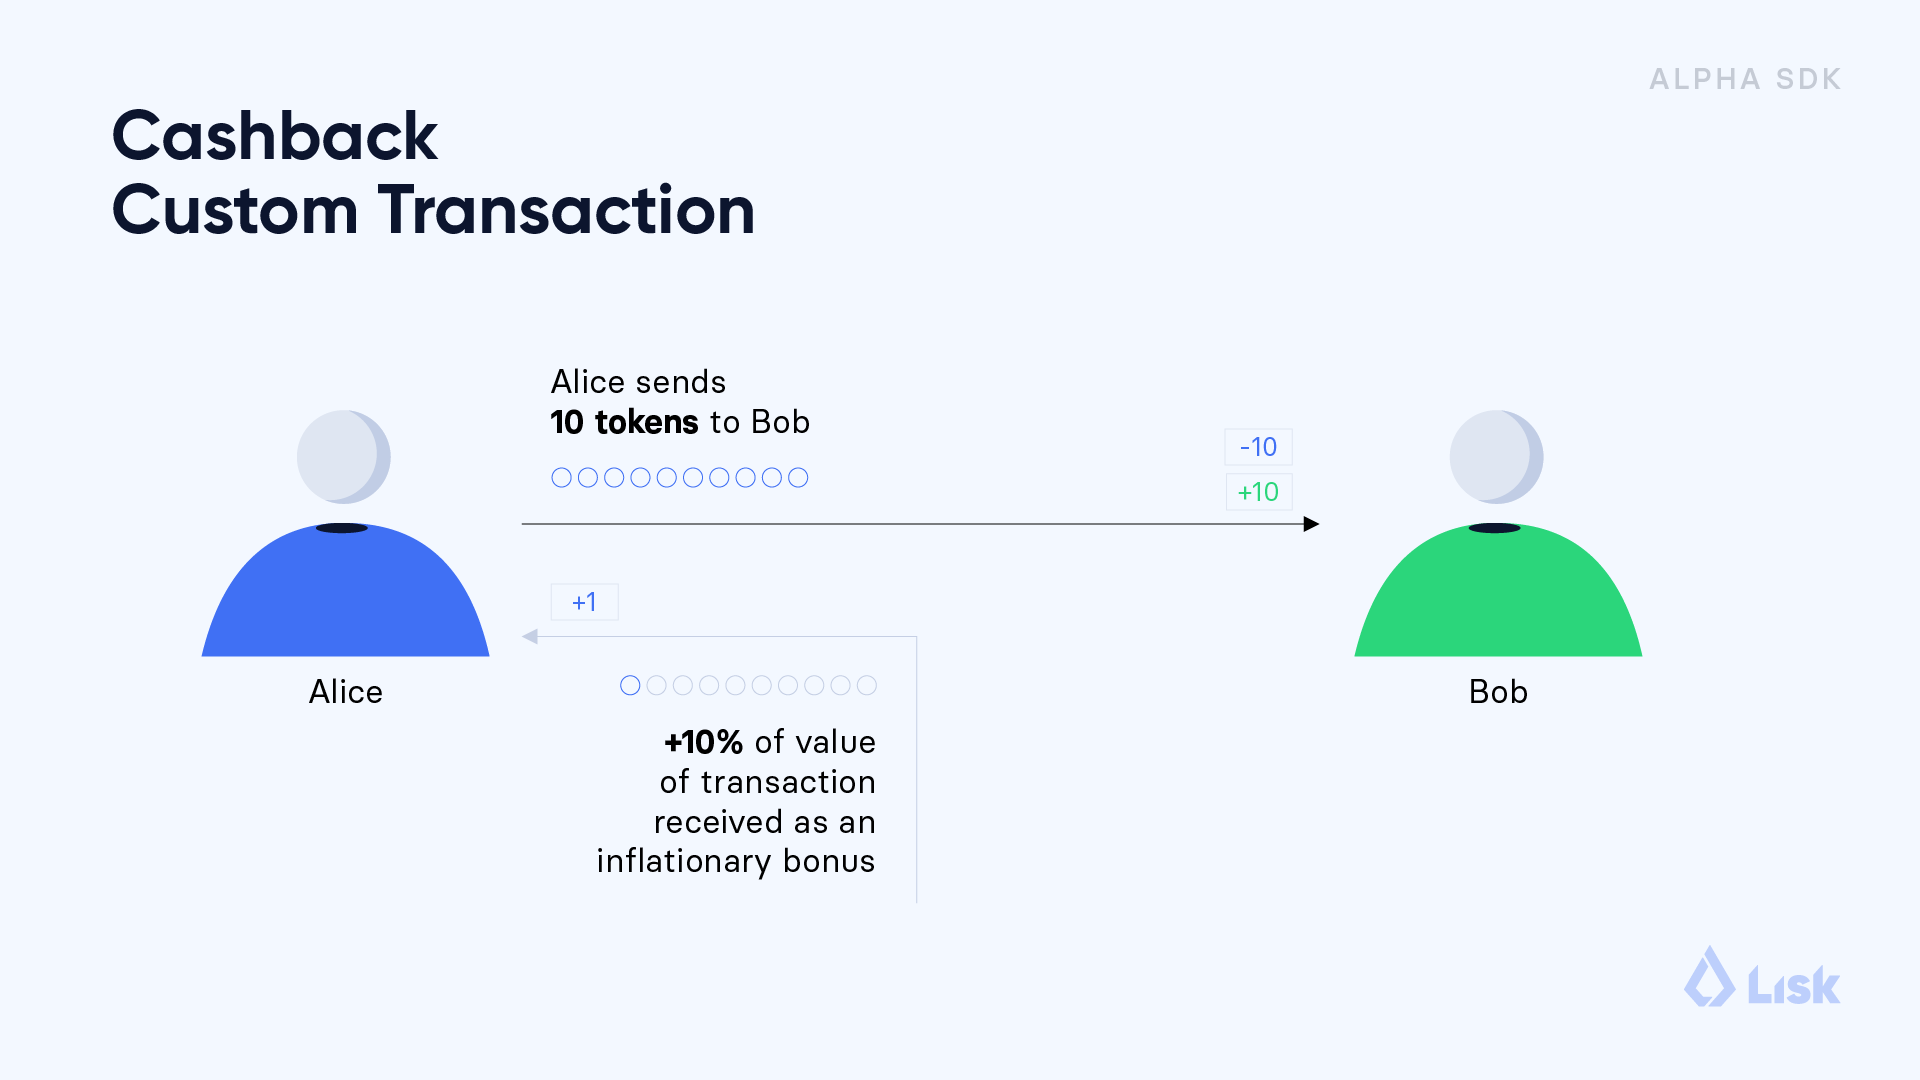
The difference between the regular TransferTransaction and the CashbackTransaction, is that the cashback transaction type also pays out a 10% bonus reward to its sender.
For example, if Alice sends 100 tokens to Bob as a cashback transaction, Bob would receive the 100 tokens and Alice would receive an additional 10 tokens as a cashback.
|
If a comparison is made with the methods below with the methods implemented in the |
|
General advice: Please be aware that if the custom transaction type is extended from an already existing transaction type, the logic might by affected by future changes in the codebase of the transaction type, from whereby it was extended from. Therefore, it is recommended to keep an eye on future changes for the transaction type, or alternatively just use the BaseTransaction as the basis for the required transaction type. |
To execute this, create and open the file cashback_transaction.js and insert the following code shown below:
const {
    transactions: { TransferTransaction },
    BigNum,
} = require('lisk-sdk');

class CashbackTransaction extends TransferTransaction {

    /**
    * Set the Cashback transaction TYPE to `11`.
    * The first 10 types, from `0-9` is reserved for the default Lisk Network functions.
    * Type `10` was used previously for the `HelloTransaction`, so it is set to `11`, but any other integer value (that is not already used by another transaction type) is a valid value.
    */
    static get TYPE () {
        return 11;
    }

    /**
    * Set the `CashbackTransaction` transaction FEE to 0.1 LSK.
    * Every time a user posts a transaction to the network, the transaction fee is paid to the delegate who includes the transaction into a block that the delegate forges.
    */
    static get FEE () {
        return `${10 ** 7}`;
    };

    /**
    * The CashbackTransaction adds an inflationary 10% to senders account.
    * Invoked as part of the apply() step of the BaseTransaction and block processing.
    */
    applyAsset(store) {
        super.applyAsset(store);

        const sender = store.account.get(this.senderId);
        const updatedSenderBalanceAfterBonus = new BigNum(sender.balance).add(
            new BigNum(this.amount).div(10)
        );
        const updatedSender = {
            ...sender,
            balance: updatedSenderBalanceAfterBonus.toString(),
        };
        store.account.set(sender.address, updatedSender);

        return [];
    }

    /**
    * Inverse of applyAsset().
    * Undoes the changes made in `applyAsset` step: It sends the transaction amount back to the sender and substracts 10% of the transaction amount from the senders account balance.
    */
    undoAsset(store) {
        super.undoAsset(store);

        const sender = store.account.get(this.senderId);
        const updatedSenderBalanceAfterBonus = new BigNum(sender.balance).sub(
            new BigNum(this.amount).div(10)
        );
        const updatedSender = {
            ...sender,
            balance: updatedSenderBalanceAfterBonus.toString(),
        };
        store.account.set(sender.address, updatedSender);

        return [];
    }
}

module.exports = CashbackTransaction;| See the file on Github: cashback/cashback_transaction.js |
After adding the code block above, save and close cashback_transaction.js.
4. Register the new transaction type
At this stage the current project should contain the following file structure:
cashback
├── cashback_transaction.js
├── index.js
├── node_modules
└──package.json
Add the new transaction type to the application by registering it to the application instance inside of index.js.
It is only necessary to add 2 new lines (number <2> and <7>) shown below to your existing index.js, to register the new transaction type.
|
const { Application, genesisBlockDevnet, configDevnet} = require('lisk-sdk'); (1)
const CashbackTransaction = require('./cashback_transaction'); (2)

configDevnet.app.label = 'cashback-blockchain-app'; (3)
//configDevnet.components.storage.user = '<username>'; (4)
configDevnet.components.storage.password = 'password'; (5)

const app = new Application(genesisBlockDevnet, configDevnet); (6)

app.registerTransaction(CashbackTransaction); (7)

app (8)
    .run()
    .then(() => app.logger.info('App started...'))
    .catch(error => {
        console.error('Faced error in application', error);
        process.exit(1);
});| See the file on Github: cashback/index.js. |
| 1 | Require application class, the default genesis block and the default config for the application. |
| 2 | New line: Require the newly created transaction type 'CashbackTransaction'. |
| 3 | Change the label of the app. |
| 4 | If a different user name than 'lisk' to access the database lisk_dev was used, then it is necessary to update the username in the config. |
| 5 | Replace the existing password with the password for the database user. |
| 6 | Create the application instance. |
| 7 | New line: Register the 'CashbackTransaction'. |
| 8 | The code block below starts the application and does not need to be changed. |
After adding the 2 new lines to your index.js file, save and close it.
5. Start the network
It is now possible to start the customized blockchain network for the first time.
The parameter configDevnet, which is passed to the Application instance in step 3, is preconfigured to start the node with a set of dummy delegates, that have enabled forging by default.
These dummy delegates stabilize the new network and make it possible to test out the basic functionality of the network with only one node immediately.
This creates a simple Devnet, which is beneficial during development of the blockchain application.
|
The dummy delegates can be replaced with real delegates later. To accomplish this, the users are required to create new secret accounts, and register themselves as delegates on the network. Then the account(s) with the most tokens need to unvote the dummy delegates, and vote for the newly registered delegates instead. |
To start the network, execute the following command:
node index.js | npx bunyan -o shortCheck the logs to verify that the network has started successfully.
If an error occurs the process should stop, and the error with the debug information will be displayed.
6. Interact with the network
Now the network is running, try to send a CashbackTransaction in order to check that the node accepts this.
|
As the blockchain process is running in the current console window, it is necessary to open a new window to proceed with the tutorial. Ensure to navigate into the root folder of the blockchain application in the new console window. |
In the new terminal window, create a new folder client, this will hold the client-side scripts.
cd cashback (1)
mkdir client (2)
cd client (3)| 1 | Open the root folder of the Cashback application. |
| 2 | Create the folder for the client-side scripts inside the Cashback folder. |
| 3 | Navigate into the client folder. |
Inside the client folder, create the file that will hold the code to create the transaction object: print_sendable_cashback.js
Open the file print_sendable_cashback.js and insert the following code:
const CashbackTransaction = require('../cashback_transaction');
const transactions = require('@liskhq/lisk-transactions');
const { EPOCH_TIME } = require('@liskhq/lisk-constants');

const getTimestamp = () => {
    // check config file or curl localhost:4000/api/node/constants to verify your epoc time
    const millisSinceEpoc = Date.now() - Date.parse(EPOCH_TIME);
    const inSeconds = ((millisSinceEpoc) / 1000).toFixed(0);
    return  parseInt(inSeconds);
};

const tx = new CashbackTransaction({
    amount: `${transactions.utils.convertLSKToBeddows('2')}`,
    fee: `${transactions.utils.convertLSKToBeddows('0.1')}`,
    recipientId: '10881167371402274308L', //delegate genesis_100
    timestamp: getTimestamp(),
});

tx.sign('wagon stock borrow episode laundry kitten salute link globe zero feed marble');

console.log(tx.stringify());
process.exit(0);| See the complete file on Github: cashback/client/print_sendable_cashback.js. |
This script will print the transaction in the console, when executed.
Python’s json.tool is used to prettify the output
|
node print_sendable_cashback.js | python -m json.toolThe generated transaction object should look like the following code snippet shown below:
{
   "id":"5372254888441494149",
   "amount":"200000000",
   "type":11,
   "timestamp":3,
   "senderPublicKey":"c094ebee7ec0c50ebee32918655e089f6e1a604b83bcaa760293c61e0f18ab6f",
   "senderId":"16313739661670634666L",
   "recipientId":"10881167371402274308L",
   "fee":"10000000",
   "signature":"0a3f41cc529f9de523cadc7db64e9436014d1b10ca2158bbce0469e8e76dfd021358496440da43acaf64d0223d3514609fc1aa41646be56353207d88a03b1305",
   "signatures":[],
   "asset":{}
}
Now a sendable transaction object exists, send it to the node and it will be processed by analyzing the logs.
The HTTP API of the node is now utilized, and the created transaction object is now posted to the transaction endpoint of the API.
Before posting the transaction it is recommended to check the balances of the sender and recipient, in order to verify that the transaction was applied correctly:
| Ensure the node is running, before sending any API requests. |
To check the account balance of the sender, execute the following commands below:
curl -X GET "http://localhost:4000/api/accounts?address=16313739661670634666L" -H "accept: application/json" | python -m json.tool{
"meta": {
"offset": 0,
"limit": 10
},
"data": [
{
"address": "16313739661670634666L",
"publicKey": "c094ebee7ec0c50ebee32918655e089f6e1a604b83bcaa760293c61e0f18ab6f",
"balance": "10000000000000000",
"secondPublicKey": ""
}
],
"links": {}
}Checking the account balance of the recipient:
curl -X GET "http://localhost:4000/api/accounts?address=10881167371402274308L" -H "accept: application/json" | python -m json.tool|
It is possible the account data of |
{
  "meta": {
    "offset": 0,
    "limit": 10
  },
  "data": [
    {
      "address": "10881167371402274308L",
      "publicKey": "addb0e15a44b0fdc6ff291be28d8c98f5551d0cd9218d749e30ddb87c6e31ca9",
      "balance": "0",
      "secondPublicKey": "",
      "delegate": {
        "username": "genesis_100",
        "vote": "9999999680000000",
        "rewards": "1500000000",
        "producedBlocks": 26,
        "missedBlocks": 0,
        "rank": 70,
        "productivity": 100,
        "approval": 100
      }
    }
  ],
  "links": {}
}
Due to the fact that the API of every node is only accessible from the localhost by default, it is necessary to execute this query on the same server that the node is running on, unless the config to make your API accessible to others, or to the public was changed.
| Ensure the node is running, before sending the transaction. |
node print_sendable_cashback.js | tee >(curl -X POST -H "Content-Type: application/json" -d @- localhost:4000/api/transactions) (1)| 1 | Posts the tx object to the node and displays it on the console. |
If the node accepted the transaction, the response should be as follows:
{"meta":{"status":true},"data":{"message":"Transaction(s) accepted"},"links":{}}
To verify that the transaction was included in a block:
Use the id of the transaction object which was posted to the node in the previous step.
|
curl -X GET "http://localhost:4000/api/transactions?id=5372254888441494149" -H "accept: application/json" | python -m json.tool{
"meta": {
"offset": 0,
"limit": 10,
"count": 1
},
"data": [
{
"id": "5372254888441494149",
"height": 2048,
"blockId": "12427514488773581697",
"type": 11,
"timestamp": 3,
"senderPublicKey": "c094ebee7ec0c50ebee32918655e089f6e1a604b83bcaa760293c61e0f18ab6f",
"recipientPublicKey": "addb0e15a44b0fdc6ff291be28d8c98f5551d0cd9218d749e30ddb87c6e31ca9",
"senderId": "16313739661670634666L",
"recipientId": "10881167371402274308L",
"amount": "100000000",
"fee": "10000000",
"signature": "0a3f41cc529f9de523cadc7db64e9436014d1b10ca2158bbce0469e8e76dfd021358496440da43acaf64d0223d3514609fc1aa41646be56353207d88a03b1305",
"signatures": [],
"asset": {},
"confirmations": 5
}
],
"links": {}
}| The balance of an account is stored in Beddows. 1 LSK = 100000000(= 10^8) Beddows. |
Verify that the sender’s account balance is reduced by 1.9 LSK by executing the following command below:
curl -X GET "http://localhost:4000/api/accounts?address=16313739661670634666L" -H "accept: application/json" | python -m json.tool{
"meta": {
"offset": 0,
"limit": 10
},
"data": [
{
"address": "16313739661670634666L",
"publicKey": "c094ebee7ec0c50ebee32918655e089f6e1a604b83bcaa760293c61e0f18ab6f",
"balance": "9999999810000000",
"secondPublicKey": ""
}
],
"links": {}
}Verify that the recipient’s account received the credit of 2 LSK by executing the following command below:
curl -X GET "http://localhost:4000/api/accounts?address=10881167371402274308L" -H "accept: application/json" | python -m json.tool{
"meta": {
"offset": 0,
"limit": 10
},
"data": [
{
"address": "10881167371402274308L",
"publicKey": "addb0e15a44b0fdc6ff291be28d8c98f5551d0cd9218d749e30ddb87c6e31ca9",
"balance": "200000000",
"secondPublicKey": "",
"delegate": {
"username": "genesis_100",
"vote": "9999999680000000",
"rewards": "1500000000",
"producedBlocks": 26,
"missedBlocks": 0,
"rank": 70,
"productivity": 100,
"approval": 100
}
}
],
"links": {}
}If the balances are equal to the expected values, then it is verified with the new custom transaction type CashbackTransaction, and is successfully integrated into the application.
For further interaction with the network, it is possible to run the process in the background by executing the following:
cd cashback (1)
pm2 start --name cashback index.js (2)
pm2 stop cashback (3)
pm2 start cashback (4)| 1 | Navigate into the root folder of the Cashback application. |
| 2 | Add the application to pm2 under the name 'cashback'. |
| 3 | Stop the Cashback app. |
| 4 | Start the Cashback app. |
|
PM2 needs to be installed on the system in order to run these commands. Please see SDK Pre-Install section. |
7. Customize the default configuration
The new project should have now the following file structure:
cashback
├── client
│   └── print_sendable_cashback.js
├── cashback_transaction.js
├── index.js
├── node_modules
└── package.json
To run the script remotely, change the configuration before creating the Application instance in order to make the API accessible as shown below:
| For more configuration options, please see the full list of configurations for Lisk SDK. |
const { Application, genesisBlockDevnet, configDevnet} = require('lisk-sdk'); (1)
const CashbackTransaction = require('./cashback_transaction'); (2)

configDevnet.app.label = 'cashback-blockchain-app'; (3)
//configDevnet.components.storage.user = '<username>'; (4)
//configDevnet.components.storage.password = 'password'; (5)

configDevnet.modules.http_api.access.public = true; (6)
//configDevnet.modules.http_api.access.whitelist.push('1.2.3.4'); (7)

const app = new Application(genesisBlockDevnet, configDevnet); (8)

app.registerTransaction(CashbackTransaction); (9)

app (10)
    .run()
    .then(() => app.logger.info('App started...'))
    .catch(error => {
        console.error('Faced error in application', error);
        process.exit(1);
});| 1 | Require application class, the default genesis block and the default config for the application. |
| 2 | Require the newly created transaction type 'CashbackTransaction'. |
| 3 | Set the name of your blockchain application. |
| 4 | In case a different user than lisk is used to access to the database lisk_dev, it is necessary to update the username in the config. |
| 5 | Uncomment this and replace password with the new password for your database user. |
| 6 | Make the API accessible from everywhere. |
| 7 | Example how to make the API accessible for specific IP addresses: add 1.2.3.4 IP address as whitelisted. |
| 8 | Create the application instance. |
| 9 | Register the 'CashbackTransaction'. |
| 10 | The code block below starts the application and does not need to be changed. |
|
Optional: After the first successful verification, it is possible to reduce the default console log level (info), and file log level (debug).
This can be completed by sending a copy of the config object
|
For the next step a wallet software can be used. For example, a customized Lisk Desktop, so that the users can utilize the new transaction type.
Please also see the following section: Interact with the network.