Part 3: A simple supply chain management system
The goal of Part 3 covers how to implement a complete workflow of a simple version of a supply chain tracking system.
The following points below are covered in this section:
-
How to implement the missing transactions types
RegisterPacket,StartTransportandFinishTransport. -
How to cache multiple accounts in the
preparestep. -
How to implement a simple trust system.
-
How to lock funds in an account.
-
How to execute a first complete test run of the supply chain tracking system.
| It is recommended to view the diagram on the Introduction page, which will help the user to have an overiew of the workshop. |
After completing a task, compare with the solutions in order to verify if the task has been successfully completed. However, be aware that there is not only just one valid solution to write the code. In step 3.3 later in this section, the actual code will be run to verify it functions correctly. |
3.0 Implement RegisterPacket
To move on to the next step in the prototype it is necessary to implement the RegisterPacket transaction.
This transaction will register a packet on the blockchain that is ready to be picked up by a delivery person.
The transaction allows the package owner to define the following properties:
-
packetId: The ID of the packet account (registered on Raspberry Pi). -
postage: The postage refers to a number of LSK tokens the carrier receives upon successful delivery of the packet. The postage is stored in the packet account’s asset field. -
security: The security refers to a number of LSK tokens that the carrier should lock as a "security" before the packet can be accepted for delivery. Upon successful delivery, the security regarding the carriers balance will be unlocked again. -
minTrust: This minimum trust property has been introduced to keep track of well behaving/performing carriers. Whenever a carrier successfully delivers a packet, their trust will be increased by a factor of one. The package owner can set a minimal trust level for a carrier before he/she can accept the package for delivery. If a carrier has a lower trust than the minimal required trust level, it is not possible to accept the package for delivery. -
recipientId: Please note that this is a highly important field, as it sets the actual recipient who will receive the package.
For the RegisterPacketTransaction the following guide runs through the undoAsset() function and explains how this can be achieved. This in turn allows the user to implement the following small snippet of code shown below:
register-packet.jsconst {
BaseTransaction,
TransactionError
} = require('@liskhq/lisk-transactions');
/**
* Register new package for sender and update package account.
*/
class RegisterPacketTransaction extends BaseTransaction {
static get TYPE () {
return 20;
}
async prepare(store) {
await store.account.cache([
{
address: this.asset.packetId,
},
{
address: this.senderId,
}
]);
}
validateAsset() {
// Static checks for presence of `packetId`, `postage`, `security`, and `minTrust`.
const errors = [];
if (!this.asset.packetId || typeof this.asset.packetId !== 'string') {
errors.push(
new TransactionError(
'Invalid "asset.packetId" defined on transaction',
this.id,
'.asset.packetId',
this.asset.packetId
)
);
}
if (!this.asset.postage || typeof this.asset.postage !== 'string') {
errors.push(
new TransactionError(
'Invalid "asset.postage" defined on transaction',
this.id,
'.asset.postage',
this.asset.postage,
'A string value',
)
);
}
if (!this.asset.security || typeof this.asset.security !== 'string') {
errors.push(
new TransactionError(
'Invalid "asset.security" defined on transaction',
this.id,
'.asset.security',
this.asset.security,
'A string value',
)
);
}
if (typeof this.asset.minTrust !== 'number' || isNaN(parseFloat(this.asset.minTrust)) || !isFinite(this.asset.minTrust)) {
errors.push(
new TransactionError(
'Invalid "asset.minTrust" defined on transaction',
this.id,
'.asset.minTrust',
this.asset.minTrust,
'A number value',
)
);
}
return errors;
}
async applyAsset(store) {
const errors = [];
const packet = await store.account.get(this.asset.packetId);
if (!packet.asset.status) {
/* --- Modify sender account --- */
/**
* Update the sender account:
* - Deduct the postage from senders' account balance
*/
const sender = await store.account.get(this.senderId);
sender.balance = BigInt(sender.balance) - BigInt(this.asset.postage);
store.account.set(sender.address, sender);
/* --- Modify packet account --- */
/**
* Update the packet account:
* - Add the postage to the packet account balance
* - Add all important data about the packet inside the asset field:
* - recipient: ID of the packet recipient
* - sender: ID of the packet sender
* - carrier: ID of the packet carrier
* - security: Number of tokens the carrier needs to lock during the transport of the packet
* - postage: Number of tokens the sender needs to pay for transportation of the packet
* - minTrust: Minimal trust that is needed to be carrier for the packet
* - status: Status of the transport (pending|ongoing|success|fail)
*/
packet.balance = packet.balance + BigInt(this.asset.postage);
packet.asset = {
recipient: this.asset.recipientId,
sender: this.senderId,
security: this.asset.security,
postage: this.asset.postage,
minTrust: this.asset.minTrust.toString(),
status: 'pending',
carrier: null
};
store.account.set(packet.address, packet);
} else {
errors.push(
new TransactionError(
'packet has already been registered',
packet.asset.status
)
);
}
return errors;
}
async undoAsset(store) {
const errors = [];
/* --- Revert sender account --- */
const sender = await store.account.get(this.senderId);
sender.balance = sender.balance + BigInt(this.asset.postage);
store.account.set(sender.address, sender);
/* --- Revert packet account --- */
const packet = await store.account.get(this.asset.packetId);
packet.balance = BigInt("0");
packet.asset = null;
store.account.set(packet.address, packet);
return errors;
}
}
module.exports = RegisterPacketTransaction;Task: Complete the implementation of the undoAsset function.
Please note a small part of the logic is missing whereby the packet account was reset to its original state.
Now try to implement the missing logic for undoAsset() by reverting the steps of the applyAsset() function.
Important: To verify the implementation of undoAsset(), compare it with the solution.
Explanation: undoAsset(store)
The undoAsset function is responsible for informing the blockchain how to revert changes that have been applied via the applyAsset function.
This is very useful in case of a fork whereby it is necessary to change to a different chain.
In order to accomplish this it is necessary to roll back blocks and apply new blocks of a new chain.
Hence, when rolling back blocks it is necessary to update the account state of the affected accounts.
Please note that this is the reason why writing the logic for the undoAsset function should never be skipped.
3.1 Start the transport
For the next step it is now required to implement the StartTransport transaction.
This transaction indicates the start of the transportation as the carrier picks up the package from the sender.
When creating the StartTransport transaction, the carrier defines the following:
-
packetId: The ID of the packet that the carrier is going to transport. ThepacketIdis not sent in the asset field, but is assigned to therecipientIdproperty of the transaction.
This transaction will perform the following:
-
Lock the specified
securityof the packet in the carrier’s account. This security cannot be accessed by the carrier, unless the transport has been finished successfully. -
Add the
carrierto the packet account. -
Set the
statusof the packet frompendingtoongoing.
The StartTransportTransaction , the prepare(),and the `undoAsset() functions are described below, including implementing the security locking of the carriers account:
const {
    BaseTransaction,
    TransactionError
} = require('@liskhq/lisk-transactions');

class StartTransportTransaction extends BaseTransaction {

    static get TYPE () {
        return 21;
    }

    async prepare(store) {
        await store.account.cache([
            {
                address: this.asset.recipientId,
            },
            {
                address: this.senderId,
            }
        ]);
    }

    validateAsset() {
        const errors = [];

        return errors;
    }

    async applyAsset(store) {
        const errors = [];
        const packet = await store.account.get(this.asset.recipientId);
        if (packet.asset.status === "pending"){
            const carrier = await store.account.get(this.senderId);
            // If the carrier has the trust to transport the packet
            const carrierTrust = carrier.asset.trust ? carrier.asset.trust : '0';
            if (BigInt(packet.asset.minTrust) <= BigInt(carrierTrust) && carrier.balance >= BigInt(packet.asset.security)) {
                /**
                 * Update the Carrier account:
                 * - Lock security inside the account
                 * - Remove the security from balance
                 * - initialize carriertrust, if not present already
                 */
                carrier.balance = { /* Write your code here */ };
                carrier.asset = { /* Write your code here */ };
                store.account.set(carrier.address, carrier);
                /**
                 * Update the Packet account:
                 * - Set status to "ongoing"
                 * - set carrier to ID of the carrier
                 */
                packet.asset.status = "ongoing";
                packet.asset.carrier = carrier.address;
                store.account.set(packet.address, packet);
            } else {
                errors.push(
                    new TransactionError(
                        'carrier has not enough trust to deliver the packet, or not enough balance to pay the security',
                        packet.asset.minTrust,
                        carrier.asset.trust,
                        packet.asset.security,
                        carrier.balance.toString()
                    )
                );
            }
        } else {
            errors.push(
                new TransactionError(
                    'packet status needs to be "pending"',
                    packet.asset.status
                )
            );
        }

        return errors;
    }

    async undoAsset(store) {
        const errors = [];
        const packet = await store.account.get(this.asset.packetId);
        const carrier = await store.account.get(this.senderId);
        /* --- Revert carrier account --- */
        carrier.balance = carrier.balance + BigInt(packet.asset.security);

        store.account.set(carrier.address, carrier);
        /* --- Revert packet account --- */
        packet.asset = {
            deliveryStatus: "pending",
            carrier: null
        };
        store.account.set(packet.address, packet);
        return errors;
    }

}

module.exports = StartTransportTransaction;
Task: Lock funds
To lock the funds, simply deduct the number of tokens locked from the account’s balance.
const carrierBalanceWithoutSecurity = carrierBalance - packetSecurity;Next, store the deducted number of tokens in a custom property in the asset field.
This provides the ability to keep track of the amount of tokens locked as security.
Insert your own code here:
Create an updated object for the carrier account that substracts the security from the carriers balance, and add a new property lockedSecurity to the asset field of the carriers account.
The lockedSecurity should exactly equal the amount deducted from the carriers balance.
To unlock locked tokens, remove or nullify the custom property in the asset field and add the number of tokens again to the account’s balance.
|
Important: To verify the implementation, please compare it with the solution.
Explanation: prepare()
The prepare function here is caching both the carrier account through the senderId and the packet account through the recipientId.
Why is it possible to cache two accounts at the same time? Please notice that the cache function accepts an array which allows it to pass in multiple query objects. When a pass in an array to the cache function is made, it will try to find a result for each query object.
It is also possible to pass in just one query object without a surrounding array. In this case, only objects that exactly match this query object will be cached as shown below:
async prepare(store) {
        await store.account.cache([
            {
                address: this.asset.recipientId,
            },
            {
                address: this.senderId,
            }
        ]);
    }
A further in depth explanation in the custom transactions deep dive article can be found on our blog.
The link opens the section B/ Combining Filters.
3.2 Finish the transport
The last custom transaction required to be implemented is the FinishTransportTransaction, which will complete the transport of the packet.
When reaching the recipient of the packet, the carrier passes the packet to the recipient.
The recipient needs to sign the FinishTransportTransaction, this verifies that the packet has been passed on to the recipient.
When sending the transaction, the recipient needs to specify the following criteria:
-
packetID: The ID of the packet that the recipient received. -
status: The status of the transport, which has 2 options:"success"or"fail".
This transaction will perform the following:
-
If
status="success"-
Send
postageto the carrier’s account. -
Unlock
securityin the carrier’s account. -
Increase
trustof the carrier +1. -
Set packet
statustosuccess.
-
-
If
status="fail"-
Send
postageto the sender’s account. -
Add
securityto the sender’s account, and nullifylockedSecurityfrom the account for the carrier. -
Decrease
trustof the carrier by -1. -
Set packet
statustofail.
-
Click here to see the full code for FinishTransportTransaction
applyAsset() of finish-transport.jsasync applyAsset(store) {
const errors = [];
let packet = await store.account.get(this.asset.packetId);
let carrier = await store.account.get(packet.asset.carrier);
let sender = await store.account.get(packet.asset.sender);
// if the transaction has been signed by the packet recipient
if (this.senderId === packet.asset.recipient) {
// if the packet status isn't "ongoing" or "alarm"
if (packet.asset.status !== "ongoing" && packet.asset.status !== "alarm") {
errors.push(
new TransactionError(
'FinishTransport can only be triggered, if packet status is "ongoing" or "alarm" ',
this.id,
'ongoing or alarm',
this.asset.status
)
);
return errors;
}
// if the transport was a success
if ( this.asset.status === "success") {
/**
* Update the Carrier account:
* - Unlock security
* - Add postage & security to balance
* - Earn 1 trustpoint
*/
carrier.balance = carrier.balance + BigInt(packet.asset.security) + BigInt(packet.asset.postage);
const trustInc = carrier.asset.trust ? BigInt(carrier.asset.trust) + BigInt(1) : BigInt(1);
carrier.asset = {
...carrier.asset,
trust: trustInc.toString(),
lockedSecurity: null
};
store.account.set(carrier.address, carrier);
/**
* Update the Packet account:
* - Remove postage from balance
* - Change status to "success"
*/
packet.balance = BigInt(0);
packet.asset = {
...packet.asset,
status: 'success'
}
store.account.set(packet.address, packet);
return errors;
}
// if the transport failed
/**
* Update the Sender account:
* - Add postage and security to balance
*/
sender.balance = sender.balance + BigInt(packet.asset.security) + BigInt(packet.asset.postage);
store.account.set(sender.address, sender);
/**
* Update the Carrier account:
* - Reduce trust by 1
* - Set lockedSecurity to 0
*/
const trustDec = carrier.asset.trust ? BigInt(carrier.asset.trust) - BigInt(1) : BigInt(-1);
carrier.asset = {
...carrier.asset,
trust: trustDec.toString(),
lockedSecurity: null
};
store.account.set(carrier.address, carrier);
/**
* Update the Packet account:
* - set status to "fail"
* - Remove postage from balance
*/
packet.balance = BigInt('0');
packet.asset = {
...packet.asset,
status: 'fail'
};
store.account.set(packet.address, packet);
return errors;
}
errors.push(
new TransactionError(
'FinishTransport transaction needs to be signed by the recipient of the packet',
this.id,
'.asset.recipient',
this.asset.recipient
)
);
return errors;
}Explanation: Caching data based on data from the db
It may be required to cache accounts or other data from the database, depending on other data that is stored in the database.
To achieve this, the points listed below must be followed:
-
Cache the data with
store.account.cache. -
Save the data as a constant with
store.account.get. -
It is now possible to use the newly created constant to cache the rest of the data, as shown in the code snippet below:
prepare() function of finish-transport.jsasync prepare(store) {
/**
* Get packet account
*/
await store.account.cache([
{
address: this.asset.packetId,
}
]);
/**
* Get sender and recipient accounts of the packet
*/
const pckt = await store.account.get(this.asset.packetId);
await store.account.cache([
{
address: pckt.asset.carrier,
},
{
address: pckt.asset.sender,
},
]);
}Task: Implement the logic in applyAsset() for a successful transport
When the recipient receives the packet from the carrier, the recipient has to sign and send the FinishTransportTransaction.
If the recipient considers the transport successful, then the carrier should be rewarded accordingly and the packet status will be updated to success.
More information can be found in the code comments of finish-transport.js
|
Important: To verify your implementation of applyAsset(), please compare it with the solution.
3.3 Test out the full workflow with the client app
Check the status in the lightAlarmTransaction
At this point the entire workflow should be implemented with the status of the different packets.
If a packet is currently in ongoing or alarm status, then to send an alarm follow the instructions described below:
Insert the code snippet listed below in the applyAsset() function of light-alarm.js, before the code that applies the changes to the database accounts.
If the status is not in ongoing or alarm, it will create a new TransactionError, push it to the errors list, and then return it.
This snippet must be inserted twice: Once in transaction/light-alarm.js on the local machine, and also in the light-alarm.js on the raspberry pi.
|
const packet = store.account.get(this.senderId);
if (packet.asset.status !== 'ongoing' && packet.asset.status !== 'alarm') {
    errors.push(
        new TransactionError(
            'Transaction invalid because delivery is not "ongoing".',
            this.id,
            'packet.asset.status',
            packet.asset.status,
            `Expected status to be equal to "ongoing" or "alarm"`,
        )
    );

    return errors;
}
Register all transaction types with the node app
Please follow the required steps below to uncomment all of the custom transactions, in order to register them with the node application:
const { Application, genesisBlockDevnet, configDevnet } = require('lisk-sdk');
const RegisterPacketTransaction = require('../transactions/register-packet');
const StartTransportTransaction = require('../transactions/start-transport');
const FinishTransportTransaction = require('../transactions/finish-transport');
const LightAlarmTransaction = require('../transactions/light-alarm');

configDevnet.label = 'lisk-transport';
configDevnet.modules.http_api.access.public = true;

const app = new Application(genesisBlockDevnet, configDevnet);
app.registerTransaction(RegisterPacketTransaction);
app.registerTransaction(StartTransportTransaction);
app.registerTransaction(FinishTransportTransaction);
app.registerTransaction(LightAlarmTransaction);

app
    .run()
    .then(() => app.logger.info('App started...'))
    .catch(error => {
        console.error('Faced error in application', error);
        process.exit(1);
    });
Try it out in the client app
Now try to start or re-start the node, client and iot application, exactly as performed earlier in Step 2.3 in Part 2 of this tutorial.
Go to http://localhost:3000 to access the client app through the web browser.
|
The prepared account credentials for the sender, recipient, and carrier can be found in These credentials are already pre-filled in the different forms in the client app. |
{
  "carrier": {
    "passphrase": "endless focus guilt bronze hold economy bulk parent soon tower cement venue",
    "privateKey": "a30c9e2b10599702b985d18fee55721b56691877cd2c70bbdc1911818dabc9b9508a965871253595b36e2f8dc27bff6e67b39bdd466531be9c6f8c401253979c",
    "publicKey": "508a965871253595b36e2f8dc27bff6e67b39bdd466531be9c6f8c401253979c",
    "address": "8531579280410192796L"
  },
  "recipient": {
    "passphrase": "mushroom edit regular pencil ten casino wine north vague bachelor swim piece",
    "privateKey": "a0b281d0449f9c2977f5fa40114c1c7e1550ff3c785bcdb1ac25f64a1c627154a9a3c363a71a3089566352127cf0e6f79d3834e1d67b4132b98d35afd3b85375",
    "publicKey": "a9a3c363a71a3089566352127cf0e6f79d3834e1d67b4132b98d35afd3b85375",
    "address": "7700165370820050502L"
  },
  "sender": {
    "address": "5059876081639179984L",
    "passphrase": "peanut hundred pen hawk invite exclude brain chunk gadget wait wrong ready"
  }
}
Initialize a new packet account
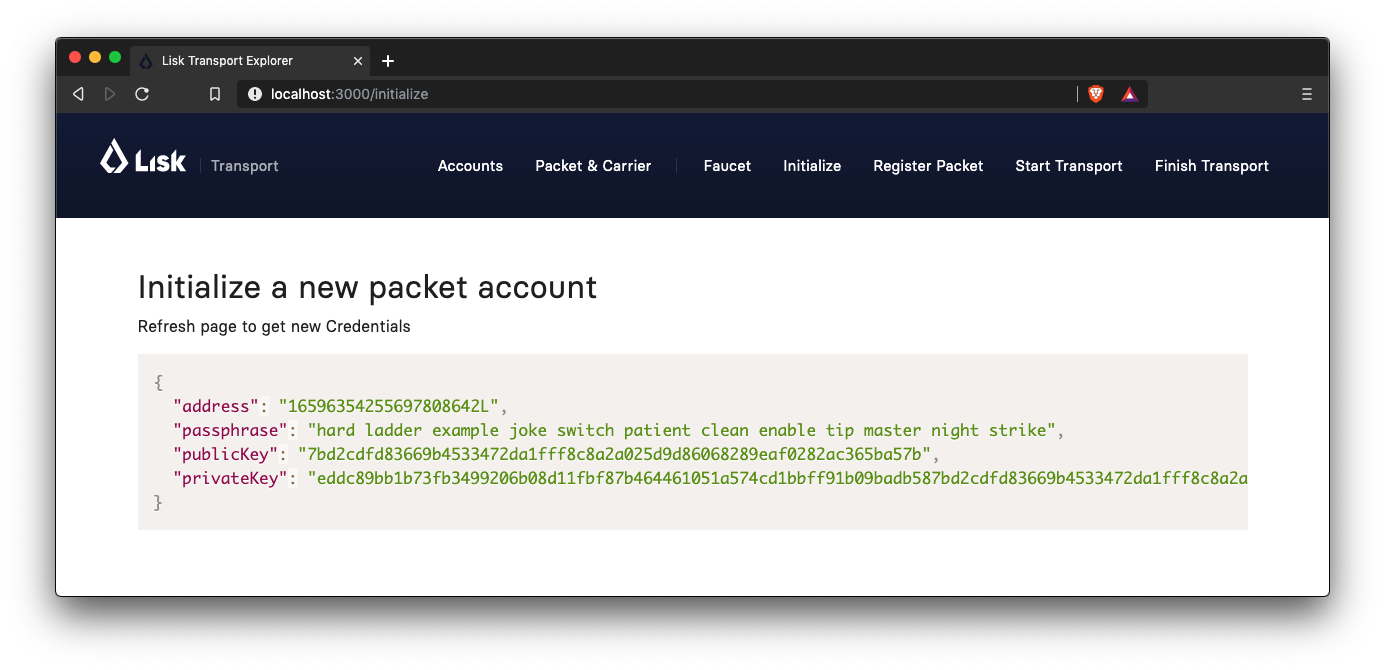
Go to http://localhost:3000/initialize and copy the packet credentials in your tracking script on the Raspberry Pi.
Register the packet
Firstly, open the Register Packet page and complete the form in order to register your packet in the network.
| Use the address of the packet credentials as the packet ID that was created in the previous step. |
Set minTrust to 0, as there is no carrier present in the system yet that has more than 0 trustpoints.
|
RegisterPacket transaction to register the packet on the network.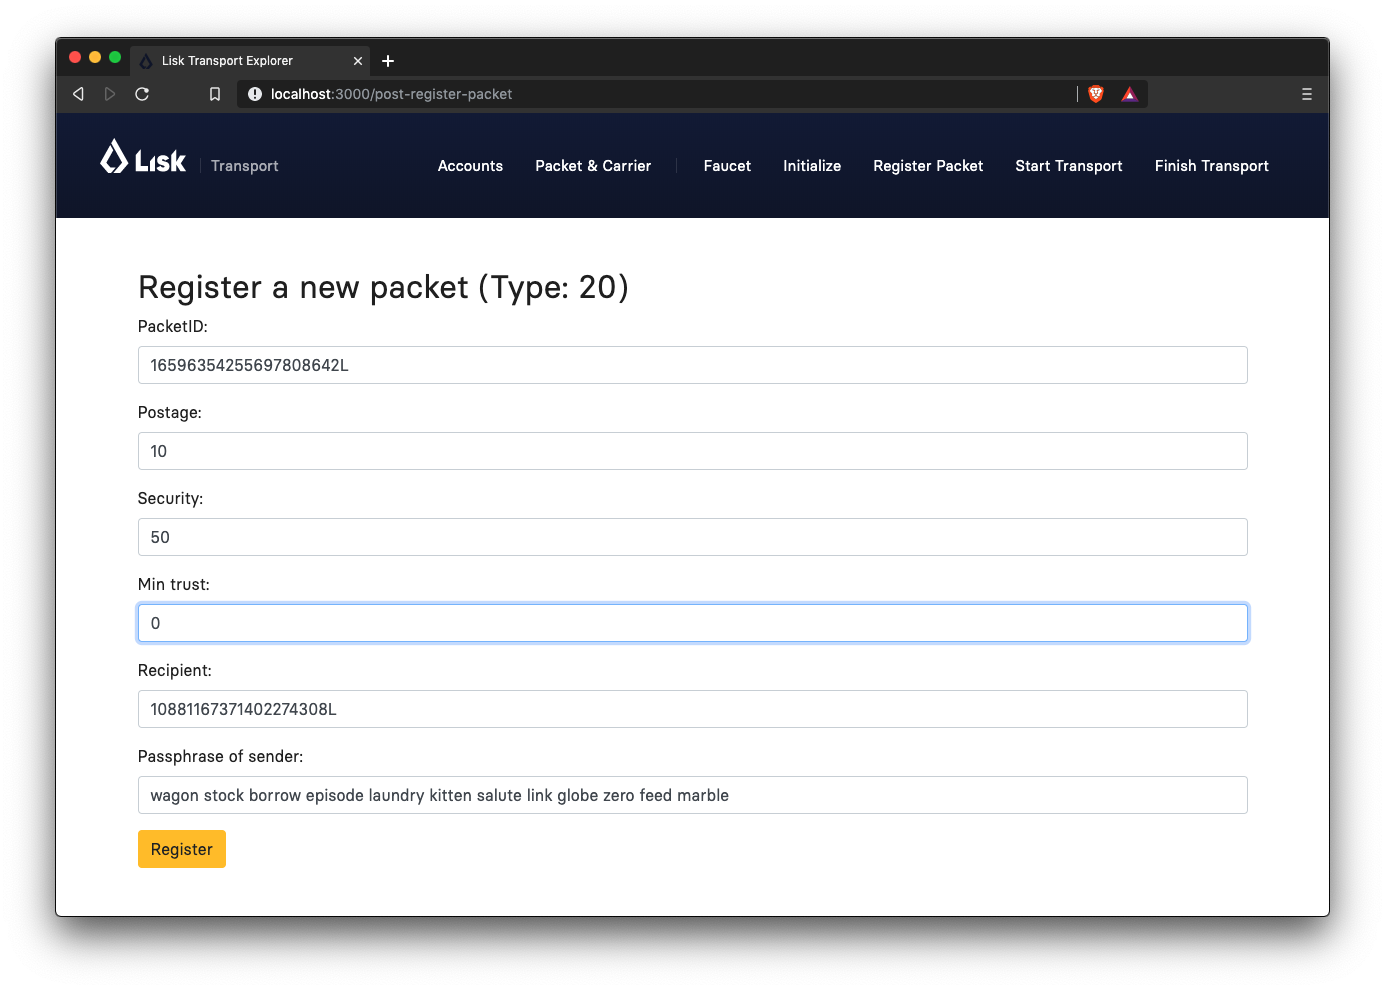
Packet & Carrier page to see if the packet status is now "pending"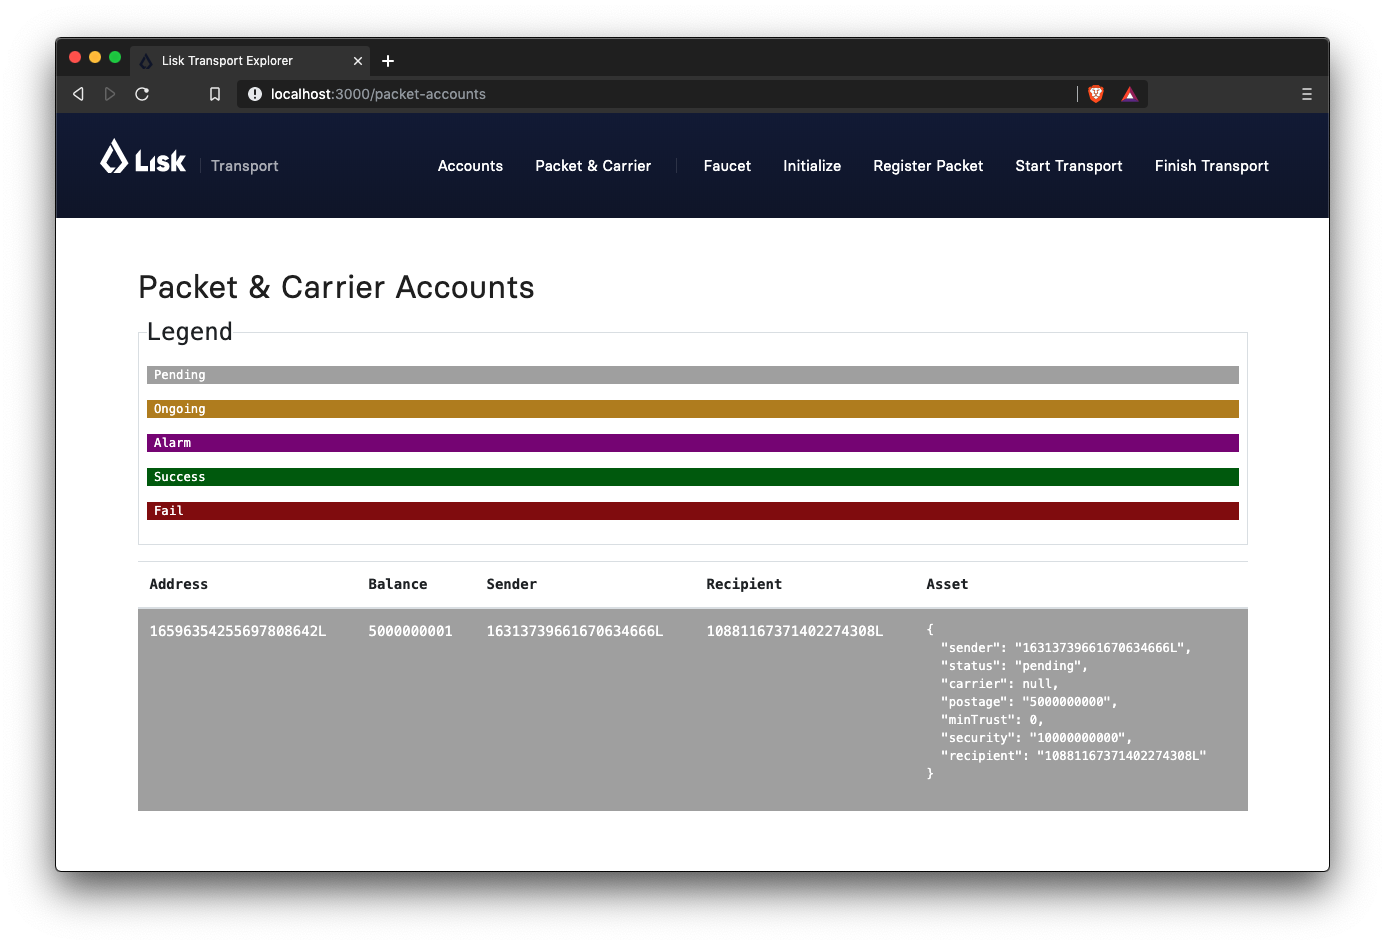
If the packet is now opened at this point, then the light alarm transaction should fail as the packet should have the wrong status.
It should display the following error message:
[
{
"message": "Transaction invalid because delivery is not \"ongoing\".",
"name": "TransactionError",
"id": "5902807582253136271",
"dataPath": "packet.asset.status",
"actual": "pending",
"expected": "Expected status to be equal to \"ongoing\" or \"alarm\""
}
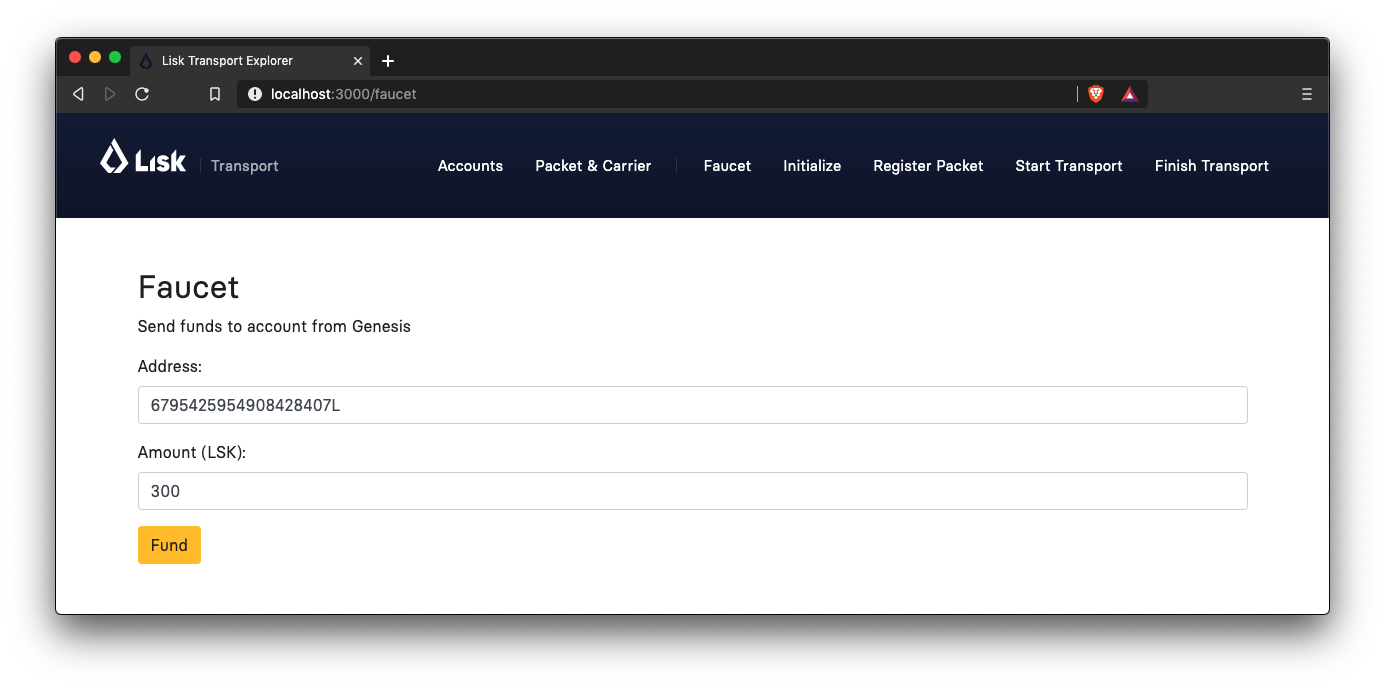
]Fund the carrier account
Before the packet transport starts, it is necessary to transfer some tokens into the empty carrier account.
This is required as the carrier needs to lock the security in the carriers account, in order to start the transport.
To perform this task, go to the Faucet page and enter the carrier address(6795425954908428407L), followed by the amount of tokens to be transferred to this account.
Please ensure that enough tokens are transferred so that the carrier can afford to lock the security of the packet, that was defined in the previous step whereby the packet was registered in the network.
This can be checked on the Accounts page, to see if the carrier received the tokens successfully.
|
Start transport
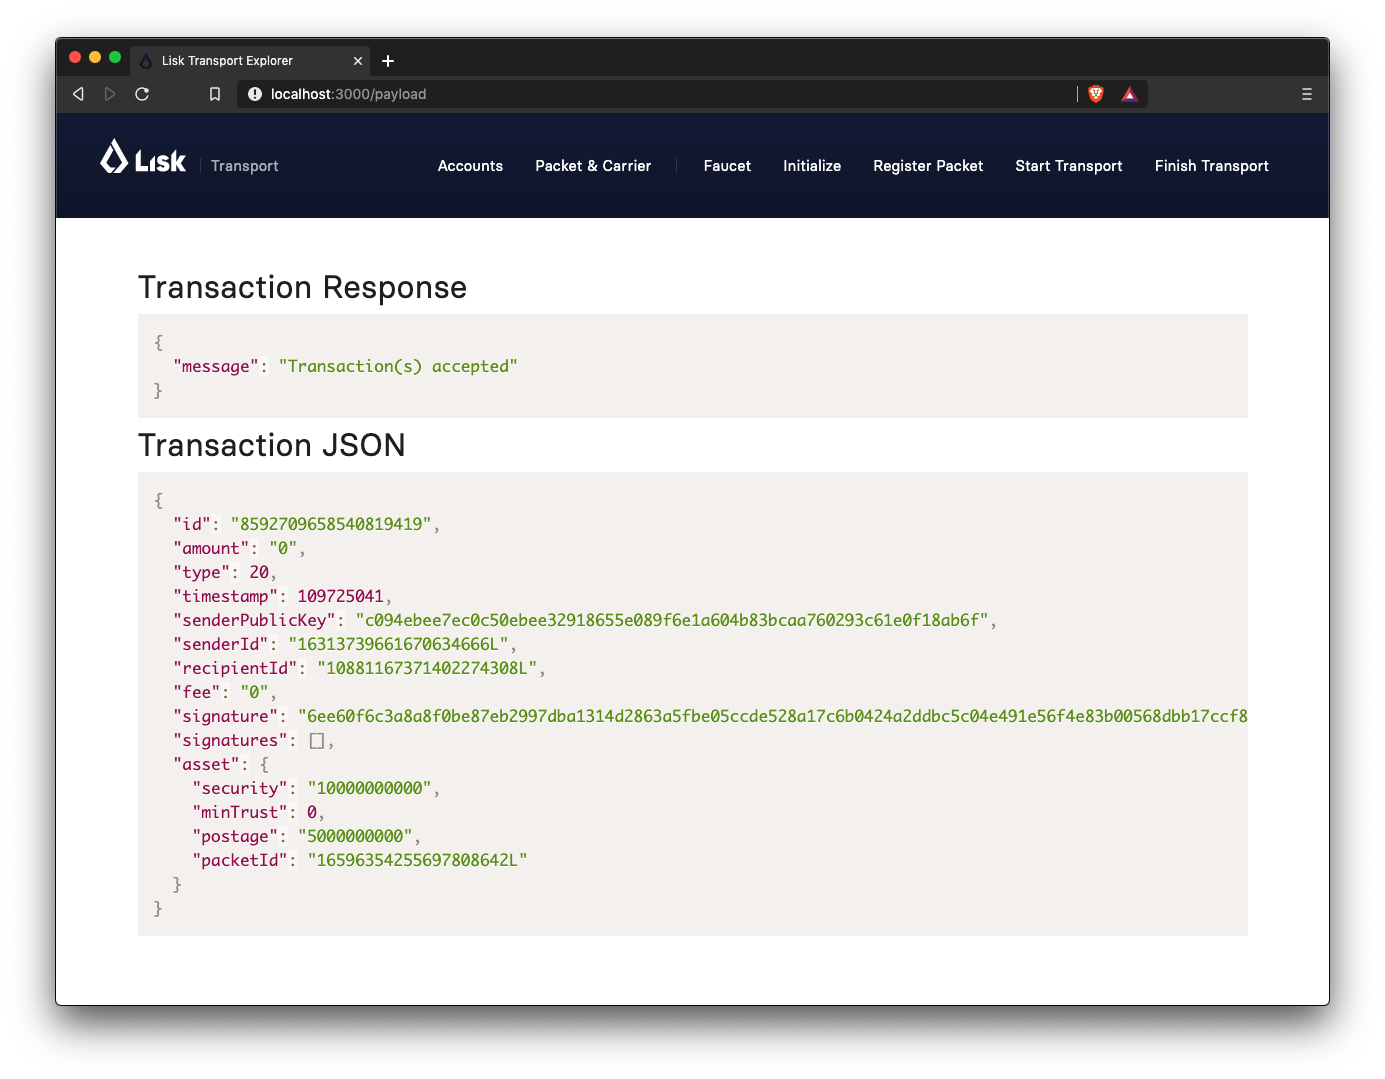
The carrier is required to post the transaction on the Start Transport page in order to initiate the transport.
The carrier is now required to specify the packetId.
The transaction will only be accepted if the carrier has enough trust and security for the specified packet.
StartTransport transaction, and then receives the packet from the sender.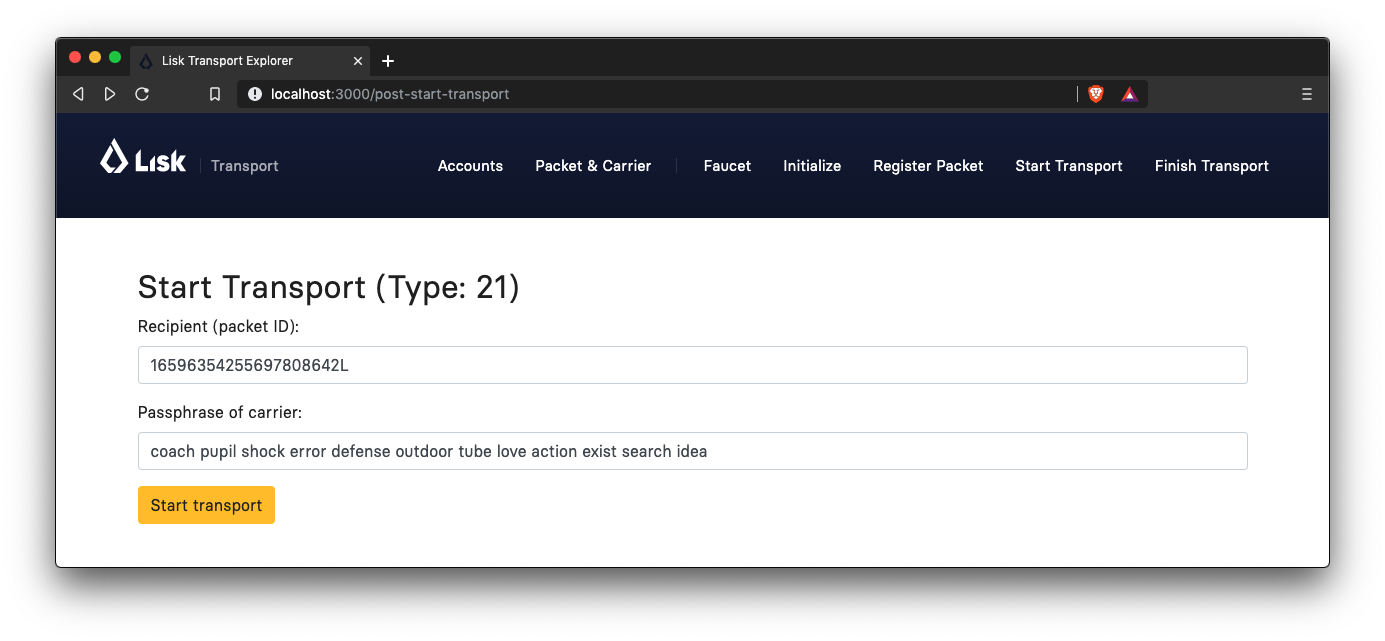
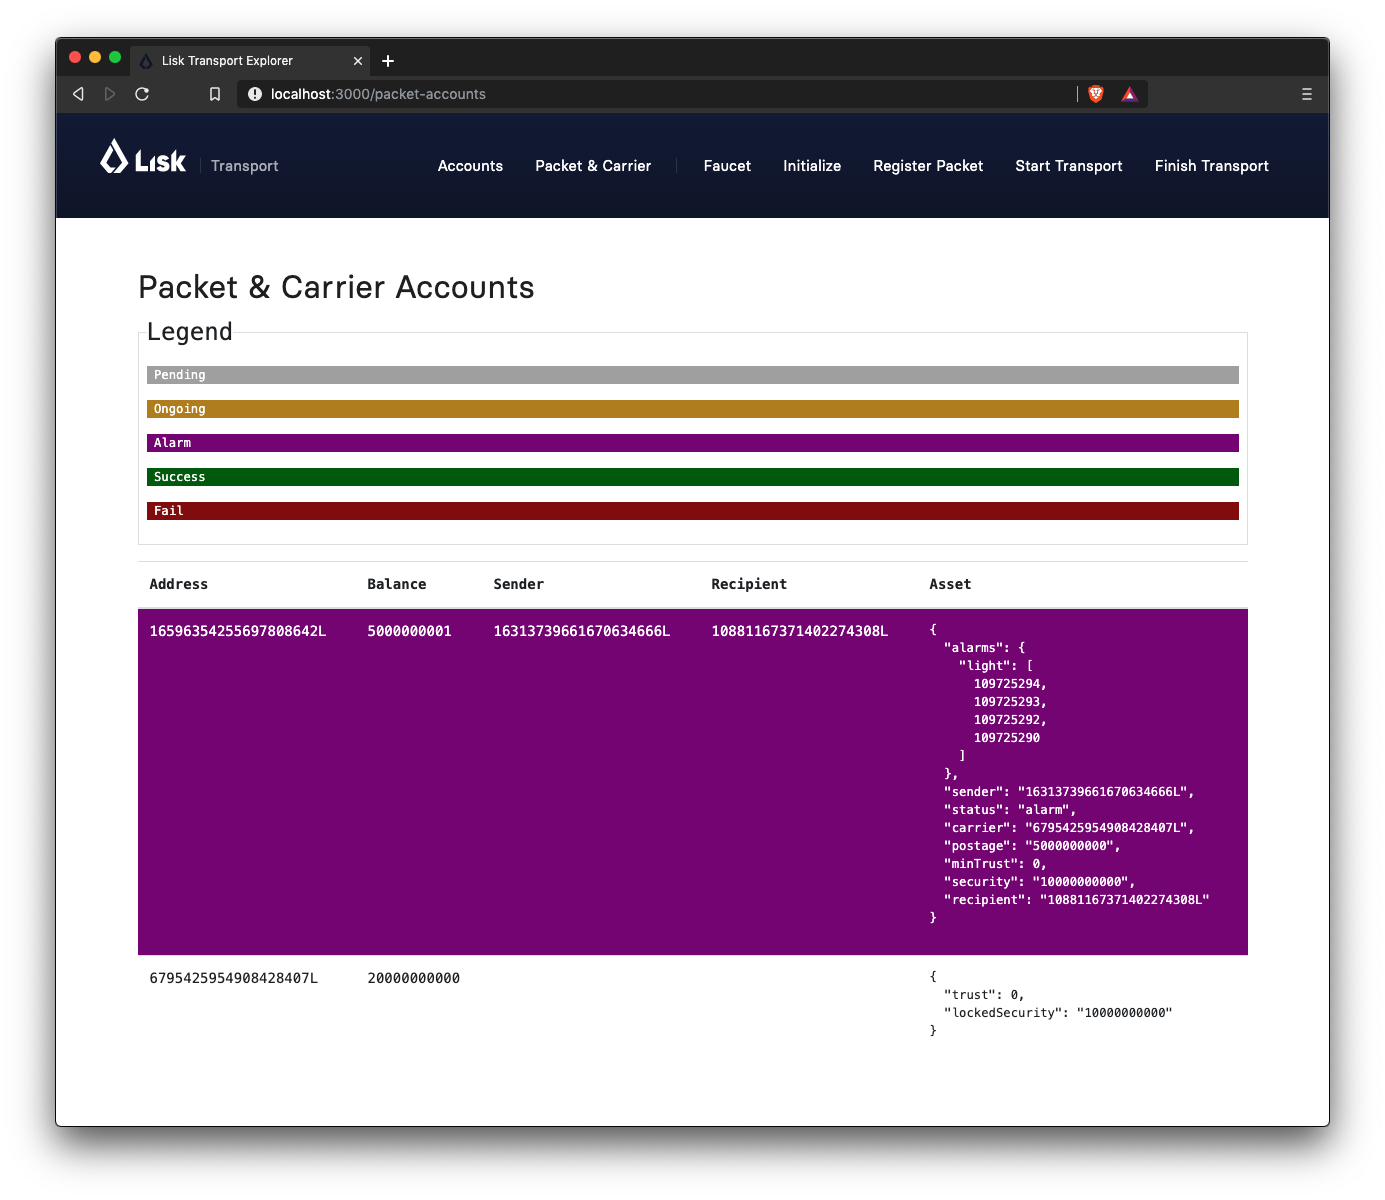
Packet & Carrier page to see if the packet status has changed to "ongoing".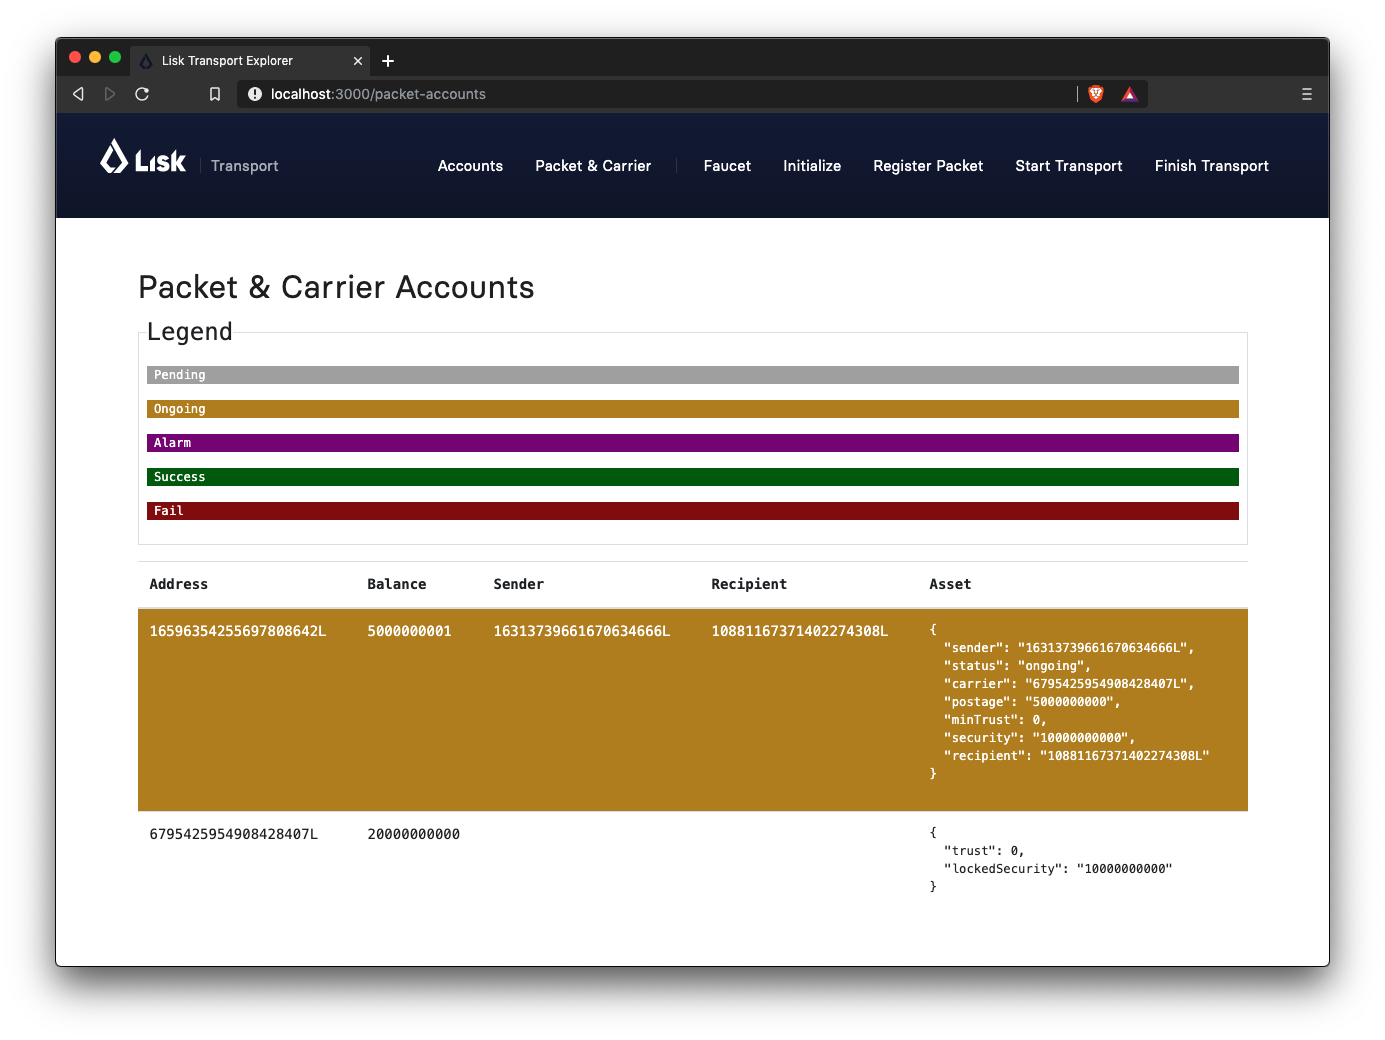
The light alarm will be extinguished after posting the StartTransport and before posting the FinishTransport.
This occurs due to the status check added in the section Check for status in the lightAlarmTransaction.
|
Finish transport
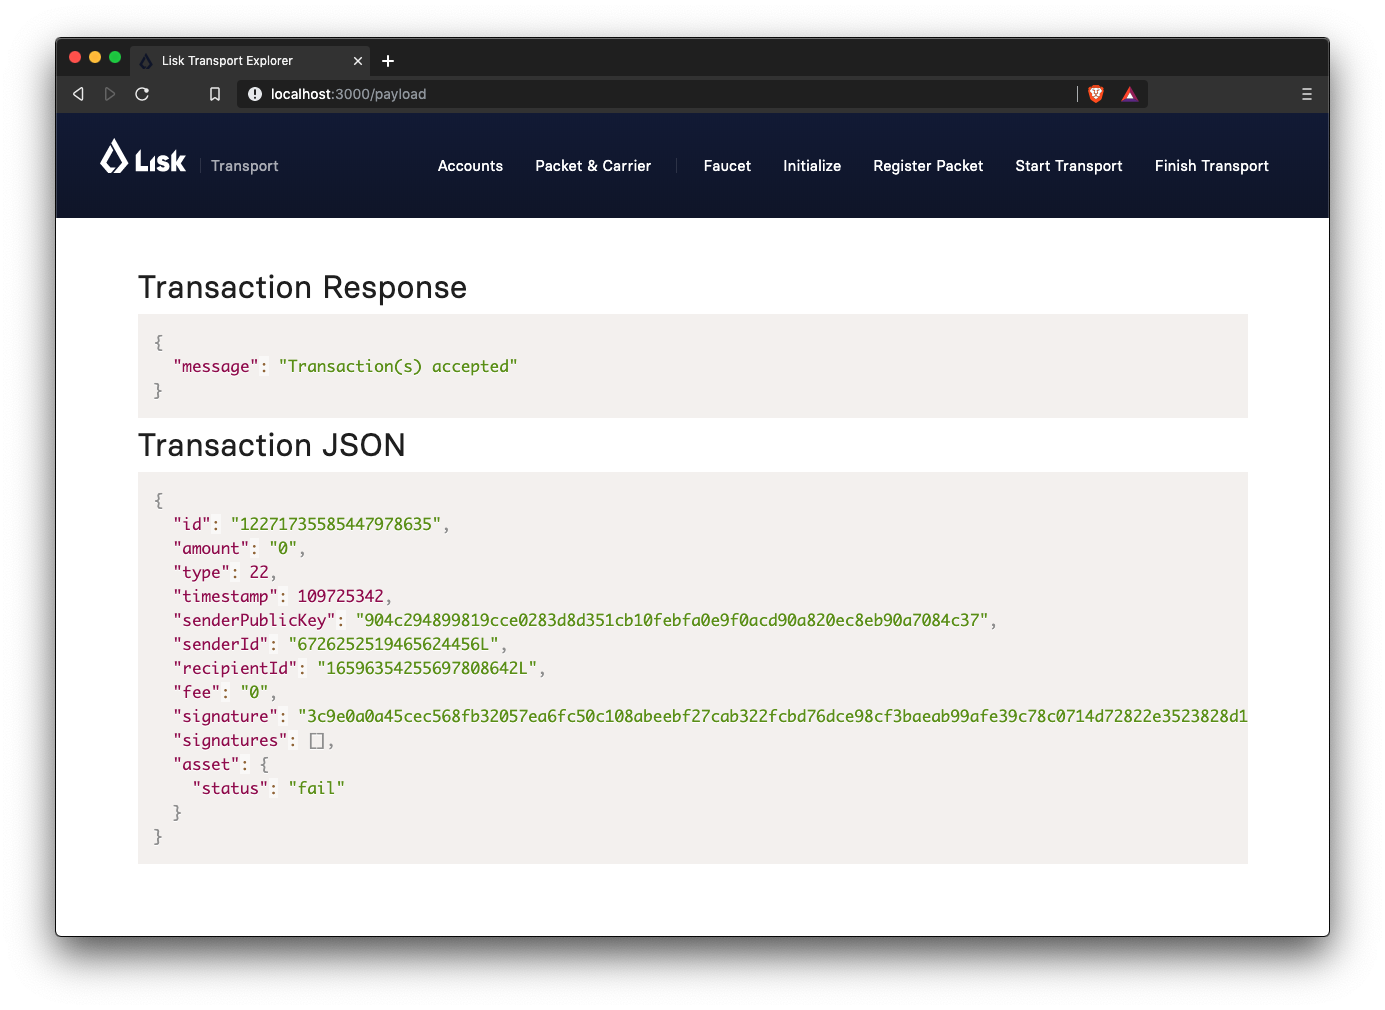
When the carrier passes the packet to the recipient, the recipient will sign the final FinishTransport transaction, which will complete the transport of the packet.
Only the packetId, and the status, which can be either fail or success needs to be specified here.
To help with the decision of the final status, the recipient can inspect the packet after receiving it. Please be aware that due to the IoT device inside the packet, the recipient can also check in the client app if the packet triggered any alarm.
In case the recipient does not receive the packet after a reasonable amount of time, the recipient should also send the FinishTransport transaction, (most likely with status=fail).
|
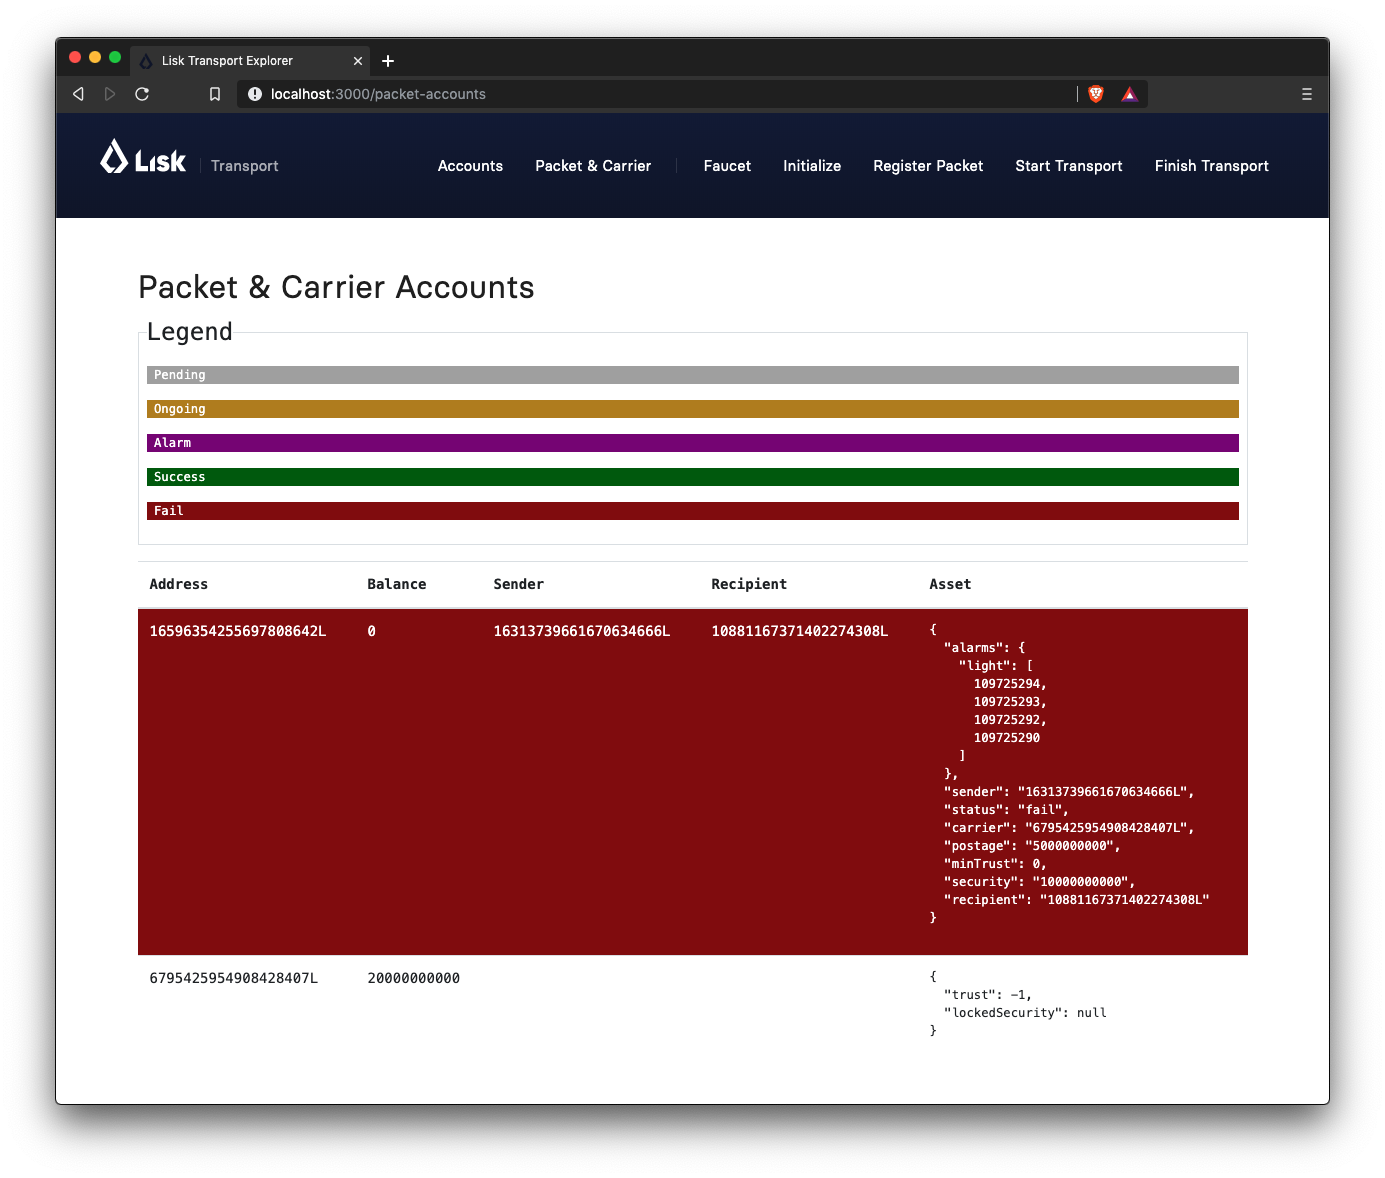
FinishTransport transaction, once the packet has been received from the carrier.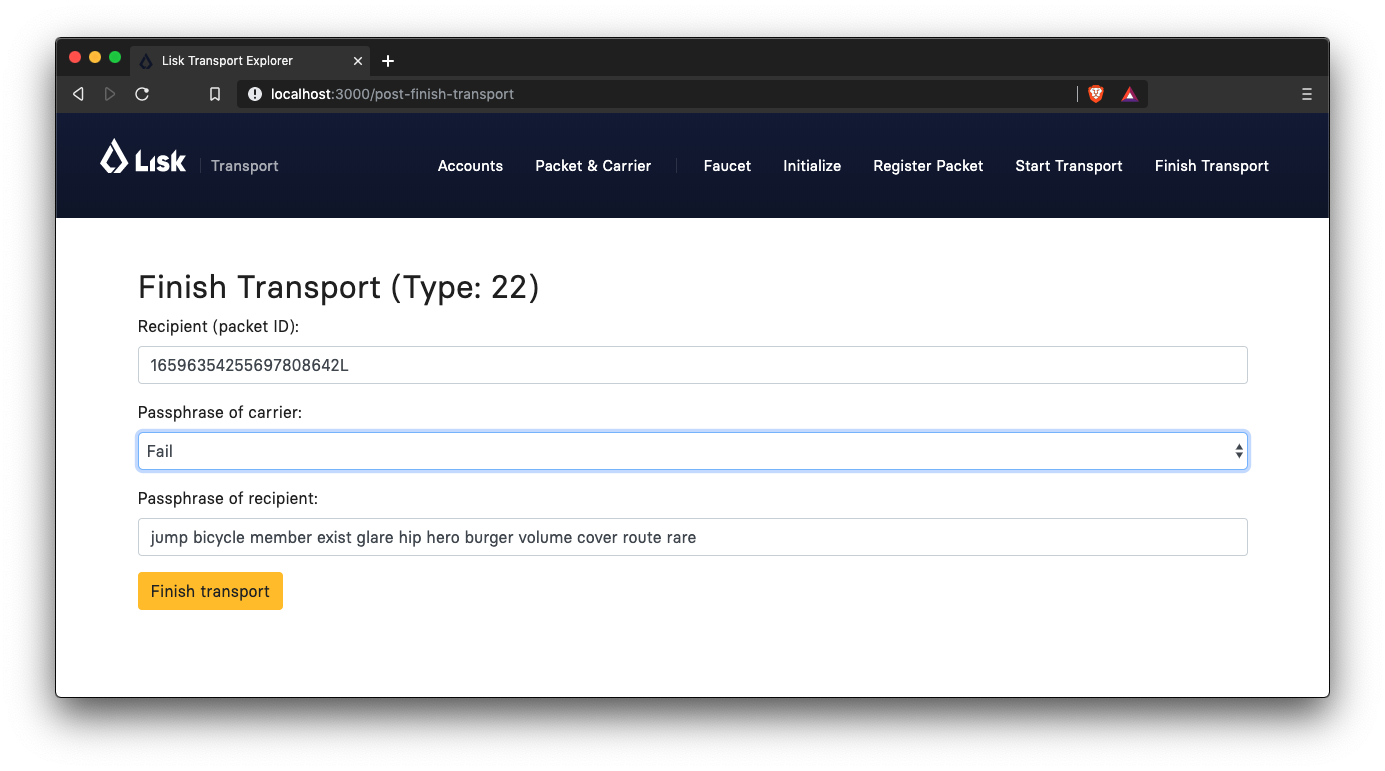 Check if the transport has been successful or if it has failed, then verify the changes accordingly in the accounts on the
 Packet&Carrier page.
Once all of the above steps have been completed, a simple and fully working proof of concept of a decentralized supply chain tracking system is now running on your machine.
| Time to celebrate! \o/ |