Non-fungible token (NFT) Tutorial
How to create a blockchain application that supports NFTs. You will learn how to create a custom module that adds the feature to create and purchase NFTs in a blockchain application, and a custom plugin that provides additional NFT-related features.
| The example app for this tutorial was build without bootstrapping via Lisk Commander, therefore the project setup and file structure are different in this tutorial. If you wish to see an example how to easily bootstrap a blockchain application with the Lisk Commander, check out how to bootstrap the Hello World application. |
| For the full code example please see the NFT app on Github. |
Fungible vs non-fungible tokens
| Fungible tokens | Non-fungible tokens | |
|---|---|---|
Description |
Tokens that can be readily interchanged with each other. |
Each token has unique characteristics which make it special. |
Characteristics |
|
|
Examples |
|
|
NFT blockchain overview
In our example, we will design the following characteristics for the blockchain application:
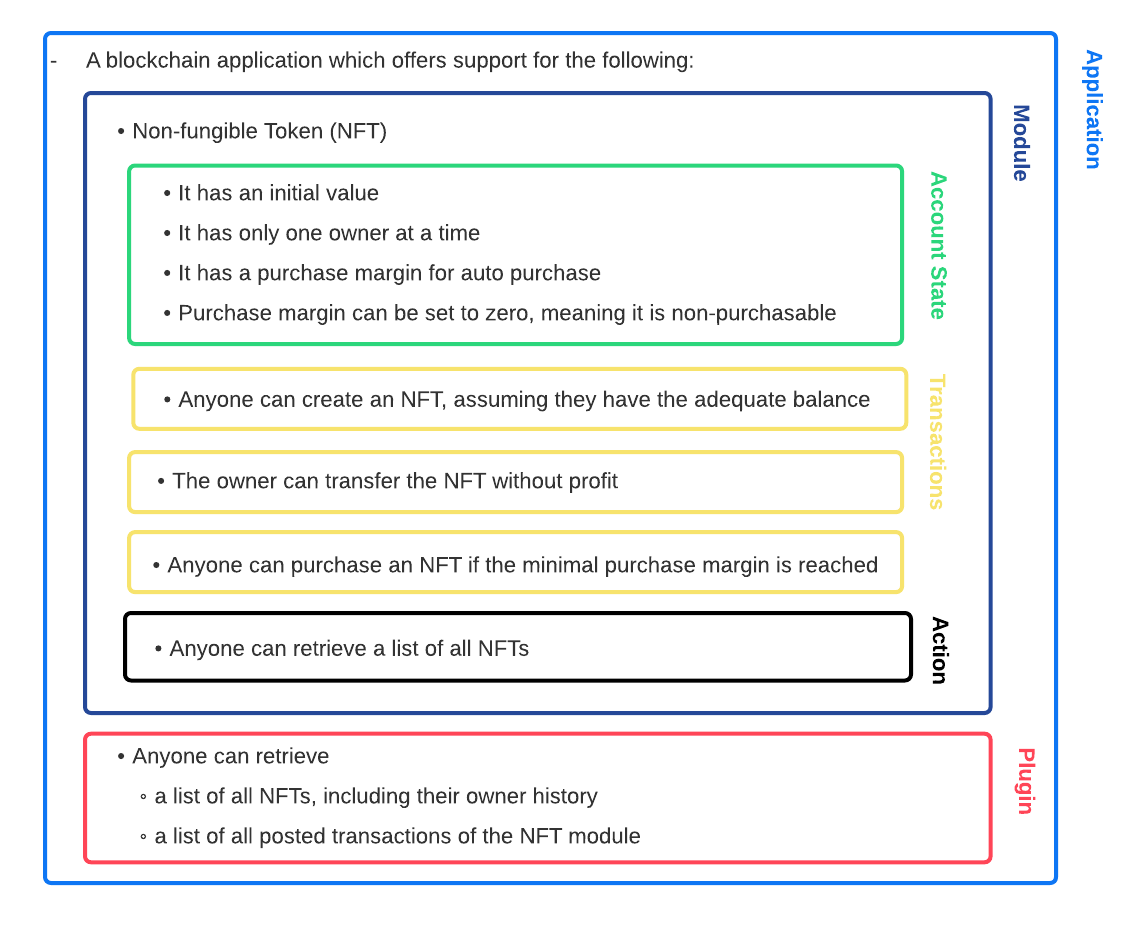
As can be seen in the above image, it is necessary to create the following components:
-
The NFT module (on-chain).
-
Three new transaction assets for the NFT module.
-
The NFT plugin (off-chain).
In addition to the blockchain application, we will also implement a frontend application, which allows us to interact with the blockchain application through a UI (User Interface), in the browser.
1. Project setup
Create a new folder, which will contain all the files for the NFT app:
mkdir nft
mkdir nft/blockchain_app
cd nft/blockchain_app
npm init
npm i lisk-sdk
Next, create a new file index.js then copy and paste the following:
const { Application, genesisBlockDevnet, configDevnet } = require('lisk-sdk');

const app = Application.defaultApplication(genesisBlockDevnet, configDevnet);

app
	.run()
	.then(() => app.logger.info('App started...'))
	.catch(error => {
		console.error('Faced error in application', error);
		process.exit(1);
	});
This code snippet creates a default blockchain application, which is configured for development purposes. We will use this app as a basis for the NFT app and extend it with a module and a plugin in the following steps, to suit the desired use case.
Create a new folder nft_module/ and inside a new file index.js:
mkdir nft_module2. NFT related functions
For a better overview, create a new file nft.js in the nft_module/ folder.
Now open nft.js and define the functions related to the NFT, which will be used in the assets and the module in the next steps.
The following functions are implemtented:
-
registeredNFTTokensSchema: The schema, how the NFTs are saved in the database. Each NFT has the following properties:-
id: The unique ID of the NFT.
-
value: The value of the NFT.
-
ownerAddress: The address of the owner of the NFT.
-
minPurchaseMargin: The minimum price increase, that should happen with every purchase of the NFT in percentage.
-
name: The NFT name.
-
-
CHAIN_STATE_NFT_TOKENS: The key under which the NFTs are saved in the database. -
createNFTToken(): Creates a new NFT based on the providedname,ownerAddress,nonce,value, andminPurchaseMargin. The ID for the NFT is created by combining and hashing the owner address and its' current nonce, which in combination always creates a unique value. This way it is ensured that each newly created NFT has a unique ID in the database. -
setAllNFTTokens(): Saves provided NFTs to the database. -
getAllNFTTokens(): Retrieves NFTs from the database. -
getAllNFTTokensAsJSON(): Returns all NFTs from the database as JSON.
|
You may have noticed that we use special parameters in the functions, such as |
const { codec, cryptography } = require("lisk-sdk");

const registeredNFTTokensSchema = {
  $id: "lisk/nft/registeredTokens",
  type: "object",
  required: ["registeredNFTTokens"],
  properties: {
    registeredNFTTokens: {
      type: "array",
      fieldNumber: 1,
      items: {
        type: "object",
        required: ["id", "value", "ownerAddress", "minPurchaseMargin", "name"],
        properties: {
          id: {
            dataType: "bytes",
            fieldNumber: 1,
          },
          value: {
            dataType: "uint64",
            fieldNumber: 2,
          },
          ownerAddress: {
            dataType: "bytes",
            fieldNumber: 3,
          },
          minPurchaseMargin: {
            dataType: "uint32",
            fieldNumber: 4,
          },
          name: {
            dataType: "string",
            fieldNumber: 5,
          },
        },
      },
    },
  },
};

const CHAIN_STATE_NFT_TOKENS = "nft:registeredNFTTokens";

const createNFTToken = ({ name, ownerAddress, nonce, value, minPurchaseMargin }) => {
  const nonceBuffer = Buffer.alloc(8);
  nonceBuffer.writeBigInt64LE(nonce);
  // Create a unique seed by using a combination of the owner account address and the current nonce of the account.
  const seed = Buffer.concat([ownerAddress, nonceBuffer]);
  const id = cryptography.hash(seed);

  return {
    id,
    minPurchaseMargin,
    name,
    ownerAddress,
    value,
  };
};

const getAllNFTTokens = async (stateStore) => {
  const registeredTokensBuffer = await stateStore.chain.get(
    CHAIN_STATE_NFT_TOKENS
  );
  if (!registeredTokensBuffer) {
    return [];
  }

  const registeredTokens = codec.decode(
    registeredNFTTokensSchema,
    registeredTokensBuffer
  );

  return registeredTokens.registeredNFTTokens;
};

const getAllNFTTokensAsJSON = async (dataAccess) => {
  const registeredTokensBuffer = await dataAccess.getChainState(
    CHAIN_STATE_NFT_TOKENS
  );

  if (!registeredTokensBuffer) {
    return [];
  }

  const registeredTokens = codec.decode(
    registeredNFTTokensSchema,
    registeredTokensBuffer
  );

  return codec.toJSON(registeredNFTTokensSchema, registeredTokens)
    .registeredNFTTokens;
};

const setAllNFTTokens = async (stateStore, NFTTokens) => {
  const registeredTokens = {
    registeredNFTTokens: NFTTokens.sort((a, b) => a.id.compare(b.id)),
  };

  await stateStore.chain.set(
    CHAIN_STATE_NFT_TOKENS,
    codec.encode(registeredNFTTokensSchema, registeredTokens)
  );
};

module.exports = {
  registeredNFTTokensSchema,
  CHAIN_STATE_NFT_TOKENS,
  getAllNFTTokens,
  setAllNFTTokens,
  getAllNFTTokensAsJSON,
  createNFTToken,
};
3. Transaction assets
The user shall have the ability to create, purchase, and transfer NFTs in the network. To do this, we create the corresponding transaction assets for the NFT module. These transaction assets each define both the asset schema for the transaction data, and the logic, which determine how this data is applied and stored in the database.
mkdir transactions (1)
cd transactions/| 1 | Create a new folder transactions/, which will contain the files for the transaction assets. |
3.1. CreateNFT asset
Create a new file create_nft_asset.js inside the newly created transactions/ folder.
Now open the file and copy and paste the code below:
const { BaseAsset } = require("lisk-sdk");

// extend base asset to implement your custom asset
class CreateNFTAsset extends BaseAsset { (1)

}

module.exports = CreateNFTAsset; (2)| 1 | Extend from the base asset to implement a custom asset. |
| 2 | Export the asset, so it can be imported later into the custom module. |
Now define all required properties for the transaction asset one after another.
3.1.1. Asset ID and name
const { BaseAsset } = require("lisk-sdk");

// extend base asset to implement your custom asset
class CreateNFTAsset extends BaseAsset {
  // define unique asset name and id
  name = "createNFT"; (1)
  id = 0; (2)
}

module.exports = CreateNFTAsset;| 1 | Set the asset name to "createNFT". |
| 2 | Set the asset id to 0. |
3.1.2. Asset schema
The asset schema describes the required datatypes and the structure of the data in the respective transaction asset.
| For more information how schemas are used in the application, check out the Schemas & Codec reference. |
For creating a new NFT, we require the following information:
-
Name: The name of the NFT.
-
Initial value: The inital value of the NFT.
-
Minimal purchase margin: The % value of the initial value, that is added to the initial value when purchasing the NFT.
Therefore, create the schema as described below:
const { BaseAsset } = require("lisk-sdk");

// extend base asset to implement your custom asset
class CreateNFTAsset extends BaseAsset {
  // define unique asset name and id
  name = "createNFT";
  id = 0;
  // define asset schema for serialization
  schema = {
    $id: "lisk/nft/create",
    type: "object",
    required: ["minPurchaseMargin", "initValue", "name"],
    properties: {
      minPurchaseMargin: {
        dataType: "uint32",
        fieldNumber: 1,
      },
      initValue: {
        dataType: "uint64",
        fieldNumber: 2,
      },
      name: {
        dataType: "string",
        fieldNumber: 3,
      },
    },
  };
}

module.exports = CreateNFTAsset;
Now that the schema defines what data to expect, we can use the validate() function to validate the received data of the transaction asset before applying it.
3.1.3. The validate() function
Before the data in the transaction asset is applied in the next step, use the validate() function to verify the correctness of the submitted data.
The validate() function has access to:
-
asset: the posted transaction asset.
const { BaseAsset } = require("lisk-sdk");

// extend base asset to implement your custom asset
class CreateNFTAsset extends BaseAsset {
  // define unique asset name and id
  name = "createNFT";
  id = 0;
  // define asset schema for serialization
  schema = {
    $id: "lisk/nft/create",
    type: "object",
    required: ["minPurchaseMargin", "initValue", "name"],
    properties: {
      minPurchaseMargin: {
        dataType: "uint32",
        fieldNumber: 1,
      },
      initValue: {
        dataType: "uint64",
        fieldNumber: 2,
      },
      name: {
        dataType: "string",
        fieldNumber: 3,
      },
    },
  };

  // verify data in the transaction asset
  validate({asset}) {
    if (asset.initValue <= 0) { (1)
      throw new Error("NFT init value is too low.");
    } else if (asset.minPurchaseMargin < 0 || asset.minPurchaseMargin > 100) { (2)
      throw new Error("The NFT minimum purchase value needs to be between 0-100.");
    }
  };
}

module.exports = CreateNFTAsset;| 1 | Verifies that the initial value of the NFT is greater than 0. If not, the transaction is not applied, and a corresponding error is thrown. |
| 2 | Verifies that the minimal purchase margin is a value between 0 and 100. |
3.1.4. The apply function
The apply() function has access to:
-
asset: the posted transaction asset. -
stateStore: The state store is a data structure that holds a temporary state while processing a block. It is used here to get and set certain data from and to the database. -
reducerHandler: Allows the user to utilize reducer functions of other modules inside theapply()function. -
transaction: the complete transaction object.
const { BaseAsset } = require("lisk-sdk");
const {
  getAllNFTTokens,
  setAllNFTTokens,
  createNFTToken,
} = require("../nft"); (1)

// extend base asset to implement your custom asset
class CreateNFTAsset extends BaseAsset {
  // define unique asset name and id
  name = "createNFT";
  id = 0;
  // define asset schema for serialization
  schema = {
    $id: "lisk/nft/create",
    type: "object",
    required: ["minPurchaseMargin", "initValue", "name"],
    properties: {
      minPurchaseMargin: {
        dataType: "uint32",
        fieldNumber: 1,
      },
      initValue: {
        dataType: "uint64",
        fieldNumber: 2,
      },
      name: {
        dataType: "string",
        fieldNumber: 3,
      },
    },
  };

  // verify data in the transaction asset
  validate({asset}) {
    if (asset.initValue <= 0) {
      throw new Error("The NFT init value is too low.");
    } else if (asset.minPurchaseMargin < 0 || asset.minPurchaseMargin > 100) {
      throw new Error("The NFT minimum purchase value needs to be between 0-100.");
    }
  };

  async apply({ asset, stateStore, reducerHandler, transaction }) {
    // create NFT (2)
    const senderAddress = transaction.senderAddress;
    const senderAccount = await stateStore.account.get(senderAddress);
    const nftToken = createNFTToken({
      name: asset.name,
      ownerAddress: senderAddress,
      nonce: transaction.nonce,
      value: asset.initValue,
      minPurchaseMargin: asset.minPurchaseMargin,
    });

    // update sender account with unique NFT ID (3)
    senderAccount.nft.ownNFTs.push(nftToken.id);
    await stateStore.account.set(senderAddress, senderAccount);

    // debit tokens from sender account to create an NFT (4)
    await reducerHandler.invoke("token:debit", {
      address: senderAddress,
      amount: asset.initValue,
    });

    // save NFTs (5)
    const allTokens = await getAllNFTTokens(stateStore);
    allTokens.push(nftToken);
    await setAllNFTTokens(stateStore, allTokens);
  }
}

module.exports = CreateNFTAsset;| 1 | Import getAllNFTTokens, setAllNFTTokens and createNFTToken from the nft.js file. |
| 2 | Create the NFT based on the asset data and the sender address of the transaction. |
| 3 | Push the ID of the newly created NFT into the sender account and save the updated sender account in the database. |
| 4 | Debit the initial value of the NFT from the sender account. |
| 5 | Push the newly created NFT into the list of all NFTs and save it in the database. |
3.2. PurchaseNFT asset
Create a new file purchase_nft_asset.js inside the transactions/ folder.
Analog to the implementation of the createNFT asset, create the purchaseNFT asset by pasting the snippet below.
The validation of the asset inputs is done in the apply() function, as it is necessary to access the database in order to validate the transaction inputs.
|
const { BaseAsset } = require("lisk-sdk");
const { getAllNFTTokens, setAllNFTTokens } = require("../nft");

// extend base asset to implement your custom asset
class PurchaseNFTAsset extends BaseAsset {
  // define unique asset name and id
  name = "purchaseNFT";
  id = 1;
  // define asset schema for serialization
  schema = {
    $id: "lisk/nft/purchase",
    type: "object",
    required: ["nftId", "purchaseValue", "name"],
    properties: {
      nftId: {
        dataType: "bytes",
        fieldNumber: 1,
      },
      purchaseValue: {
        dataType: "uint64",
        fieldNumber: 2,
      },
      name: {
        dataType: "string",
        fieldNumber: 3,
      },
    },
  };

  async apply({ asset, stateStore, reducerHandler, transaction }) {
    // verify if purchasing nft exists (1)
    const nftTokens = await getAllNFTTokens(stateStore);
    const nftTokenIndex = nftTokens.findIndex((t) => t.id.equals(asset.nftId));

    if (nftTokenIndex < 0) {
      throw new Error("Token id not found");
    }
    // verify if minimum nft purchasing condition met (2)
    const token = nftTokens[nftTokenIndex];
    const tokenOwner = await stateStore.account.get(token.ownerAddress);
    const tokenOwnerAddress = tokenOwner.address;

    if (token && token.minPurchaseMargin === 0) {
      throw new Error("This NFT can not be purchased");
    }

    const tokenCurrentValue = token.value;
    const tokenMinPurchaseValue =
      tokenCurrentValue +
      (tokenCurrentValue * BigInt(token.minPurchaseMargin)) / BigInt(100);
    const purchaseValue = asset.purchaseValue;

    if (tokenMinPurchaseValue > purchaseValue) {
      throw new Error("Token can not be purchased. Purchase value is too low. Minimum value: " + tokenMinPurchaseValue);
    }

    // remove nft from owner account (3)
    const purchaserAddress = transaction.senderAddress;
    const purchaserAccount = await stateStore.account.get(purchaserAddress);

    const ownerTokenIndex = tokenOwner.nft.ownNFTs.findIndex((a) =>
      a.equals(token.id)
    );
    tokenOwner.nft.ownNFTs.splice(ownerTokenIndex, 1);
    await stateStore.account.set(tokenOwnerAddress, tokenOwner);

    // add nft to purchaser account (4)
    purchaserAccount.nft.ownNFTs.push(token.id);
    await stateStore.account.set(purchaserAddress, purchaserAccount);

    token.ownerAddress = purchaserAddress;
    token.value = purchaseValue;
    nftTokens[nftTokenIndex] = token;
    await setAllNFTTokens(stateStore, nftTokens);

    // debit LSK tokens from purchaser account (5)
    await reducerHandler.invoke("token:debit", {
      address: purchaserAddress,
      amount: purchaseValue,
    });

    // credit LSK tokens to purchaser account (6)
    await reducerHandler.invoke("token:credit", {
      address: tokenOwnerAddress,
      amount: purchaseValue,
    });
  }
}

module.exports = PurchaseNFTAsset;| 1 | Verify, that the NFT which is purchased exists in the database.
To do this, we request all NFTs with getAllNFTTokens() and search inside the returned list for the desired NFT ID.
If no NFT is found, a corresponding error is thrown. |
| 2 | If the NFT was found, it is retrieved from the database, and the minimum purchase value of the token is compared to the purchase value in the transaction asset. If the purchase value in the transaction asset is equal or higher than the minimal purchase value of the NFT, the NFT can be purchased. Otherwise, an error will be thrown. |
| 3 | Remove the NFT from the current owner account.
The StateStore is used here to retrieve the owner account data from the database and later to update the owner account in the database, after the token ID has been removed from their owned tokens. |
| 4 | Add the NFT to the account of the purchaser.
The StateStore is used again to update the purchaser account in the database, after the token ID has been added to their owned tokens. |
| 5 | Debit the purchase value from the purchasers account.
We use the reducerHandler here and invoke token:debit from the token module which allows us to conveniently debit tokens from an account. |
| 6 | Credit the purchase value to the owners account.
We use the reducerHandler here and invoke token:debit from the token module which allows us to conveniently credit tokens to an account. |
3.3. TransferNFT asset
The last transaction asset that we want to implement in this tutorial is the transferNFT transaction.
Create a new file transfer_nft_asset.js inside the transactions/ folder.
Create the transferNFT asset by pasting the snippet below.
const { BaseAsset } = require("lisk-sdk");
const { getAllNFTTokens, setAllNFTTokens } = require("../nft");

// 1.extend base asset to implement your custom asset
class TransferNFTAsset extends BaseAsset {
  // 2.define unique asset name and id
  name = "transferNFT";
  id = 2;
  // 3.define asset schema for serialization
  schema = {
    $id: "lisk/nft/transfer",
    type: "object",
    required: ["nftId", "recipient"],
    properties: {
      nftId: {
        dataType: "bytes",
        fieldNumber: 1,
      },
      recipient: {
        dataType: "bytes",
        fieldNumber: 2,
      },
      name: {
        dataType: "string",
        fieldNumber: 3,
      },
    },
  };

  async apply({ asset, stateStore, transaction }) {
    const nftTokens = await getAllNFTTokens(stateStore);
    const nftTokenIndex = nftTokens.findIndex((t) => t.id.equals(asset.nftId));

    // 4.verify if the nft exists (1)
    if (nftTokenIndex < 0) {
      throw new Error("Token id not found");
    }
    const token = nftTokens[nftTokenIndex];
    const tokenOwnerAddress = token.ownerAddress;
    const senderAddress = transaction.senderAddress;
    // 5.verify that the sender owns the nft (2)

    if (!tokenOwnerAddress.equals(senderAddress)) {
      throw new Error("An NFT can only be transferred by the owner of the NFT.");
    }

    const tokenOwner = await stateStore.account.get(tokenOwnerAddress);
    // 6.remove nft from the owner account (3)
    const ownerTokenIndex = tokenOwner.nft.ownNFTs.findIndex((a) =>
      a.equals(token.id)
    );
    tokenOwner.nft.ownNFTs.splice(ownerTokenIndex, 1);
    await stateStore.account.set(tokenOwnerAddress, tokenOwner);

    // 7.add nft to the recipient account (4)
    const recipientAddress = asset.recipient;
    const recipientAccount = await stateStore.account.get(recipientAddress);
    recipientAccount.nft.ownNFTs.push(token.id);
    await stateStore.account.set(recipientAddress, recipientAccount);

    token.ownerAddress = recipientAddress;
    nftTokens[nftTokenIndex] = token;
    await setAllNFTTokens(stateStore, nftTokens);
  }
}

module.exports = TransferNFTAsset;| 1 | Verify, that the NFT which is purchased exists in the database.
To do this, we request all NFTs with getAllNFTTokens() and search inside the returned list for the desired NFT ID.
If no NFT is found, a corresponding error is thrown. |
| 2 | Verify, that the account who wants to transfer the NFT actually owns the NFT. |
| 3 | Remove the NFT from the current owner account.
The StateStore is used here to retrieve the owner account data from the database and later to update the owner account in the database, after the token ID has been removed from their owned tokens. |
| 4 | Add the NFT to the account of the recipient.
The StateStore is used again to update the recipient account in the database, after the token ID has been added to their owned tokens. |
4. The NFT module
Inside the nft_module/ folder, create a new file index.js.
Open index.js and create the skeleton, which will contain all parts of the NFT module:
const { BaseModule } = require("lisk-sdk");

class NFTModule extends BaseModule { (1)

}

module.exports = { NFTModule }; (2)| 1 | Extend from the base module to implement a custom module. |
| 2 | Export the module, so it can be imported into the application later. |
Now define all required properties for the module one after another.
4.1. Module ID and name
It is recommended to start with the easiest ones: defining the module name and ID.
const { BaseModule } = require("lisk-sdk");

class NFTModule extends BaseModule {
  public name = "nft"; (1)
  public id = 1024; (2)
}

module.exports = { NFTModule };| 1 | Set the module name to "nft". |
| 2 | Set the module id to 1024. |
The module ID has to be unique within the network.
The minimum value for it is 1000, as the other IDs are reserved for future default modules of the Lisk SDK.
If the module ID is not unique, it will cause forks in the network.
The module name should be unique within the network as well, otherwise, it will lead to confusion. For example, when subscribing to events or invoking actions of that module.
4.2. The account schema
Next, define the account schema. This defines the properties that are added to each network account by the module if it is registered with the application later.
Here, we expect each account to have a property ownNFTs, which is an array of NFTs which the account owns.
By default, it is empty.
const { BaseModule } = require("lisk-sdk");

// Extend base module to implement your custom module
class NFTModule extends BaseModule {
  public name = "nft";
  public id = 1024;
  public accountSchema = {
    type: "object",
    required: ["ownNFTs"],
    properties: {
      ownNFTs: {
        type: "array",
        fieldNumber: 1,
        items: {
          dataType: "bytes",
        },
      },
    },
    default: {
      ownNFTs: [],
    },
  };
}

module.exports = { NFTModule };
4.3. Importing transaction assets into the module
Now, import the transactions which were created in section 2: Transaction assets into the module.
Add them to the transactionAssets property as shown in the snippet below.
|
Best practice
It is good practice to name the imported transaction assets after their corresponding classname. In this example: |
const { BaseModule } = require("lisk-sdk");

const CreateNFTAsset = require("./transactions/create_nft_asset");
const PurchaseNFTAsset = require("./transactions/purchase_nft_asset");
const TransferNFTAsset = require("./transactions/transfer_nft_asset");

// Extend base module to implement your custom module
class NFTModule extends BaseModule {
  public name = "nft";
  public id = 1024;
  public accountSchema = {
    type: "object",
    required: ["ownNFTs"],
    properties: {
      ownNFTs: {
        type: "array",
        fieldNumber: 4,
        items: {
          dataType: "bytes",
        },
      },
    },
    default: {
      ownNFTs: [],
    },
  };
  // Add the transaction assets to the module
  public transactionAssets = [new CreateNFTAsset(), new PurchaseNFTAsset(), new TransferNFTAsset()];
}

module.exports = { NFTModule };
4.4. Actions
The last remaining feature for the NFT module consists of creating the following action getAllNFTTokens which will allow the NFT plugin to retrieve a list of all existing NFT tokens later.
To implement it, we use the function getAllNFTTokensAsJSON(), which has been described in the section NFT related functions.
The variable this._dataAccess is passed as a parameter.
This variable is available throughout the module and is used in the actions to access data from the database.
const { BaseModule } = require("lisk-sdk");
const { getAllNFTTokensAsJSON } = require("./nft");

const CreateNFTAsset = require("./transactions/create_nft_asset");
const PurchaseNFTAsset = require("./transactions/purchase_nft_asset");
const TransferNFTAsset = require("./transactions/transfer_nft_asset");

// Extend from the base module to implement the NFT module
class NFTModule extends BaseModule {
  public name = "nft";
  public id = 1024;
  public accountSchema = {
    type: "object",
    required: ["ownNFTs"],
    properties: {
      ownNFTs: {
        type: "array",
        fieldNumber: 1,
        items: {
          dataType: "bytes",
        },
      },
    },
    default: {
      ownNFTs: [],
    },
  };
  public transactionAssets = [new CreateNFTAsset(), new PurchaseNFTAsset(), new TransferNFTAsset()];
  public actions = {
    // get all the registered NFT tokens from blockchain
    getAllNFTTokens: async () => getAllNFTTokensAsJSON(this._dataAccess),
  };
}

module.exports = { NFTModule };
5. The NFT plugin
Now that all on-chain logic for the NFTs is defined in the NFT module, let’s add a corresponding NFT plugin, which will handle the off-chain logic for the NFT app.
The NFT plugin shall provide an HTTP API that offers new endpoints for NFT related data from the blockchain.
Navigate out of the nft_module folder back into the blockchain_app folder.
If you haven’t done it yet, now add an author to your package.json file.
This information will be used later in the plugin.
vim package.jsonPress i to switch to the insert mode.
Set the author name as a string of your choice and exit the insert mode by pressing Esc.
Save and exit the file by pressing :wq and Enter.
Create a new folder nft_api_plugin/.
Inside the nft_api_plugin/ folder, create a new file index.js.
mkdir nft_api_plugin
touch nft_api_plugin/index.js
Open index.js and create the skeleton, which will contain all parts of the NFT plugin:
const { BasePlugin } = require("lisk-sdk");
const pJSON = require("../package.json");

class NFTAPIPlugin extends BasePlugin { (1)
  _server = undefined;
  _app = undefined;
  _channel = undefined;
  _db = undefined;
  _nodeInfo = undefined;

  static get alias() { (2)
    return "NFTHttpApi";
  }

  static get info() { (3)
    return {
      author: pJSON.author,
      version: pJSON.version,
      name: pJSON.name,
    };
  }

  get defaults() {
    return {};
  }

  get events() {
    return [];
  }

  get actions() {
    return {};
  }
}

module.exports = { NFTAPIPlugin }; (4)| 1 | Extend from the base plugin to implement a custom plugin. |
| 2 | Set the alias for the plugin to NFTHttpApi. |
| 3 | Set the meta information for the plugin.
Here, we use the data from the package.json file. |
| 4 | Export the plugin, so it can be imported into the application later. |
5.1. Database related functions
For an enhanced overview, first, create another file that will contain the functions related to the plugin database. Here, we use a key-value store to save the data, similar to how the on-chain related data is saved in the default key-value store of the blockchain application.
Create a new file db.js.
Copy and paste the below snippet into the newly created file db.js.
db.js contains various functions that take care of the following aspects:
-
getDBInstance(dataPath,dbName): Creates a new key-value storenft_plugin.dbfor the NFT plugin. The key-value store is used to store NFT related blockchain information of the plugin in a schema that makes it conveniently accessible for third party services. -
saveTransactions(db, payload): Saves new transactions to the DB. -
getAllTransactions(db, registeredSchema): Returns a list of all transactions from the DB. -
getNFTHistory(db, dbKey): Returns the owner history of an NFT. -
saveNFTHistory(db, decodedBlock, registeredModules): Filters for transactions of the NFT module in the decoded block. Updates the NFT history based on the found NFT transaction in the block. Saves the individual owner history for the corresponding NFTs in the database.
const fs_extra = require("fs-extra");
const os = require("os");
const path = require("path");
const { cryptography, codec, db } = require("lisk-sdk");

const DB_KEY_TRANSACTIONS = "nft:transactions"; (1)
const CREATENFT_ASSET_ID = 0;
const TRANSFERNFT_ASSET_ID = 2;

// Schemas
const encodedTransactionSchema = { (2)
  $id: 'nft/encoded/transactions',
  type: 'object',
  required: ['transactions'],
  properties: {
    transactions: {
      type: 'array',
      fieldNumber: 1,
      items: {
        dataType: 'bytes',
      },
    },
  },
};

const encodedNFTHistorySchema = { (3)
  $id: 'nft/encoded/nftHistory',
  type: 'object',
  required: ['nftHistory'],
  properties: {
    nftHistory: {
      type: 'array',
      fieldNumber: 1,
      items: {
        dataType: 'bytes',
      },
    },
  },
};

const getDBInstance = async (dataPath = '~/.lisk/nft-app/', dbName = 'nft_plugin.db') => {
  const dirPath = path.join(dataPath.replace('~', os.homedir()), 'plugins/data', dbName);
  await fs_extra.ensureDir(dirPath);
  return new db.KVStore(dirPath);
};

const saveTransactions = async (db, payload) => {
  const savedTransactions = await getTransactions(db);
  const transactions = [...savedTransactions, ...payload];
  const encodedTransactions = codec.encode(encodedTransactionSchema, { transactions });
  await db.put(DB_KEY_TRANSACTIONS, encodedTransactions);
};

const getTransactions = async (db) => {
  try {
    const encodedTransactions = await db.get(DB_KEY_TRANSACTIONS);
    const { transactions } = codec.decode(encodedTransactionSchema, encodedTransactions);
    return transactions;
  }
  catch (error) {
    return [];
  }
};

const getAllTransactions = async (db, registeredSchema) => {
  const savedTransactions = await getTransactions(db);
  const transactions = [];
  for (const trx of savedTransactions) {
    transactions.push(decodeTransaction(trx, registeredSchema));
  }
  return transactions;
};

const getNFTHistory = async (db, dbKey) => {
  try {
    const encodedNFTHistory = await db.get(dbKey);
    const { nftHistory } = codec.decode(encodedNFTHistorySchema, encodedNFTHistory);

    return nftHistory;
  }
  catch (error) {
    return [];
  }
};

const saveNFTHistory = async (db, decodedBlock, registeredModules, channel) => {
  decodedBlock.payload.map(async trx => {
    const module = registeredModules.find(m => m.id === trx.moduleID);
    if (module.name === 'nft') {
      let dbKey, savedHistory, base32Address, nftHistory, encodedNFTHistory;
      if (trx.assetID === CREATENFT_ASSET_ID){
        channel.invoke('nft:getAllNFTTokens').then(async (val) => {
          for (let i = 0; i < val.length; i++) {
            const senderAdress = cryptography.getAddressFromPublicKey(Buffer.from(trx.senderPublicKey, 'hex'));
            if (val[i].ownerAddress === senderAdress.toString('hex')) {
              dbKey = `nft:${val[i].id}`; (4)
              savedHistory = await getNFTHistory(db, dbKey);
              if (savedHistory && savedHistory.length < 1) {
                base32Address = cryptography.getBase32AddressFromPublicKey(Buffer.from(trx.senderPublicKey, 'hex'), 'lsk');
                nftHistory = [Buffer.from(base32Address, 'binary'), ...savedHistory];
                encodedNFTHistory = codec.encode(encodedNFTHistorySchema, { nftHistory });
                await db.put(dbKey, encodedNFTHistory);
              }
            }
          };
        });
      } else {
        dbKey = `nft:${trx.asset.nftId}`; (5)
        base32Address = (trx.assetID === TRANSFERNFT_ASSET_ID) ? cryptography.getBase32AddressFromAddress(Buffer.from(trx.asset.recipient, 'hex')) : cryptography.getBase32AddressFromPublicKey(Buffer.from(trx.senderPublicKey, 'hex'), 'lsk');
        savedHistory = await getNFTHistory(db, dbKey);
        nftHistory = [Buffer.from(base32Address, 'binary'), ...savedHistory];
        encodedNFTHistory = codec.encode(encodedNFTHistorySchema, { nftHistory });
        await db.put(dbKey, encodedNFTHistory);
      }
    }
  });
};

const decodeTransaction = (
  encodedTransaction,
  registeredSchema,
) => {
  const transaction = codec.decode(registeredSchema.transaction, encodedTransaction);
  const assetSchema = getTransactionAssetSchema(transaction, registeredSchema);
  const asset = codec.decode(assetSchema, transaction.asset);
  const id = cryptography.hash(encodedTransaction);
  return {
    ...codec.toJSON(registeredSchema.transaction, transaction),
    asset: codec.toJSON(assetSchema, asset),
    id: id.toString('hex'),
  };
};

const getTransactionAssetSchema = (
  transaction,
  registeredSchema,
) => {
  const txAssetSchema = registeredSchema.transactionsAssets.find(
    assetSchema =>
      assetSchema.moduleID === transaction.moduleID && assetSchema.assetID === transaction.assetID,
  );
  if (!txAssetSchema) {
    throw new Error(
      // eslint-disable-next-line @typescript-eslint/restrict-template-expressions
      `ModuleID: ${transaction.moduleID} AssetID: ${transaction.assetID} is not registered.`,
    );
  }
  return txAssetSchema.schema;
};

module.exports = {
  getDBInstance,
  getAllTransactions,
  getTransactions,
  saveTransactions,
  saveNFTHistory,
  getNFTHistory,
}| 1 | DB_KEY_TRANSACTIONS: The key used to save the transactions in the key-value store. |
| 2 | encodedTransactionSchema: The schema how the transactions will be saved in the key-value store.
Here, we define a simple array which contains the encoded transactions. |
| 3 | encodedNFTHistorySchema: The schema how the owner history of an NFT is saved in the key-value store.
Here, we define a simple array, which contains the addresses of the current and all previous owners of the NFT. |
| 4 | dbKey: The key we use to save the owner history of a newly created NFT in the key-value store. |
| 5 | dbKey: The same key as in <4>, but it can be retrieved directly from the transaction asset for an existing NFT in the key-value store. |
5.2. The plugin logic
Now go back to index.js and implement the desired plugin logic.
The plugin shall provide the following additional data to the application:
-
a list of all existing NFTs and their corresponding owner history.
-
details of an NFT including the owner history, by NFT ID.
-
a list of all transactions, including their module and asset IDs and the transaction asset.
To create this data, the plugin needs to listen to events for new blocks in the blockchain application. When a new block is created, the plugin checks if the block contains transactions and if so, saves them in the key-value store of the plugin. In case the block contains transactions of the NFT module, it will also update the owner history of the NFTs in the key-value store.
We will then create an HTTP server and also create the required API endpoints to serve the data to the frontend application.
This will all be defined inside of the load() function.
All code inside the load() function is executed by the blockchain application when it loads the plugin.
The code in the unload() function is executed in complement by the blockchain application when it unloads the plugin.
const express = require("express");
const cors = require("cors");
const { BasePlugin, codec } = require("lisk-sdk");
const pJSON = require("../package.json");
const { getDBInstance, getNFTHistory, getAllTransactions, saveNFTHistory, saveTransactions } = require("./db");

// 1.plugin can be a daemon/HTTP/Websocket service for off-chain processing
class NFTAPIPlugin extends BasePlugin {
  _server = undefined;
  _app = undefined;
  _channel = undefined;
  _db = undefined;
  _nodeInfo = undefined;

  static get alias() {
    return "NFTHttpApi";
  }

  static get info() {
    return {
      author: pJSON.author,
      version: pJSON.version,
      name: pJSON.name,
    };
  }

  get defaults() {
    return {};
  }

  get events() {
    return [];
  }

  get actions() {
    return {};
  }

  async load(channel) {
    this._app = express();
    this._channel = channel;
    this._db = await getDBInstance();
    this._nodeInfo = await this._channel.invoke("app:getNodeInfo");


    this._app.use(cors({ origin: "*", methods: ["GET", "POST", "PUT"] }));
    this._app.use(express.json());

    this._app.get("/api/nft_tokens", async (_req, res) => {
      const nftTokens = await this._channel.invoke("nft:getAllNFTTokens");
      const data = await Promise.all(nftTokens.map(async token => {
        const dbKey = `${token.name}`;
        let tokenHistory = await getNFTHistory(this._db, dbKey);
        tokenHistory = tokenHistory.map(h => h.toString('binary'));
        return {
          ...token,
          tokenHistory,
        }
      }));

      res.json({ data });
    });

    this._app.get("/api/nft_tokens/:id", async (req, res) => {
      const nftTokens = await this._channel.invoke("nft:getAllNFTTokens");
      const token = nftTokens.find((t) => t.id === req.params.id);
      const dbKey = `${token.name}`;
      let tokenHistory = await getNFTHistory(this._db, dbKey);
      tokenHistory = tokenHistory.map(h => h.toString('binary'));

      res.json({ data: { ...token, tokenHistory } });
    });

    this._app.get("/api/transactions", async (_req, res) => {
      const transactions = await getAllTransactions(this._db, this.schemas);

      const data = transactions.map(trx => {
        const module = this._nodeInfo.registeredModules.find(m => m.id === trx.moduleID);
        const asset = module.transactionAssets.find(a => a.id === trx.assetID);
        return {
          ...trx,
          ...trx.asset,
          moduleName: module.name,
          assetName: asset.name,
        }
      })
      res.json({ data });
    });

    this._subscribeToChannel();

    this._server = this._app.listen(8080, "0.0.0.0");
  }

  _subscribeToChannel() {
    // listen to application events and enrich blockchain data for UI/third party application
    this._channel.subscribe('app:block:new', async (data) => {
      const { block } = data;
      const { payload } = codec.decode(
        this.schemas.block,
        Buffer.from(block, 'hex'),
      );
      if (payload.length > 0) {
        await saveTransactions(this._db, payload);
        const decodedBlock = this.codec.decodeBlock(block);
        // save NFT transaction history
        await saveNFTHistory(this._db, decodedBlock, this._nodeInfo.registeredModules, this._channel);
      }
    });
  }

  async unload() {
    // close http server
    await new Promise((resolve, reject) => {
      this._server.close((err) => {
        if (err) {
          reject(err);
          return;
        }
        resolve();
      });
    });
    // close database connection
    await this._db.close();
  }
}

module.exports = { NFTAPIPlugin };
6. Registering module and plugin
Now that the NFT module and plugin have been implemented, it is necessary to inform the blockchain application about them.
This is done by registering them with the blockchain application as shown below.
Open the nft/blockchain_app/index.js file again and copy and paste the following code:
// 1.Import lisk sdk to create the blockchain application
const {
	Application,
	configDevnet,
	genesisBlockDevnet,
	HTTPAPIPlugin,
	utils,
} = require('lisk-sdk');

// 2.Import NFT module and Plugin
const { NFTModule } = require('./nft_module');
const { NFTAPIPlugin } = require('./nft_api_plugin');

// 3.Update the genesis block accounts to include NFT module attributes
genesisBlockDevnet.header.timestamp = 1605699440;
genesisBlockDevnet.header.asset.accounts = genesisBlockDevnet.header.asset.accounts.map(
	(a) =>
		utils.objects.mergeDeep({}, a, {
			nft: {
				ownNFTs: [],
			},
		}),
);

// 4.Update application config to include unique label
// and communityIdentifier to mitigate transaction replay
const appConfig = utils.objects.mergeDeep({}, configDevnet, {
	label: 'nft-app',
	genesisConfig: { communityIdentifier: 'NFT' }, //In order to have a unique networkIdentifier
	logger: {
		consoleLogLevel: 'info',
	},
});

// 5.Initialize the application with genesis block and application config
const app = Application.defaultApplication(genesisBlockDevnet, appConfig);

// 6.Register custom NFT Module and Plugins
app.registerModule(NFTModule);
app.registerPlugin(HTTPAPIPlugin);
app.registerPlugin(NFTAPIPlugin);

// 7.Run the application
app
	.run()
	.then(() => console.info('NFT Blockchain running....'))
	.catch(console.error);
Save and close the index.js.
Now when the application is started again with node index.js, the blockchain application will load the newly created NFT module and the plugins, and the new features will become available to the blockchain application.
When using the macOS, please ensure that a different port other than 5000 is used, for example, 8756 or 4724, as port 5000 is already used by the latest macOS starting from v12 Monterey and above.
|
In the next step, we will build a simple React frontend, which allows us to interact with the blockchain application through the browser.
7. Frontend application
The final part of the NFT application is the frontend application.
|
The development of the frontend application is completely flexible, and you can use any technology stack that you feel comfortable with. In this example, we use React to build the client application. |
This tutorial is mainly about explaining how to build with the Lisk SDK, therefore other parts of the frontend app are not explained in much detail here. For example, you can find more information about how to build a React application in the official React documentation.
For convenience, clone the development branch from the lisk-sdk-examples GitHub repository and use the prepared NFT frontend_app from the sdk examples.
git clone https://github.com/LiskHQ/lisk-sdk-examples.git
mv lisk-sdk-examples/tutorials/nft/frontend_app frontend_app
rm -r ./lisk-sdk-examples
cd frontend_app
npm i
At this point it is now possible to already try out the frontend and verify that the NFT blockchain application works as expected:
First, open a second terminal window and navigate to the nft/blockchain_app. Now start the blockchain application with node index.js, if it is not already running.
In the first terminal window, start the frontend application with the following:
npm startThis should open the React app in the browser under http://localhost:3000/.
7.1. Frontend walkabout
Before we explore the code of the frontend app, let’s first take a tour through the frontend in the browser to see how it all works together.
We will perform the following:
-
Create 3 different accounts.
-
Send an initial amount of tokens to each account.
-
Create a new NFT with the first account.
-
Transfer the newly created NFT to the second account.
-
Purchase the NFT with the third account.
-
Create a second NFT with the first account, which is non-purchasable.
In the example screenshots we use the following account credentials:
================================
Artist
passphrase: boss annual room suspect ride robot connect repeat relax govern dolphin depth
address: lsktxksfsbmkmoto68y7edszaecgpnaxqqg7cs43d
--------------------------------
Collector1
passphrase: mammal fan below aspect thing iron uniform then humble double endorse gauge
address: lskybgqryr9tk4m3rdp66ethaf6xurm6hj8c93udo
--------------------------------
Collector2
passphrase: emotion project prepare cream double damage gentle basket submit enhance between drill
address: lskha38ewso7do8zeuqx8qnyoqd8962mk48atknbs
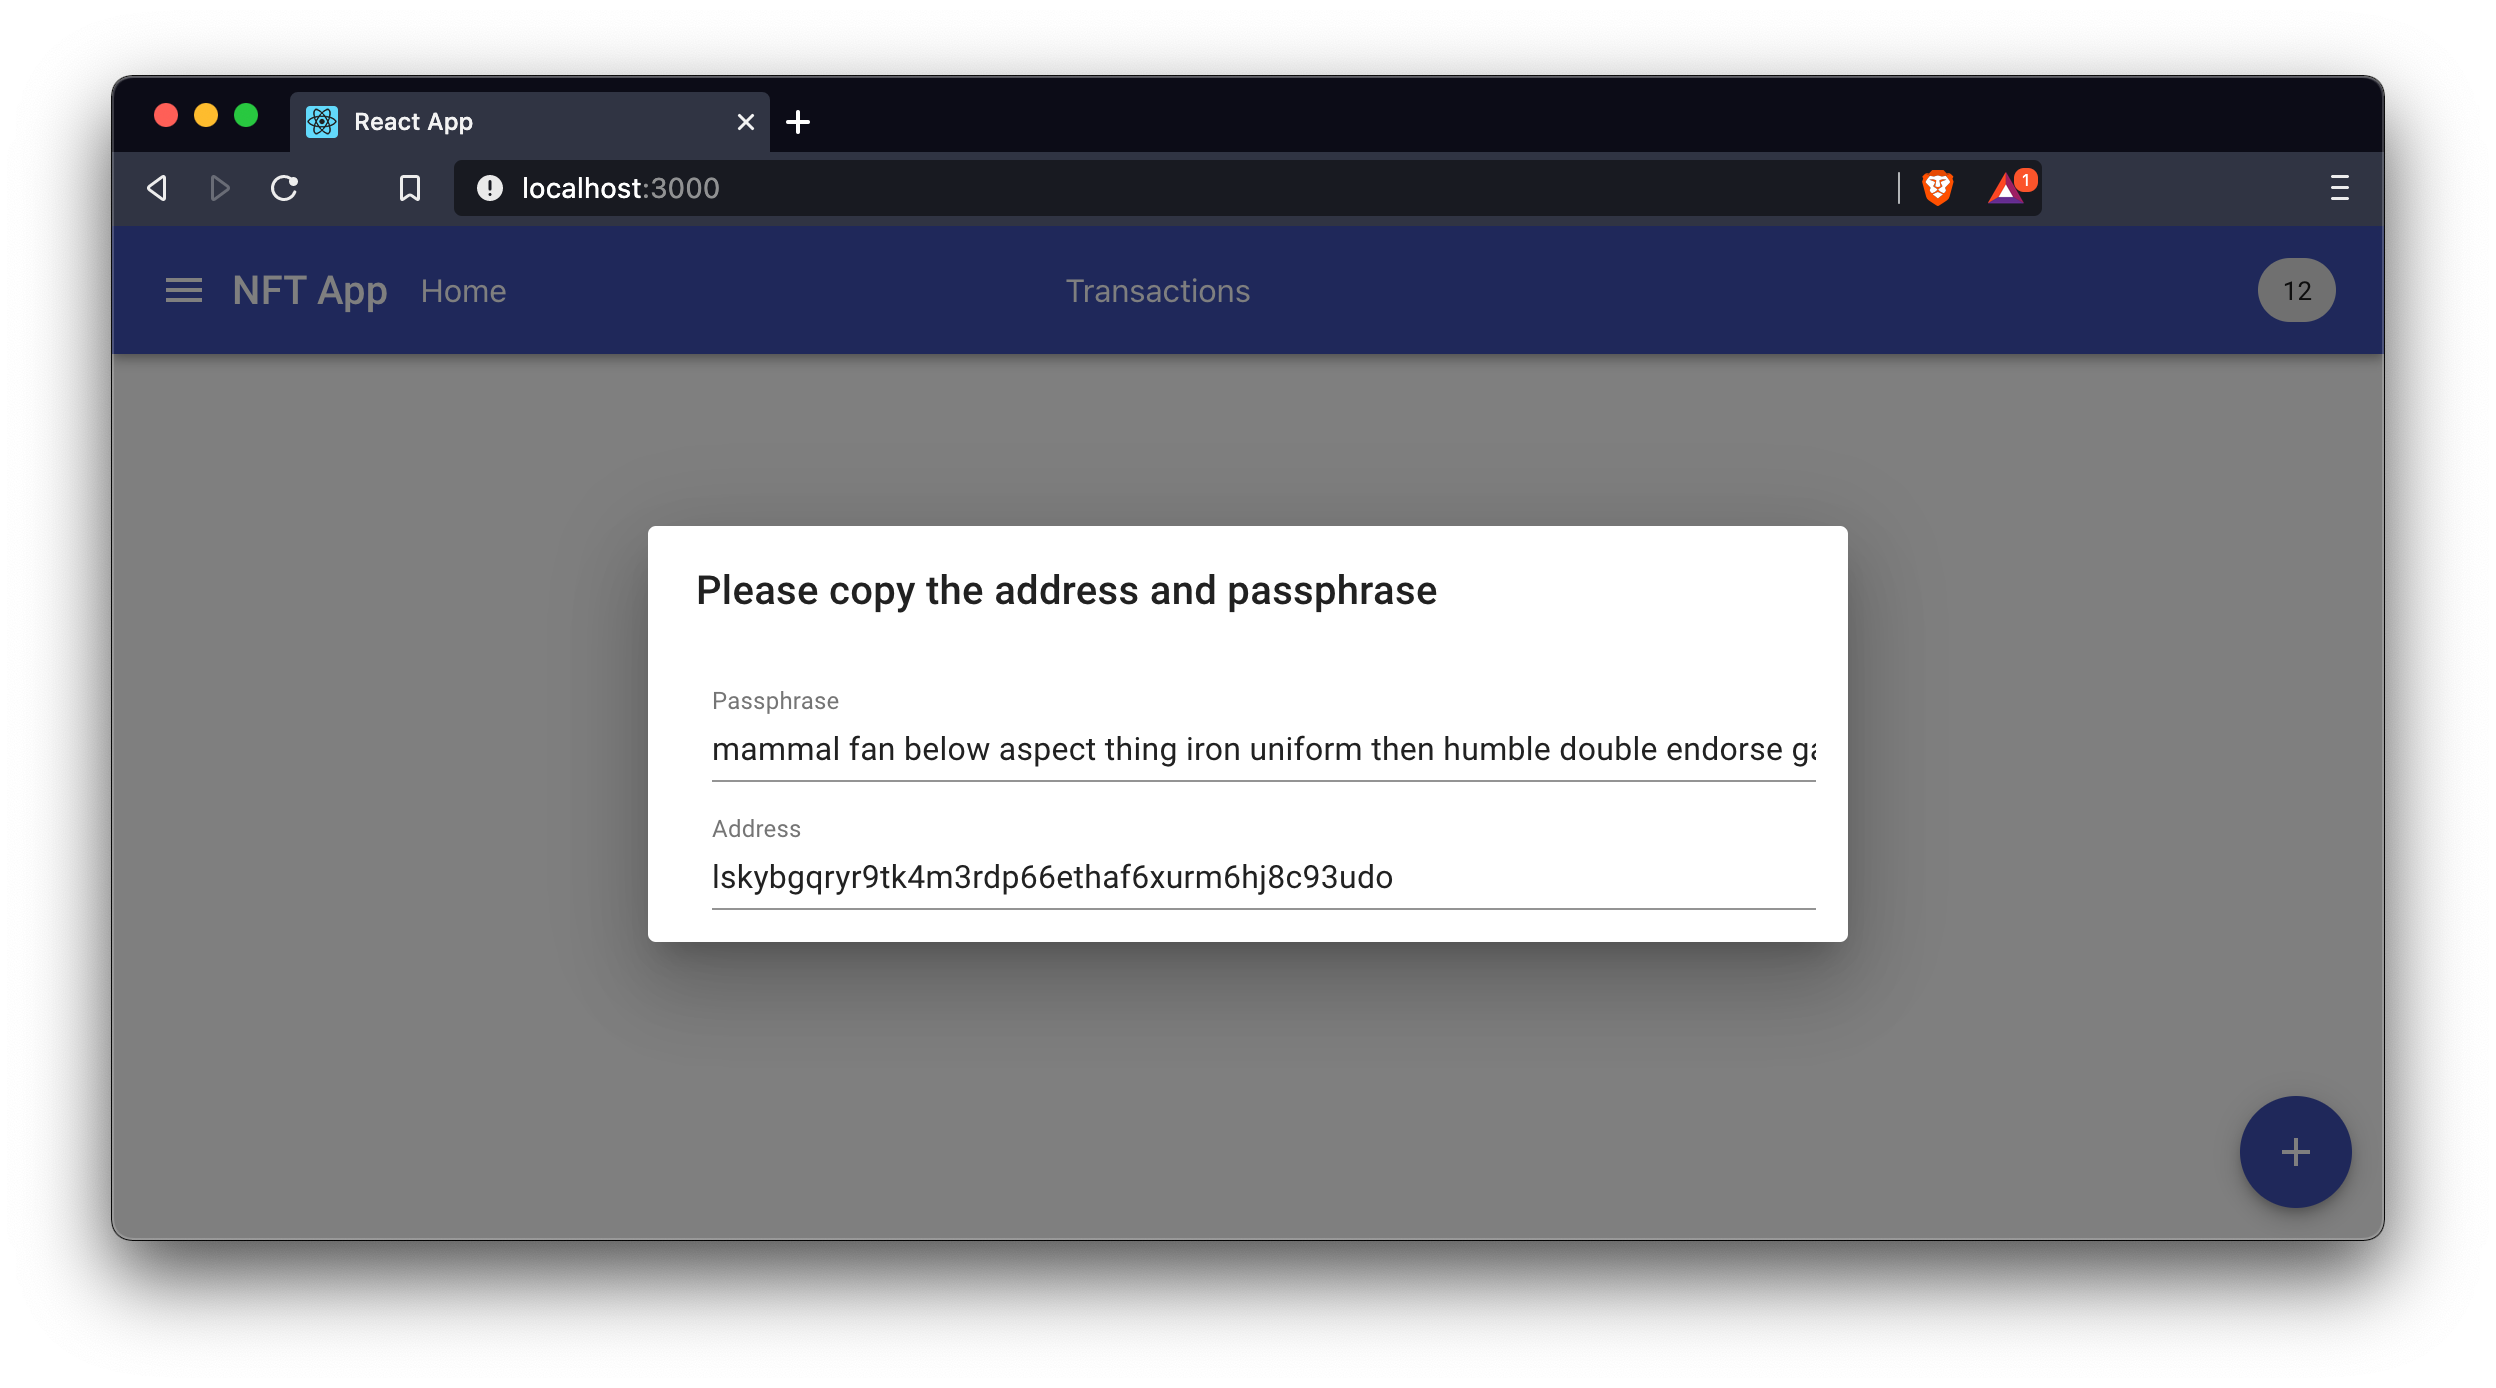
================================However, you can also create new credentials by using the Create Account dialog:
7.1.1. The home page
The home page is the landing page you see when opening the frontend app under http://localhost:3000/ in the browser.
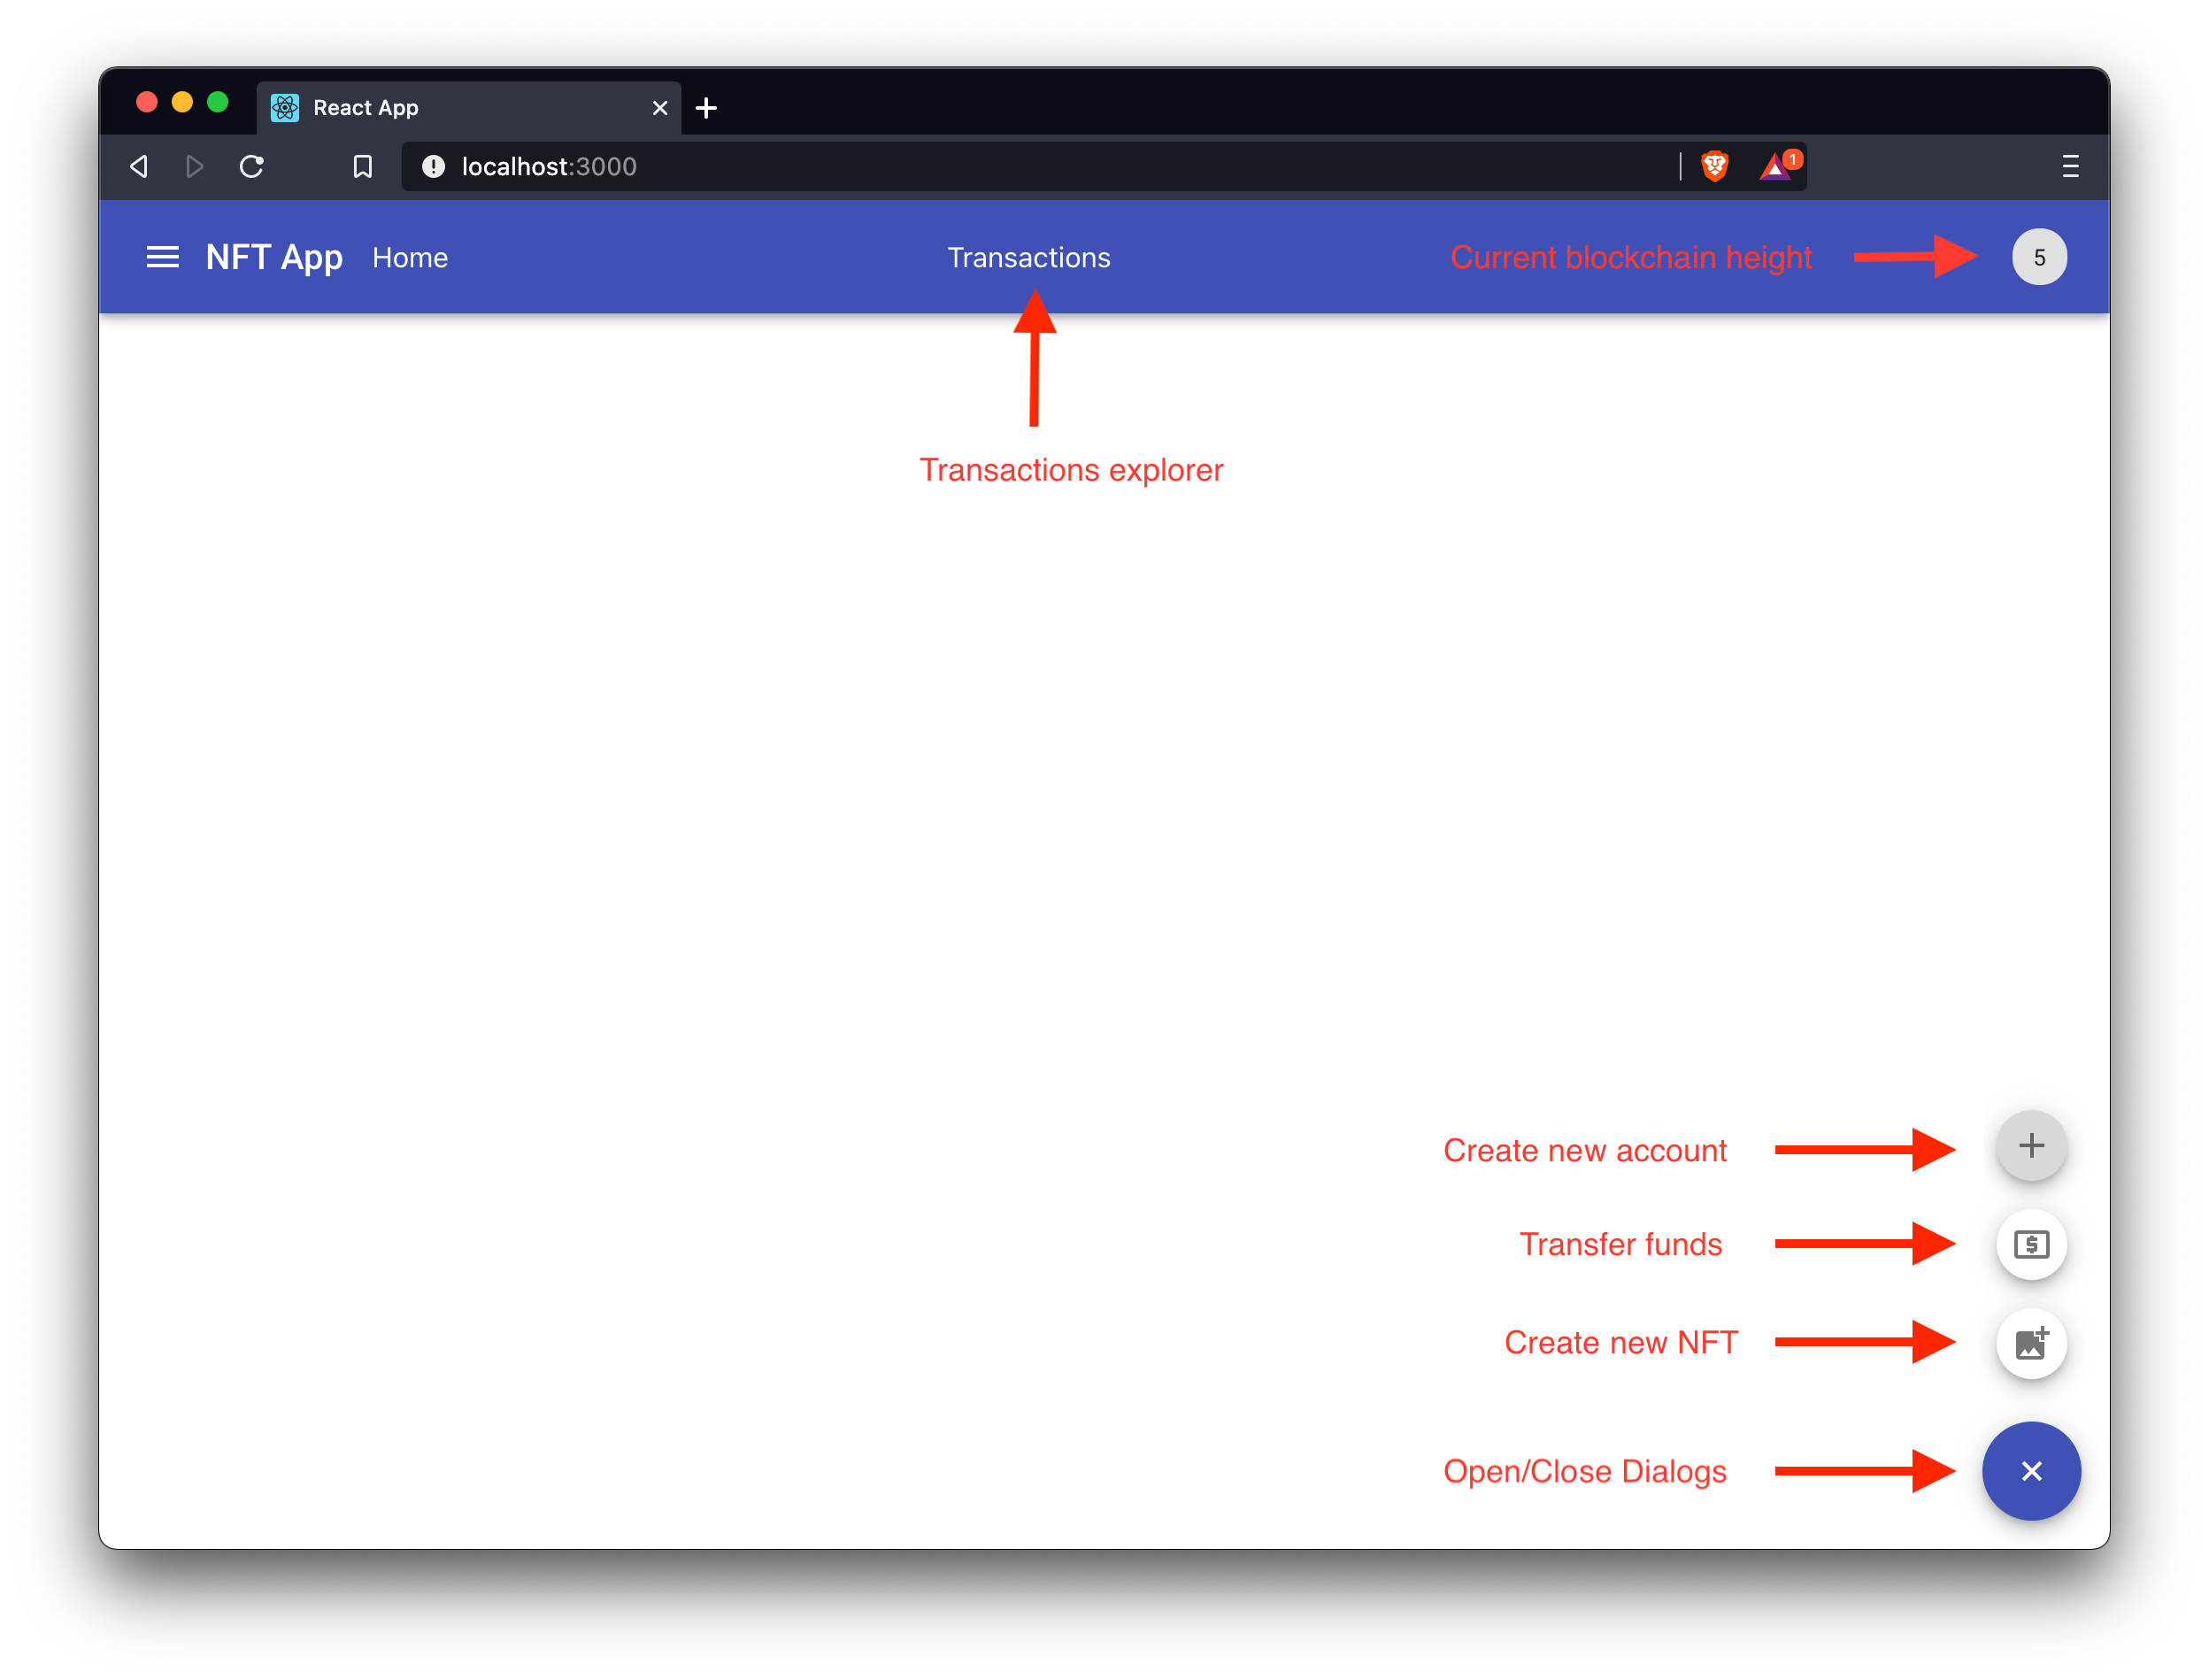
On the first start of the app, the page is quite empty. However, once we have created the first NFTs, the home page will display all existing NFTs and their details.
In the top bar there is a link to the transactions explorer, which displays a list of all transactions which are included in the blockchain. Currently, it should also be empty as we haven’t sent any transactions yet.
On the bottom right, there is a button that can be used for opening the different dialogs for creating a new account, transferring tokens from one account to another, and most importantly, for creating new NFTs.
To be able to create and purchase a new NFT, an account needs to have some tokens in the account balance. Therefore, we first need to transfer some tokens to the created accounts.
7.1.2. Transferring funds
Click on the Transfer tokens dialog and transfer an adequate amount of tokens to the above described demo accounts.
In our example, we transferred 2000 tokens to the artist account and 1000 tokens each to the collector accounts.
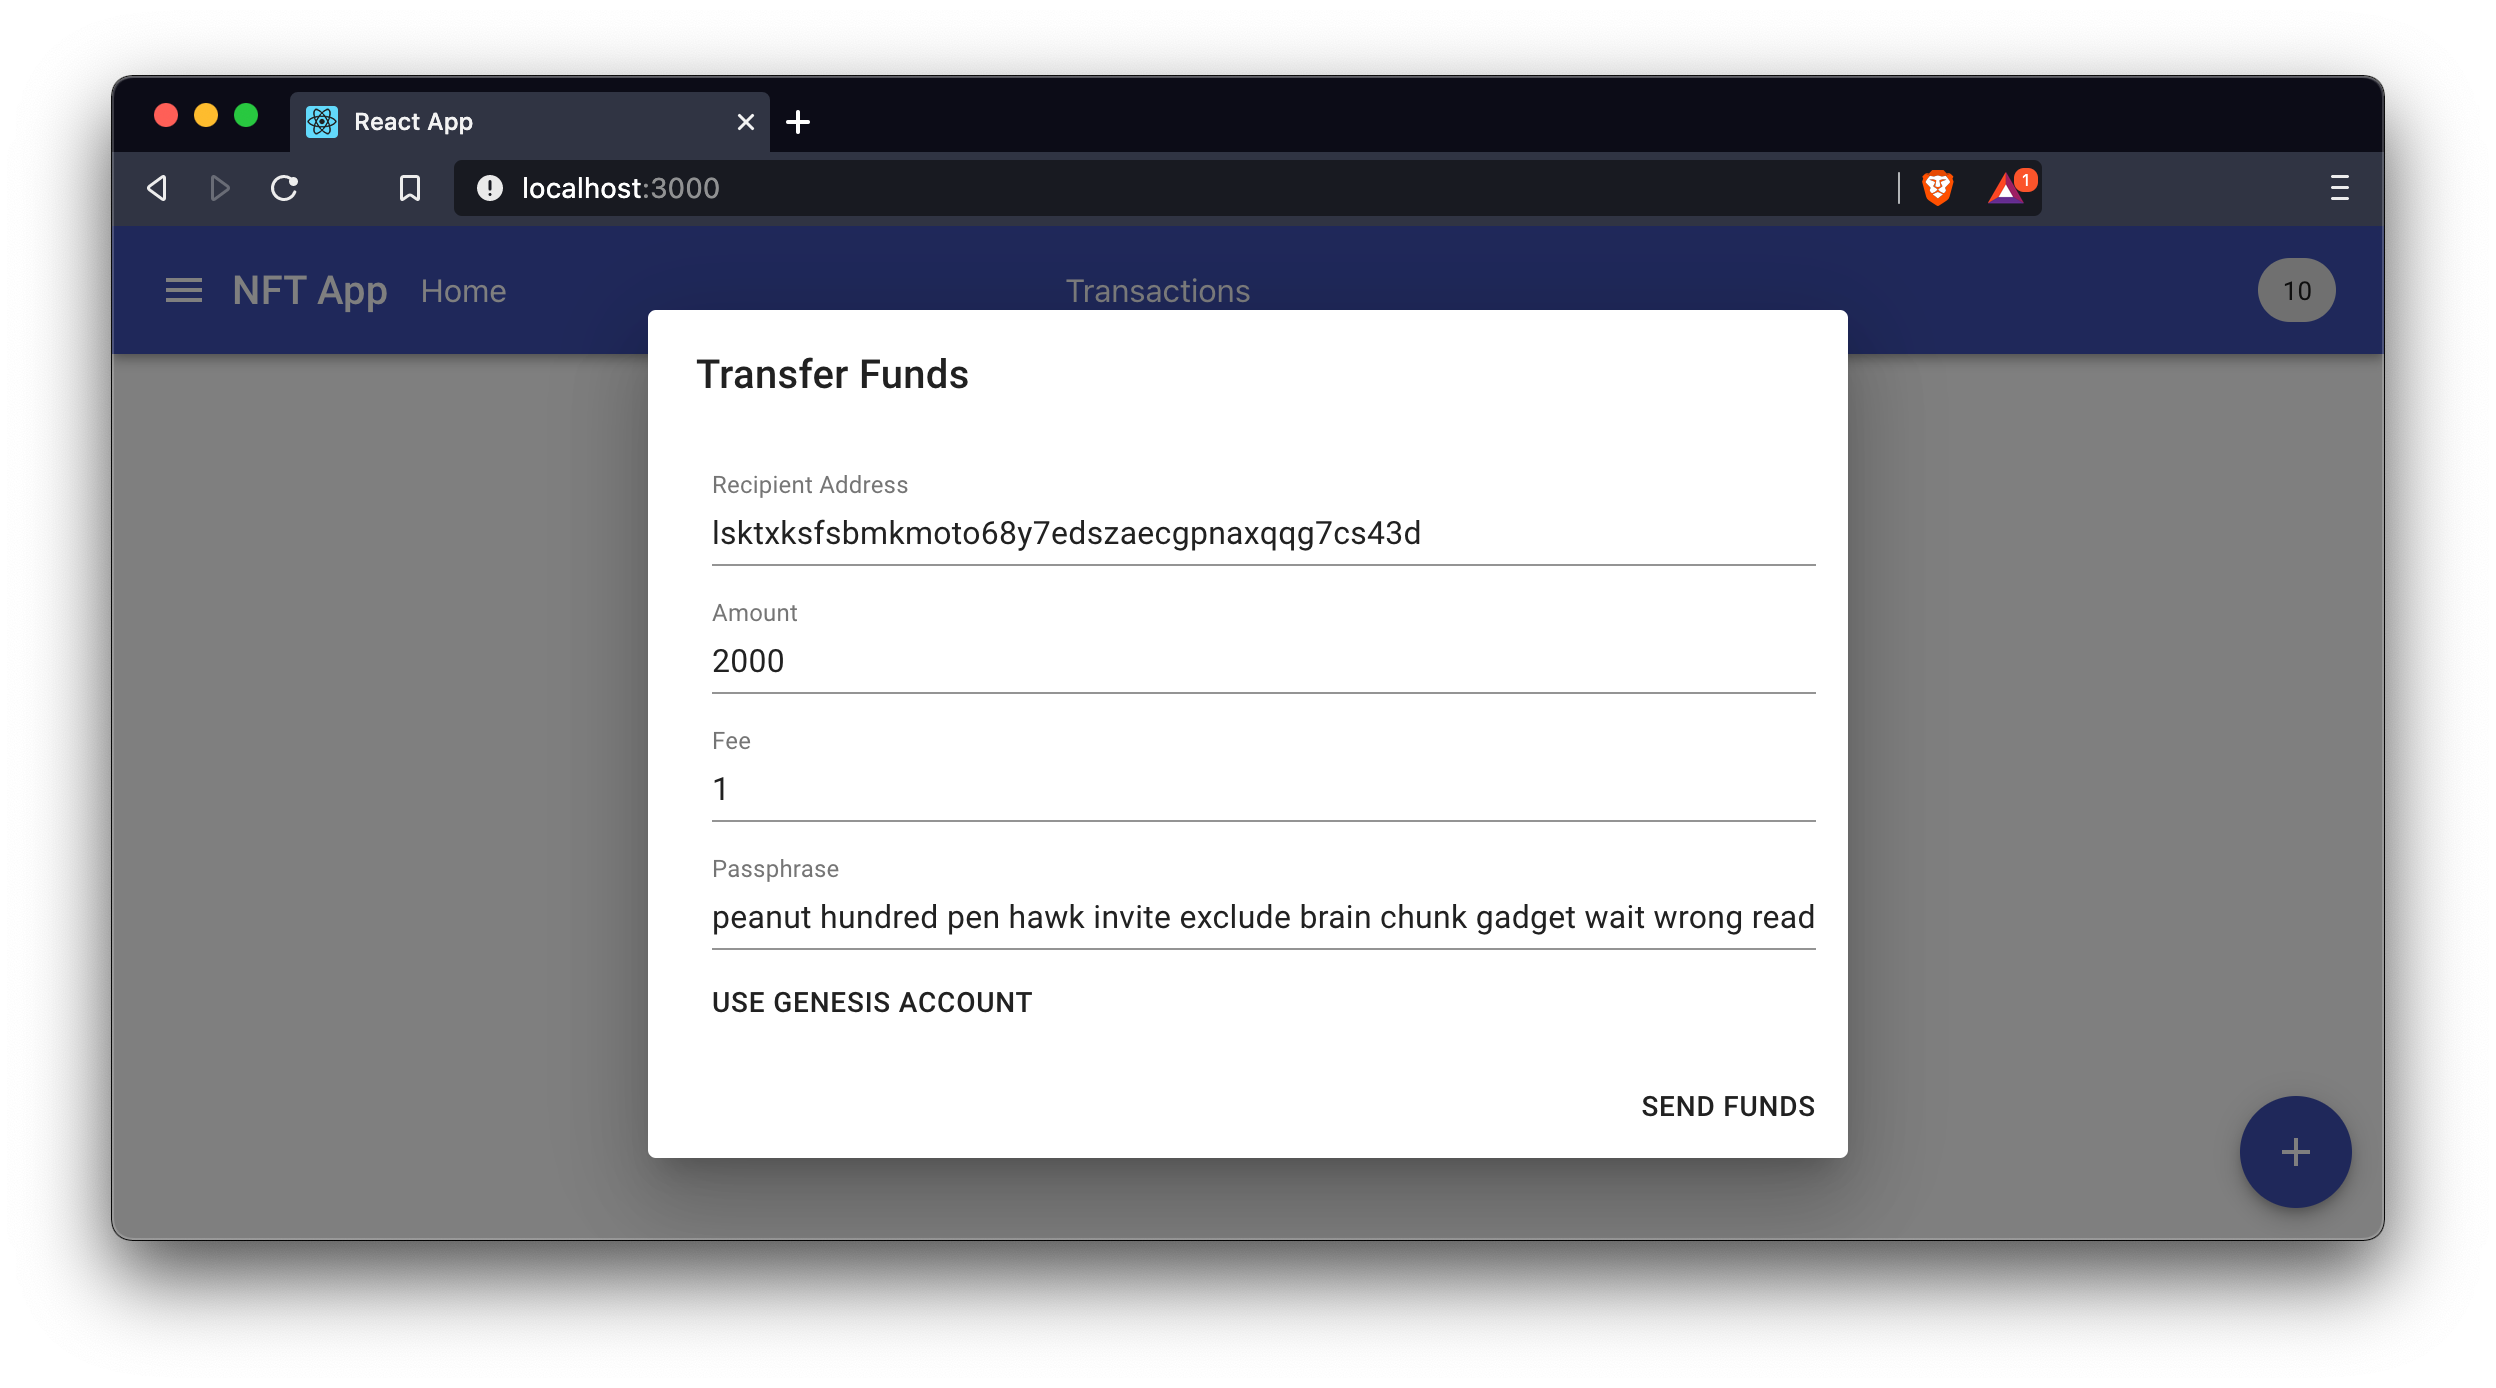
For the passphrase, use the passphrase of the genesis account, by clicking on the button Use genesis account.
Now click on Send funds.
This will send the specified tokens from the genesis account to the specified account in the Recipient Address field.
This will post a corresponding transfer transaction to the blockchain application.
It is possible to verify the transaction was included in a block by observing the logs of the blockchain application:
15:20:56 INFO lisk-framework: Added transaction to pool (module=lisk:app)
{
 "id": "b9d81d996886f28d2f9fd102c2d8407dc86df941eeea0b03c004080e0f100f27",
 "nonce": "0",
 "senderPublicKey": "836d4f07c7db6d10c84394c60549d3f95cf61354e2ab5b0965a3fe7120e2f70d"
}
15:21:00 INFO lisk-framework: New block added to the chain (module=lisk:app)
{
 "id": "f6d2ee7cb0e76938340f0b8a946389d518e7f27c062759f2c78f47d2841a7010",
 "height": 787,
 "numberOfTransactions": 1
}
7.1.3. Creating a new NFT
Now that all accounts have some tokens in their account balance, use the artist account passphrase to create a new NFT.
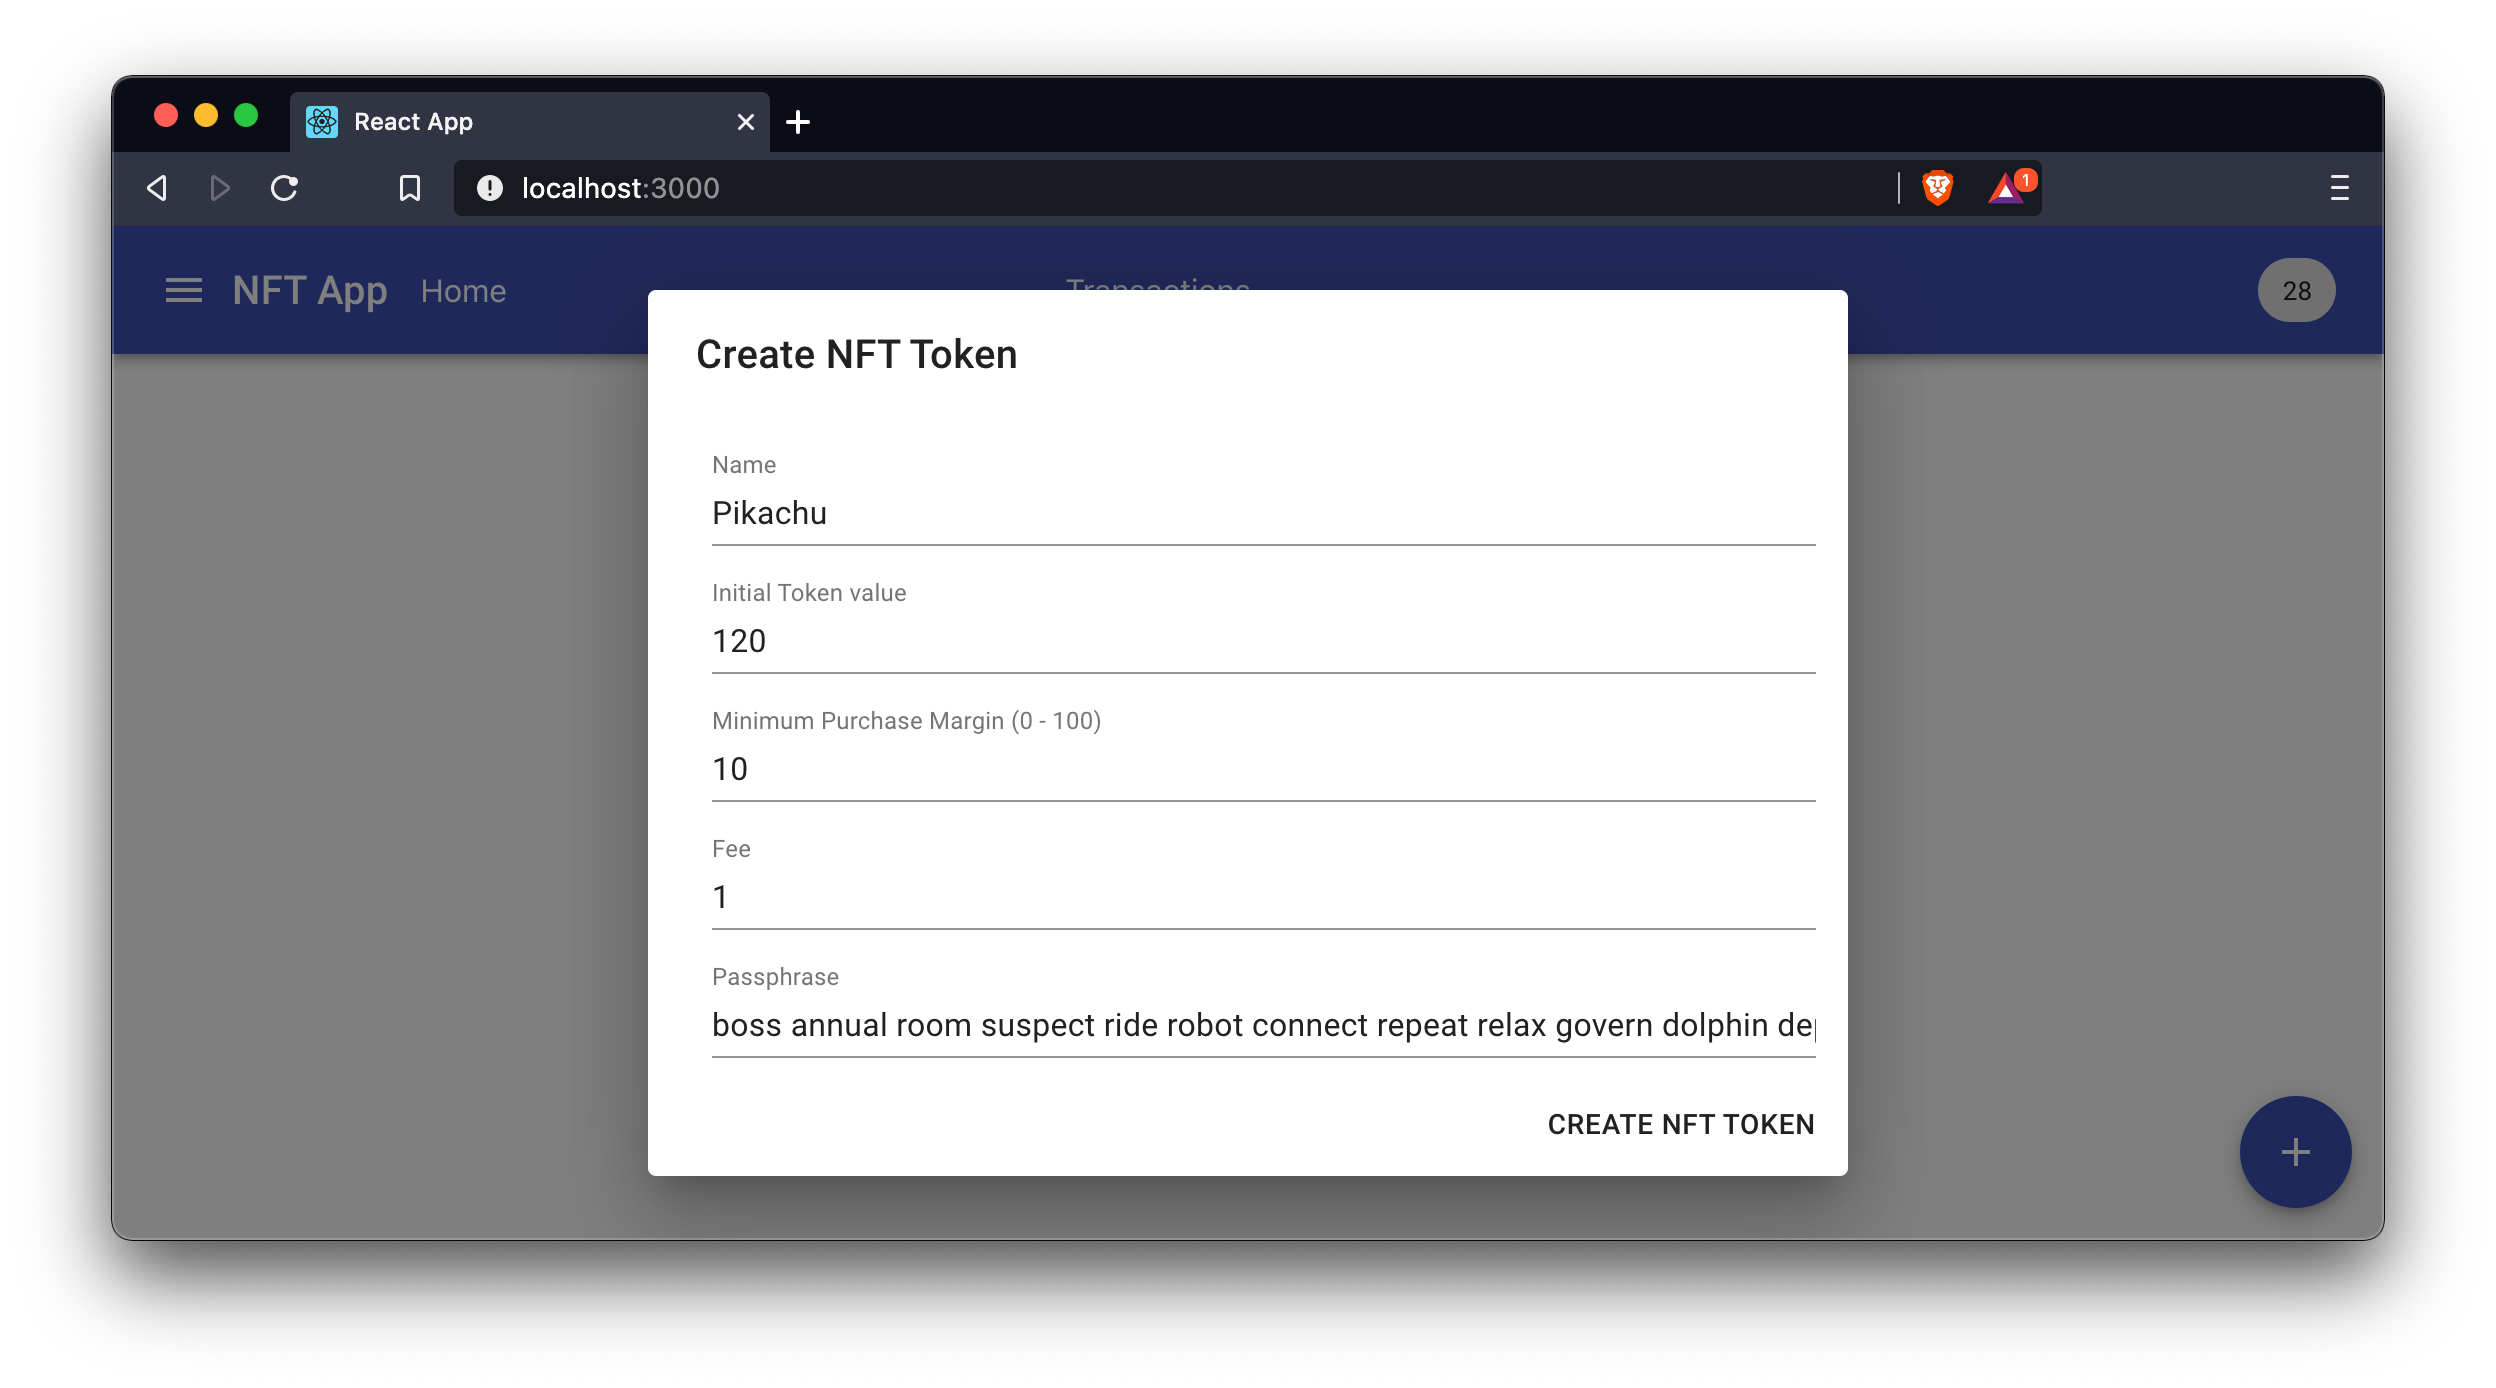
After approximately 10 seconds, the NFT should appear on the home page, after refreshing the page.
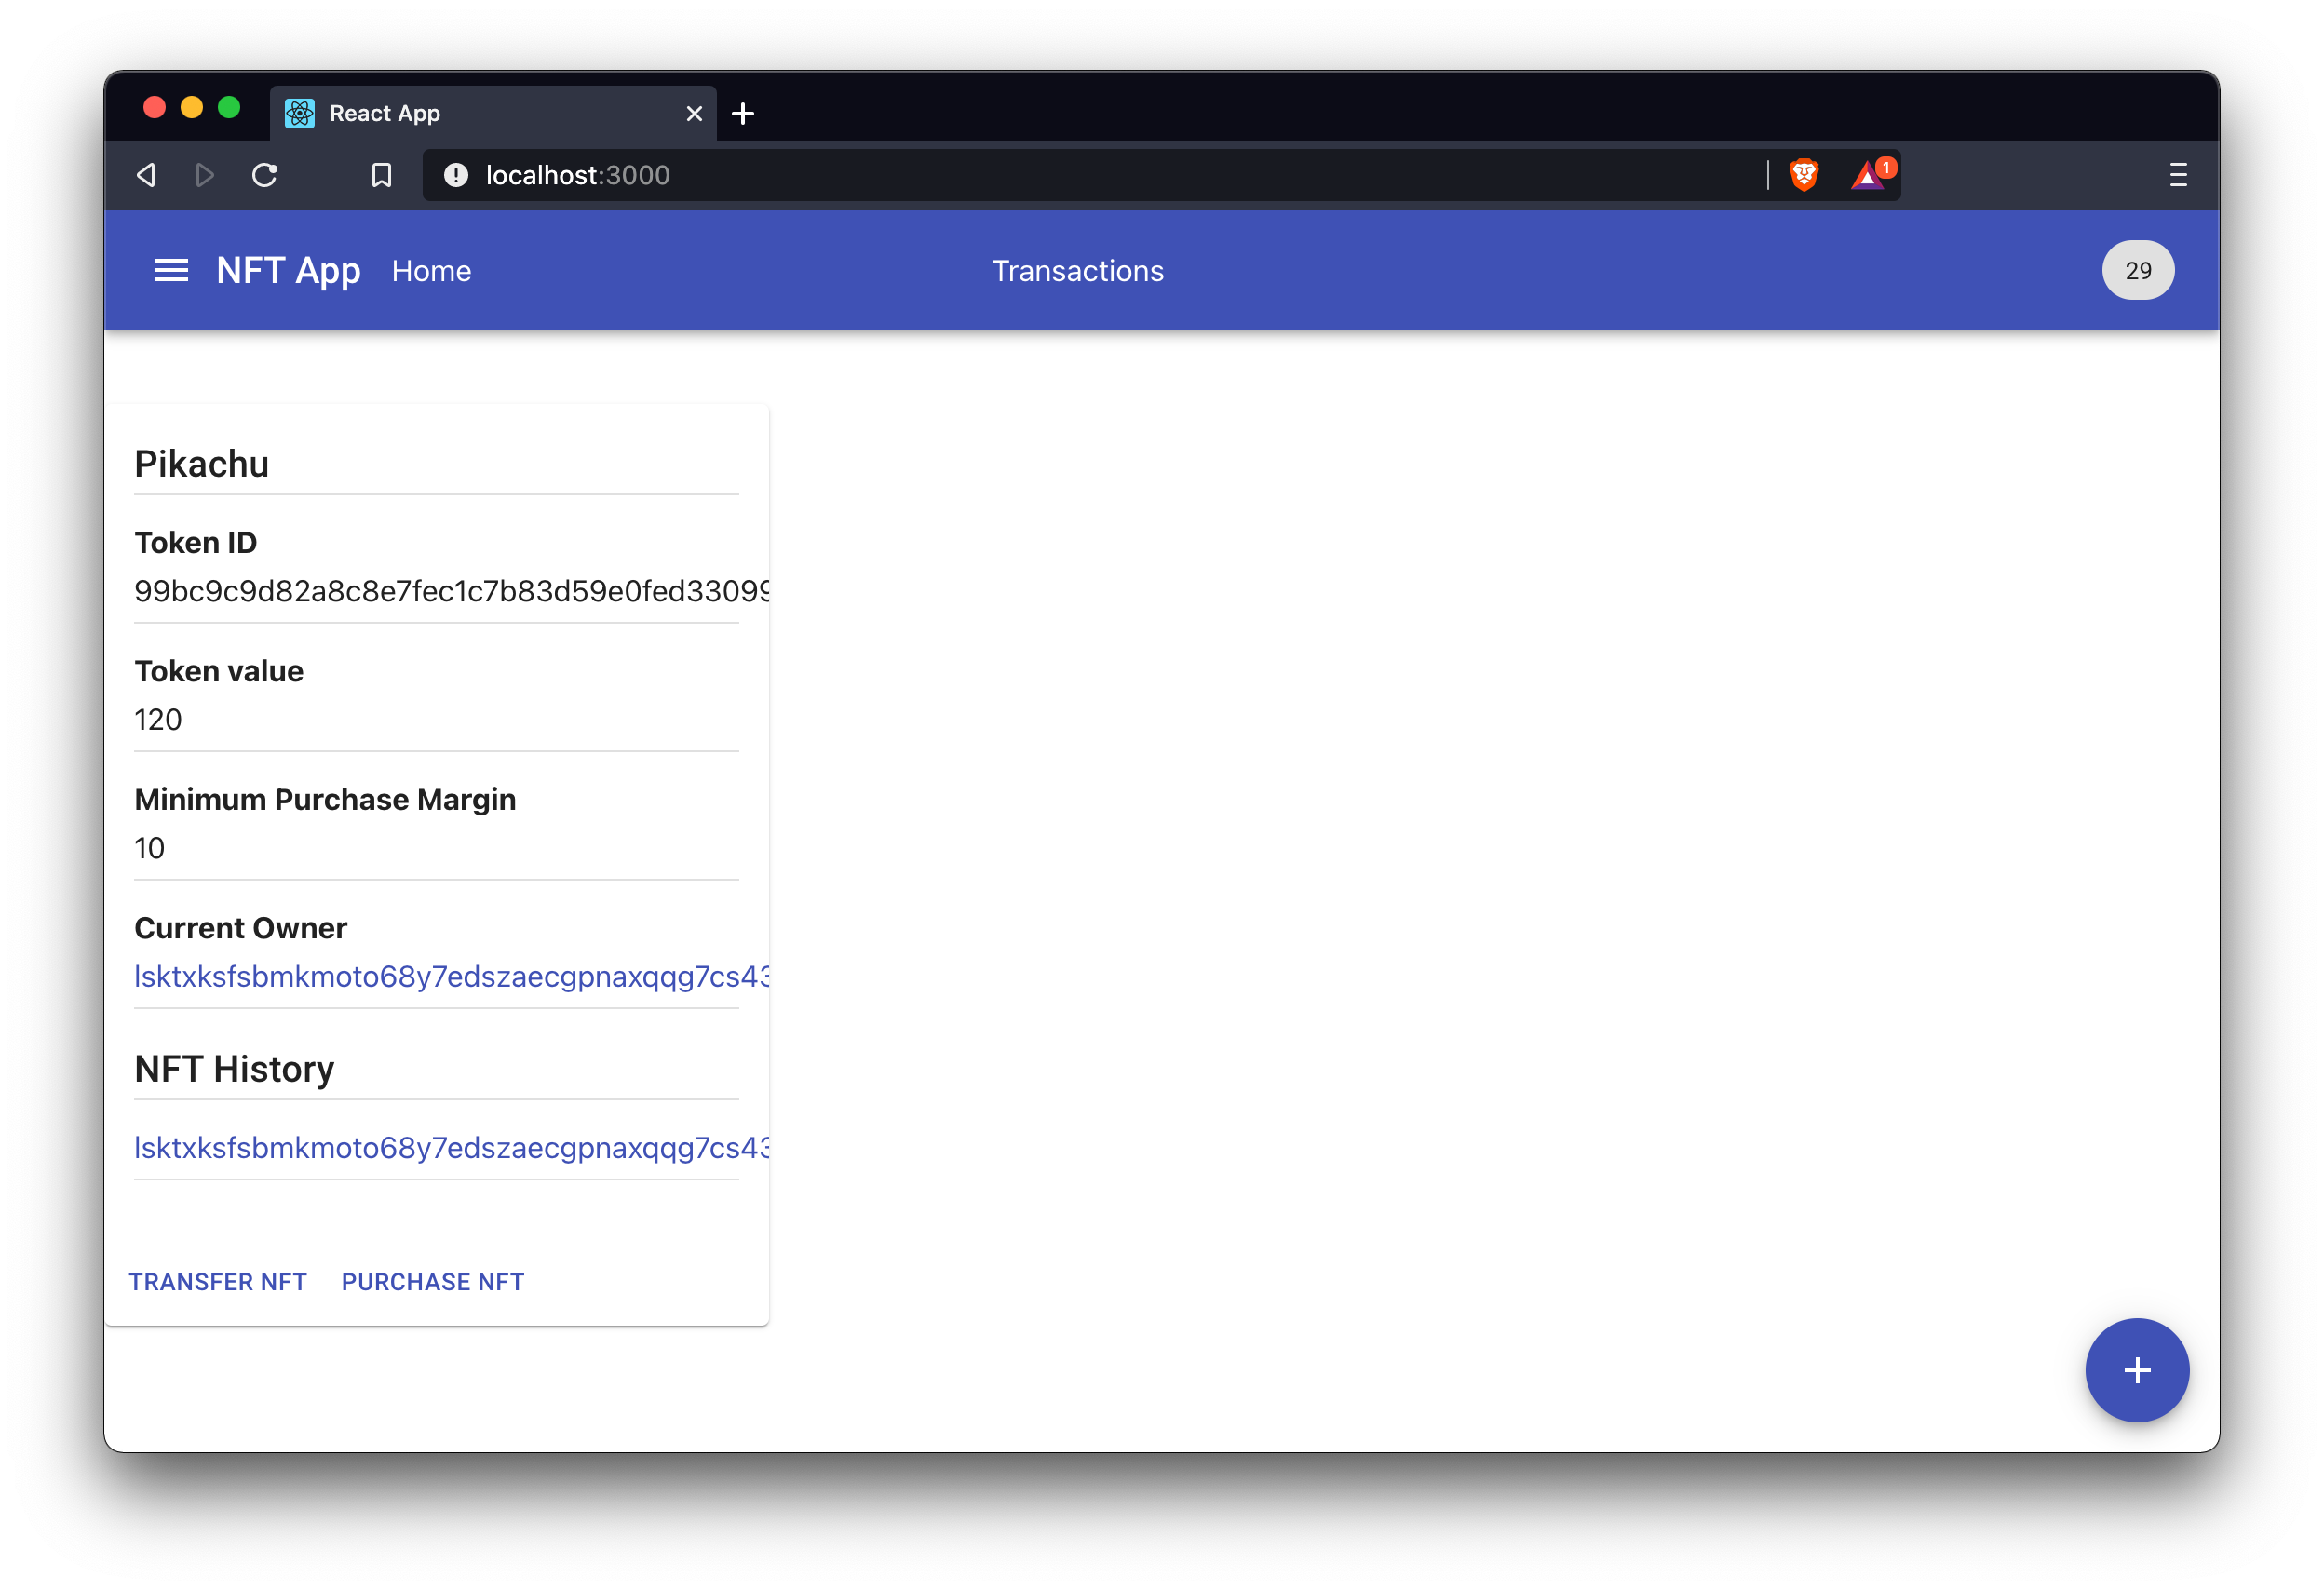
At the bottom of the NFT card, the user now has the option to transfer or purchase the NFT.
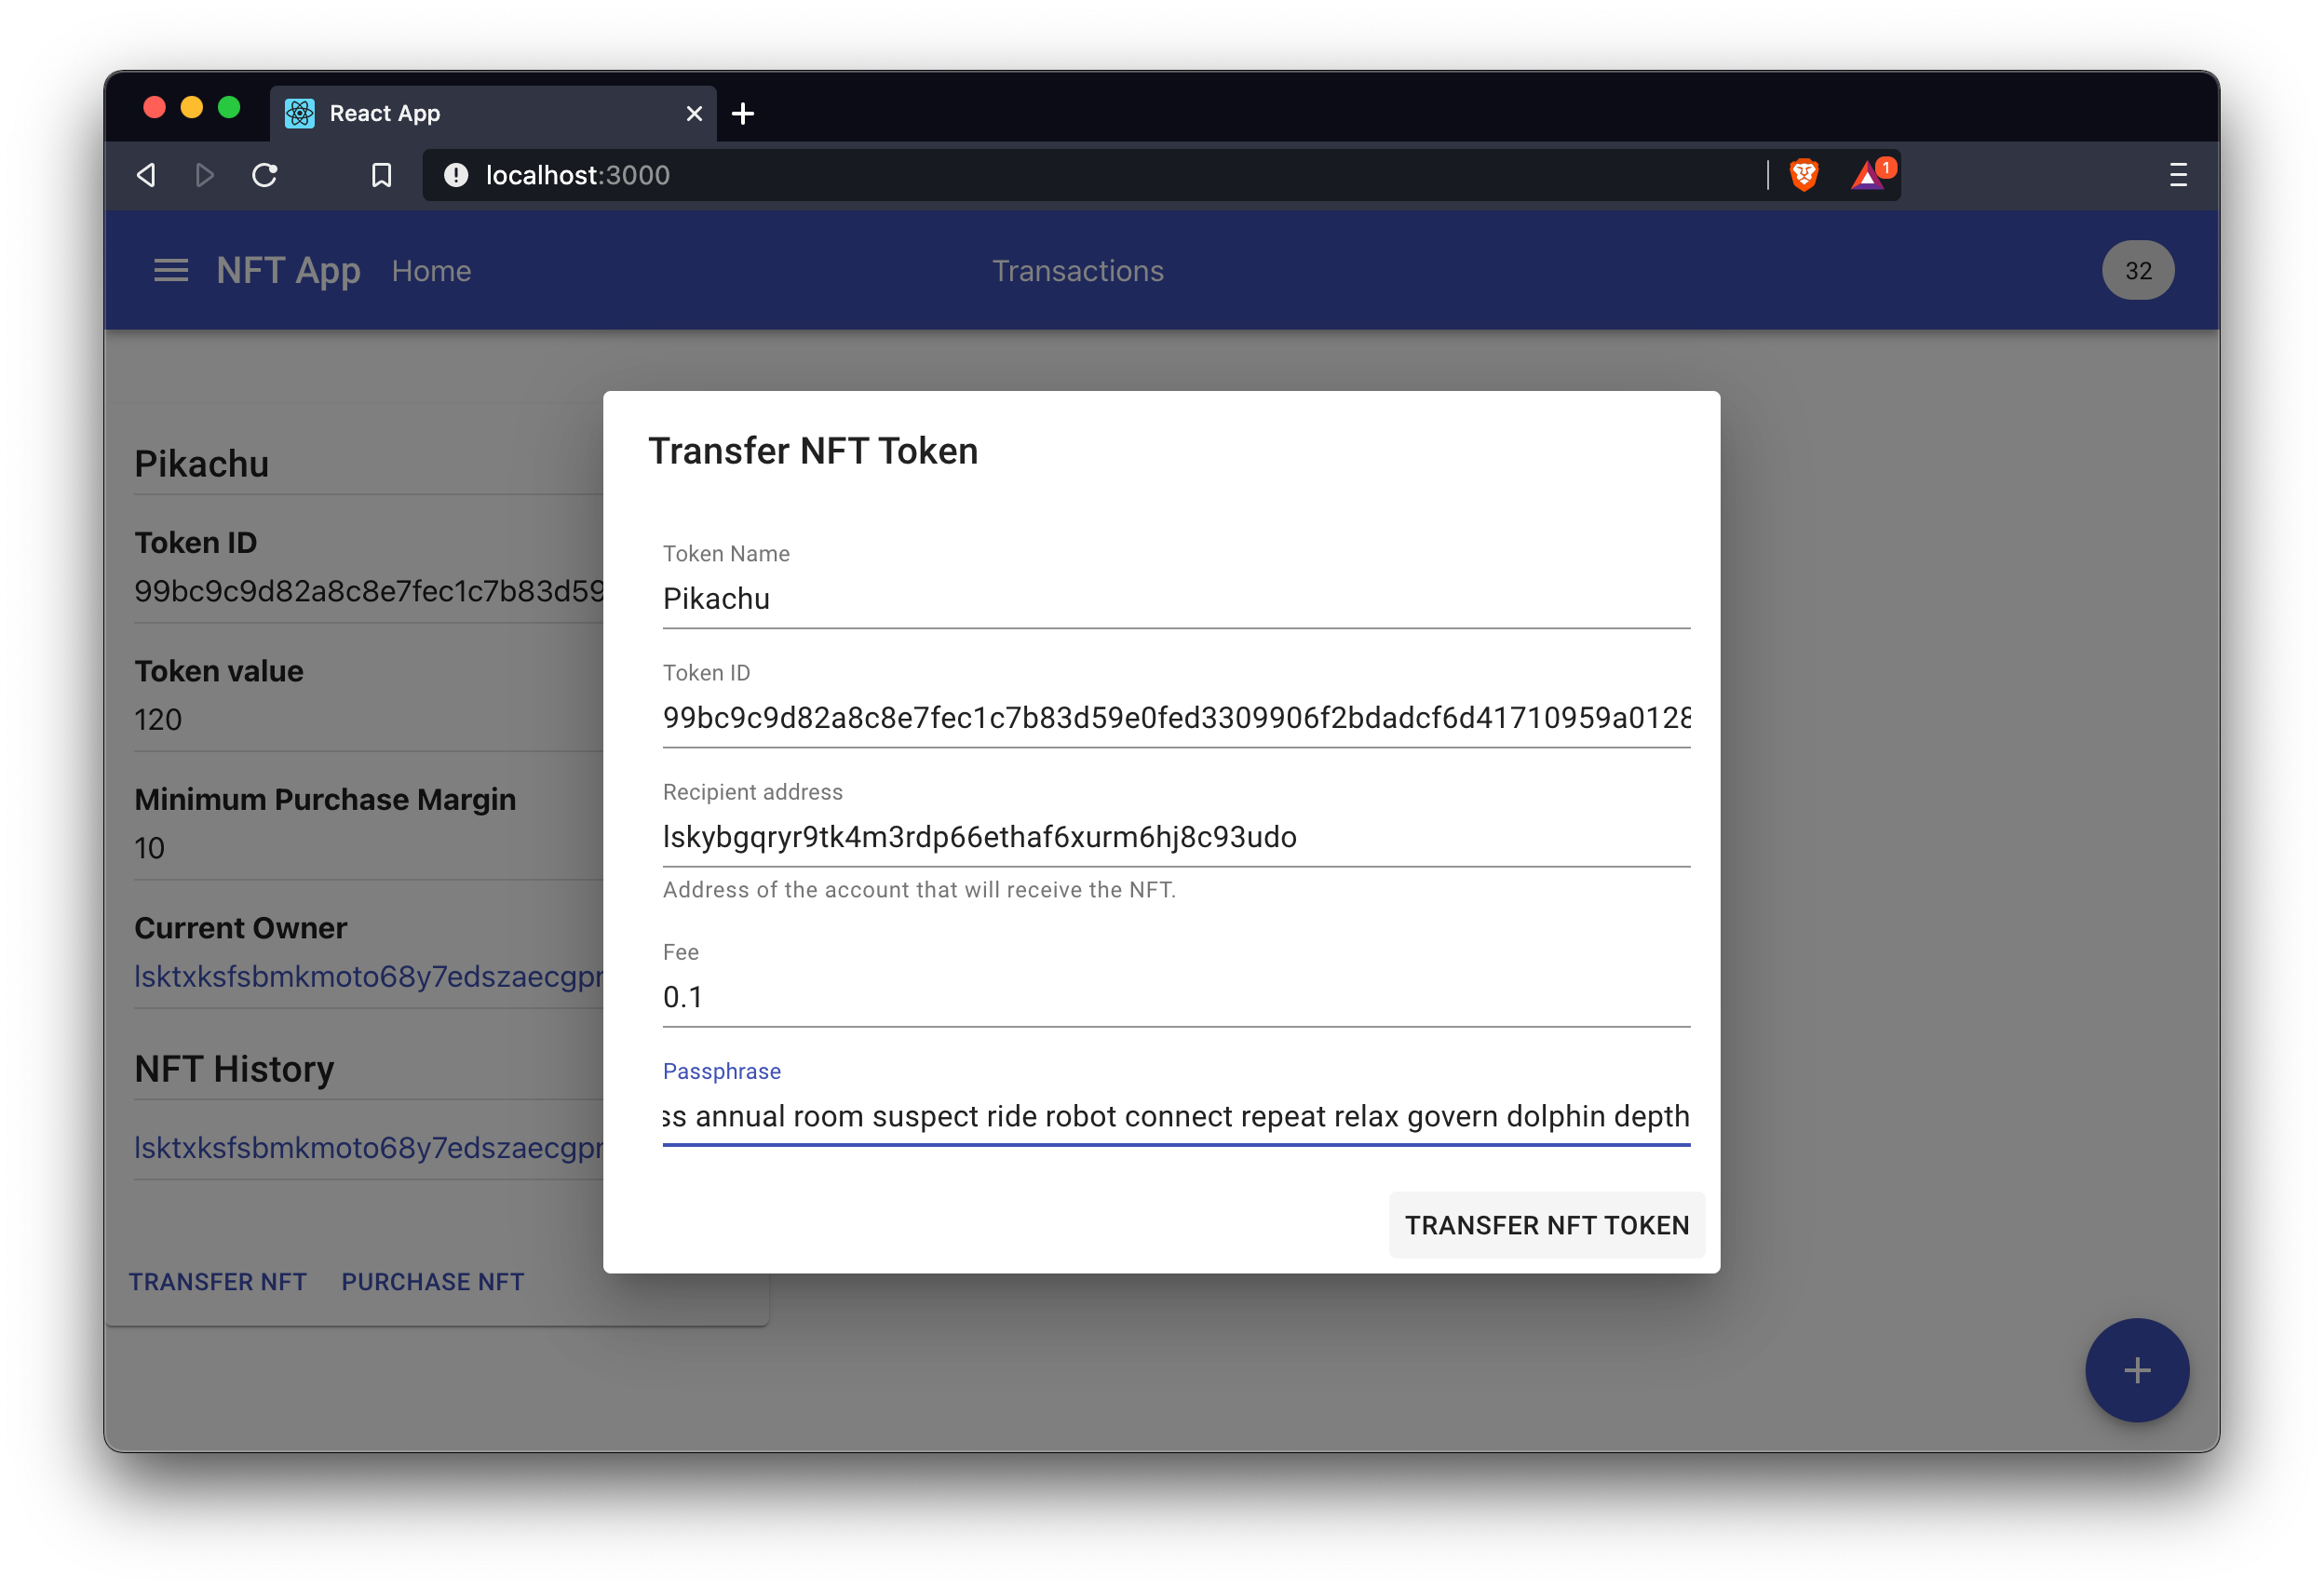
7.1.4. Transferring an NFT
To test the Transfer NFT option, transfer the NFT now to the Collector1 account:
|
You must use the passphrase of the current owner of the NFT to sign this transaction. If a different account than the owner tries to transfer the NFT, the application will throw an error |
Now wait 10 seconds and refresh the home page again, to see the updated owner and history of the NFT.

7.1.5. Purchasing an NFT
To test the Purchase NFT option, purchase the NFT with the Collector2 account:

Now wait again 10 seconds, to see the updated owner and history of the NFT.
Click on the account addresses in the NFT history, to view the account details of the corresponding account on a new page:
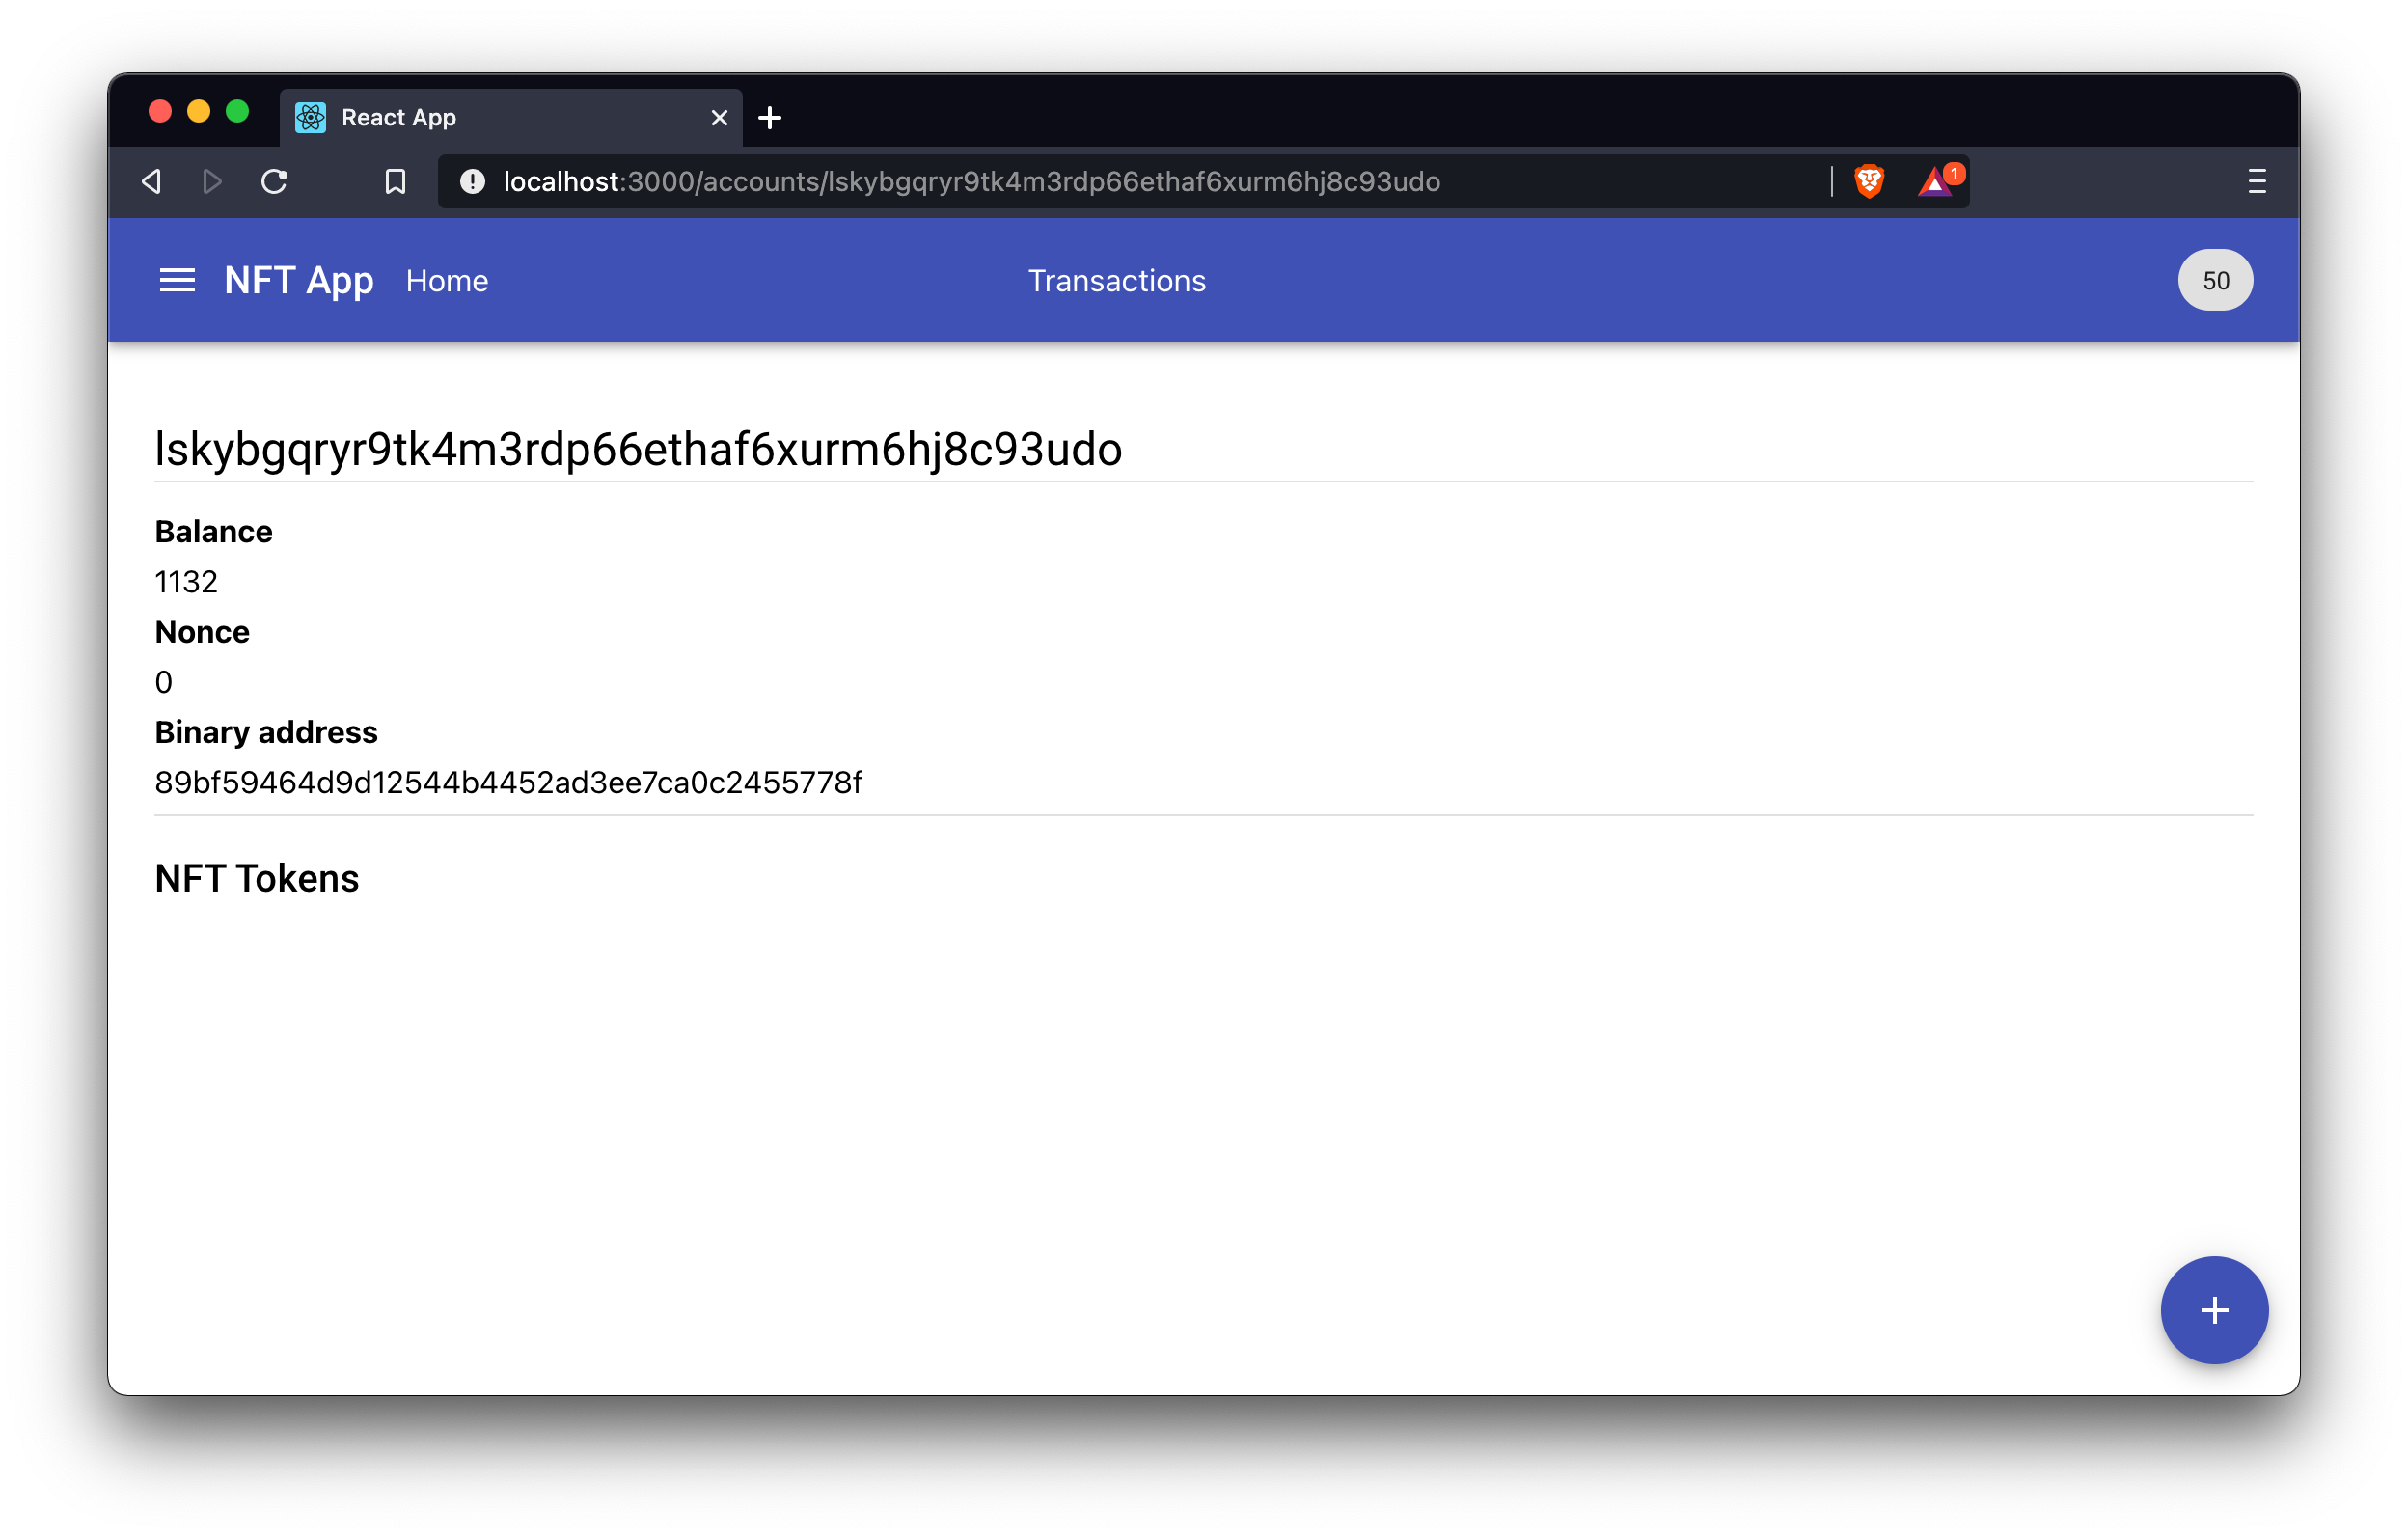

On the account page of Collector2, the NFT is now included.
Have a close look at the Token value property, which has increased from 120 to 132 due to the purchase.
7.1.6. The transactions explorer
Click on the Transactions link in the top bar, to go to the transaction explorer.
Here you can see a list of all transactions, which have been posted in the network so far, including a few details such as their respective module and asset name, the sender address, and the transaction ID.

7.1.7. Creating non-purchasable NFTs
To become more familiar with the process, play around a little more with the NFT app by creating more NFTs.
For example, it is also possible to create non-purchasable NFTs by setting the minimum purchase margin to zero.
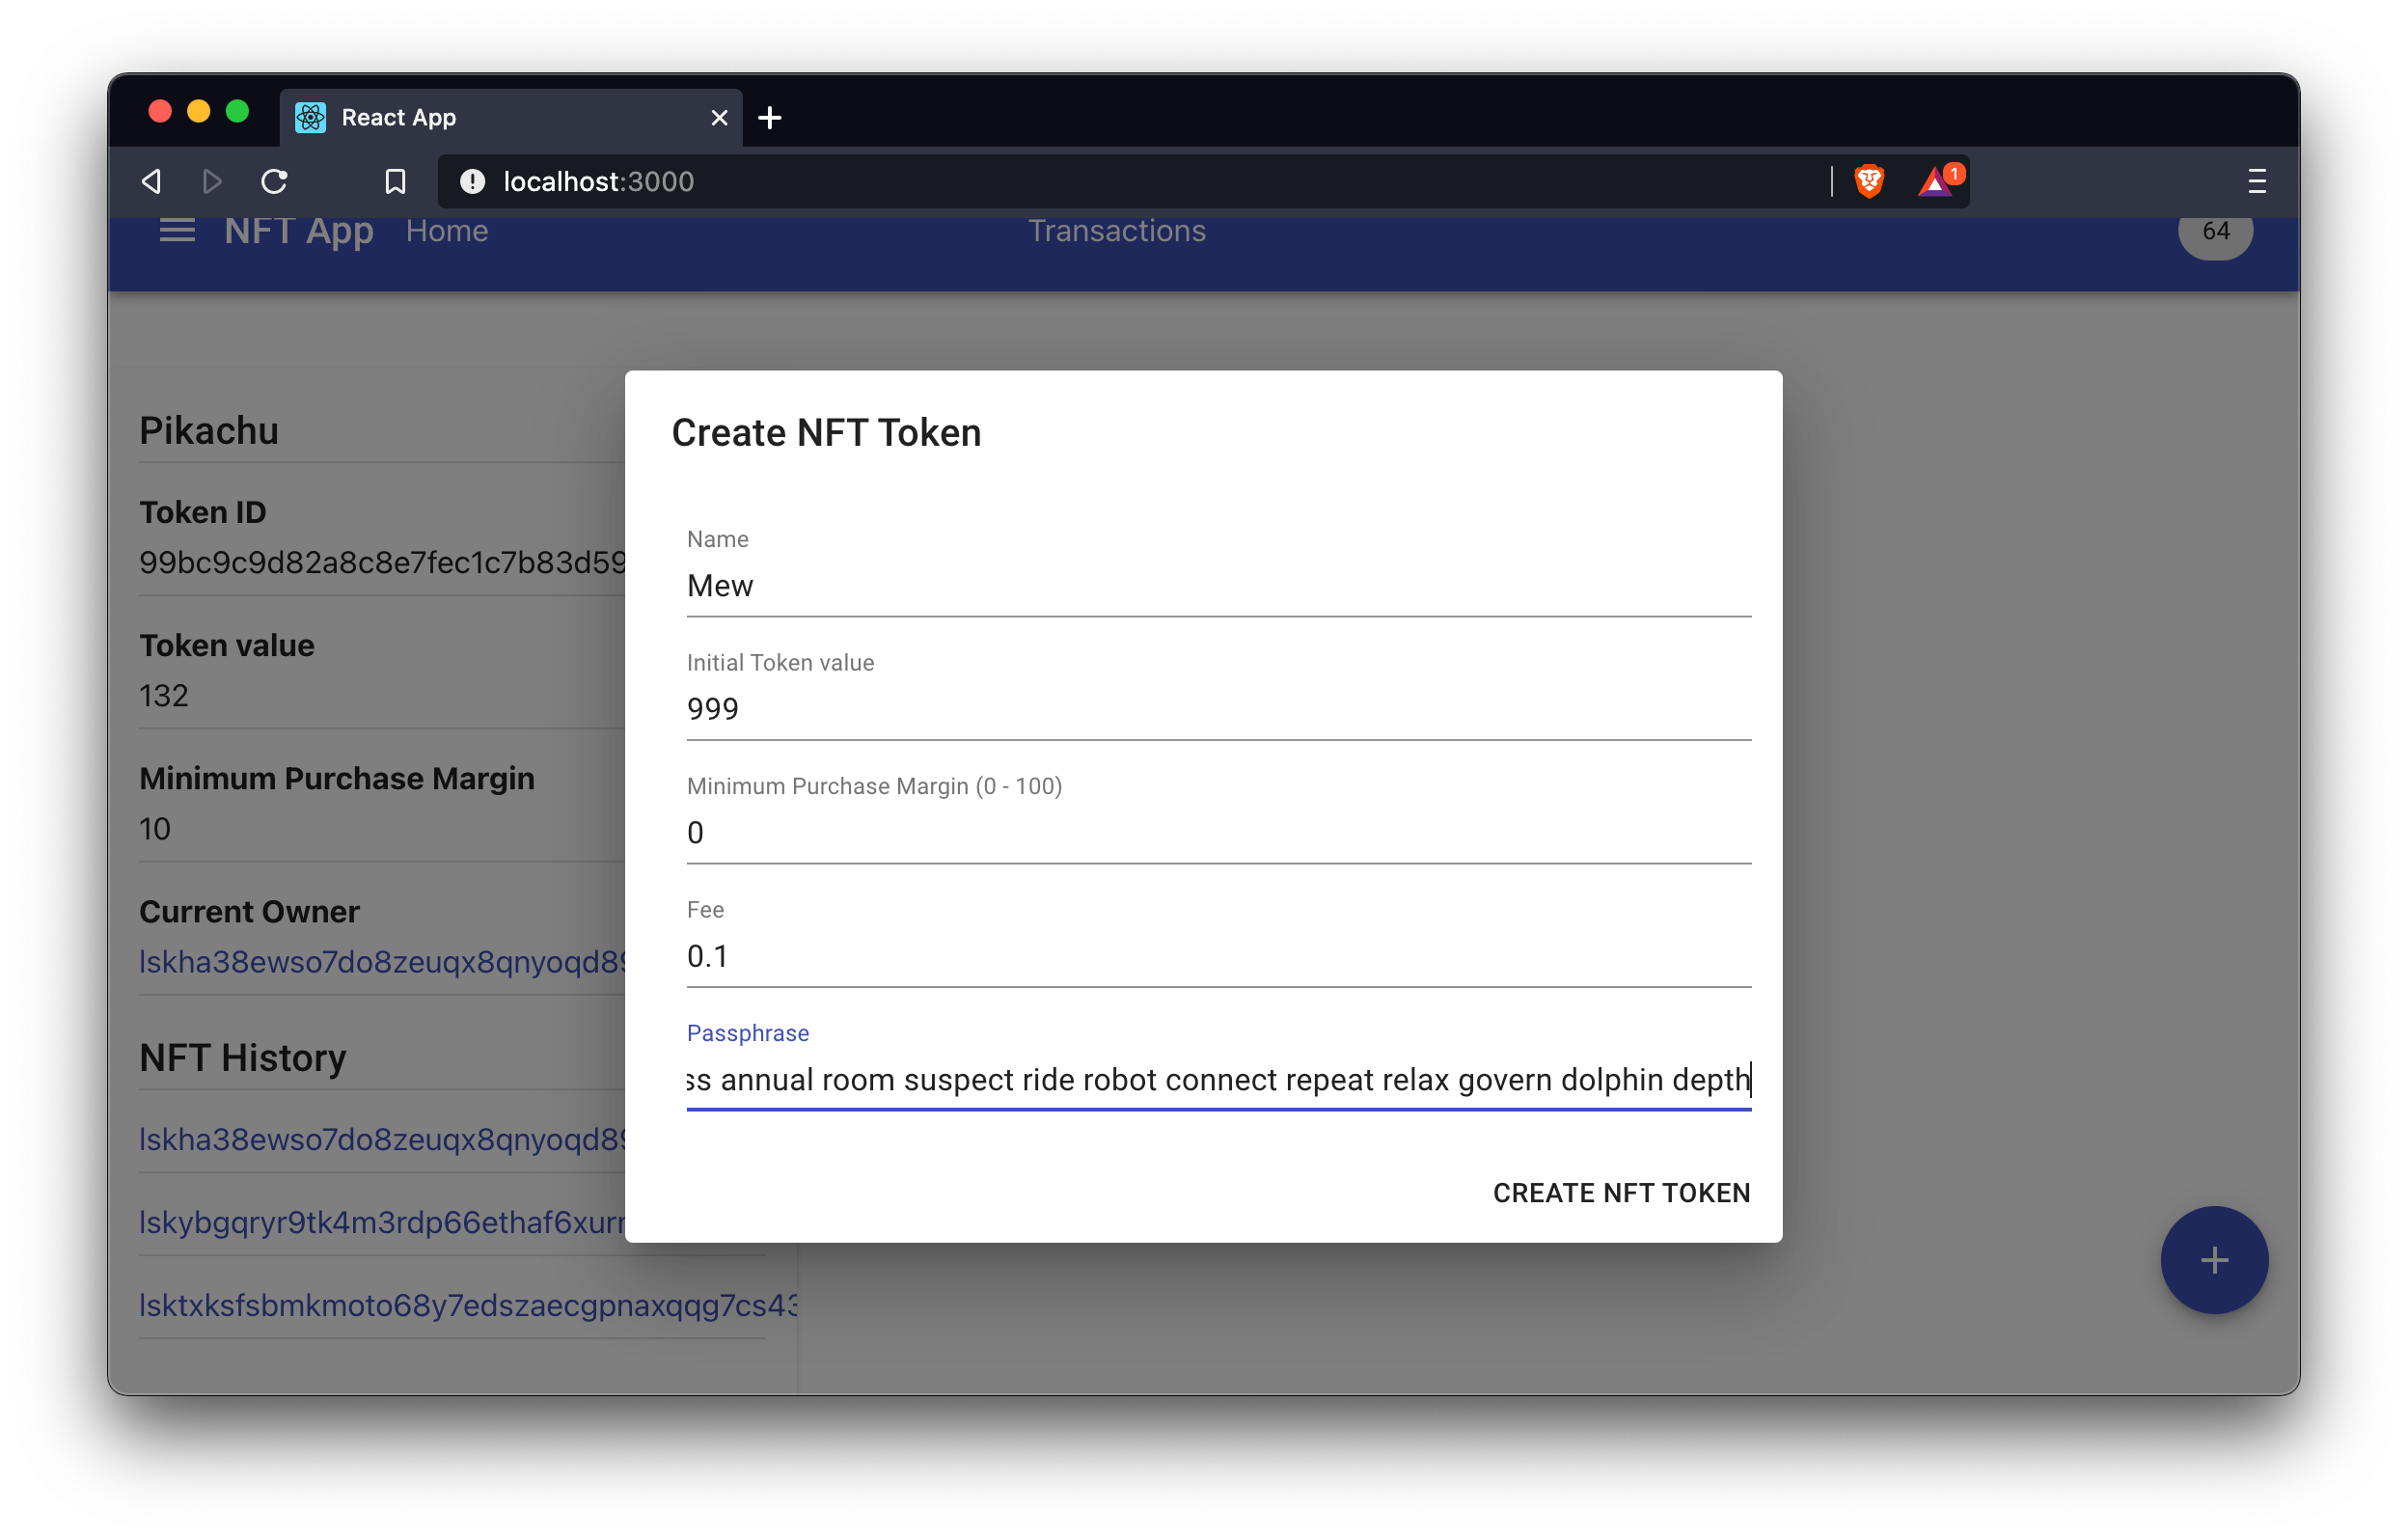
The refreshed home page will then look like this:
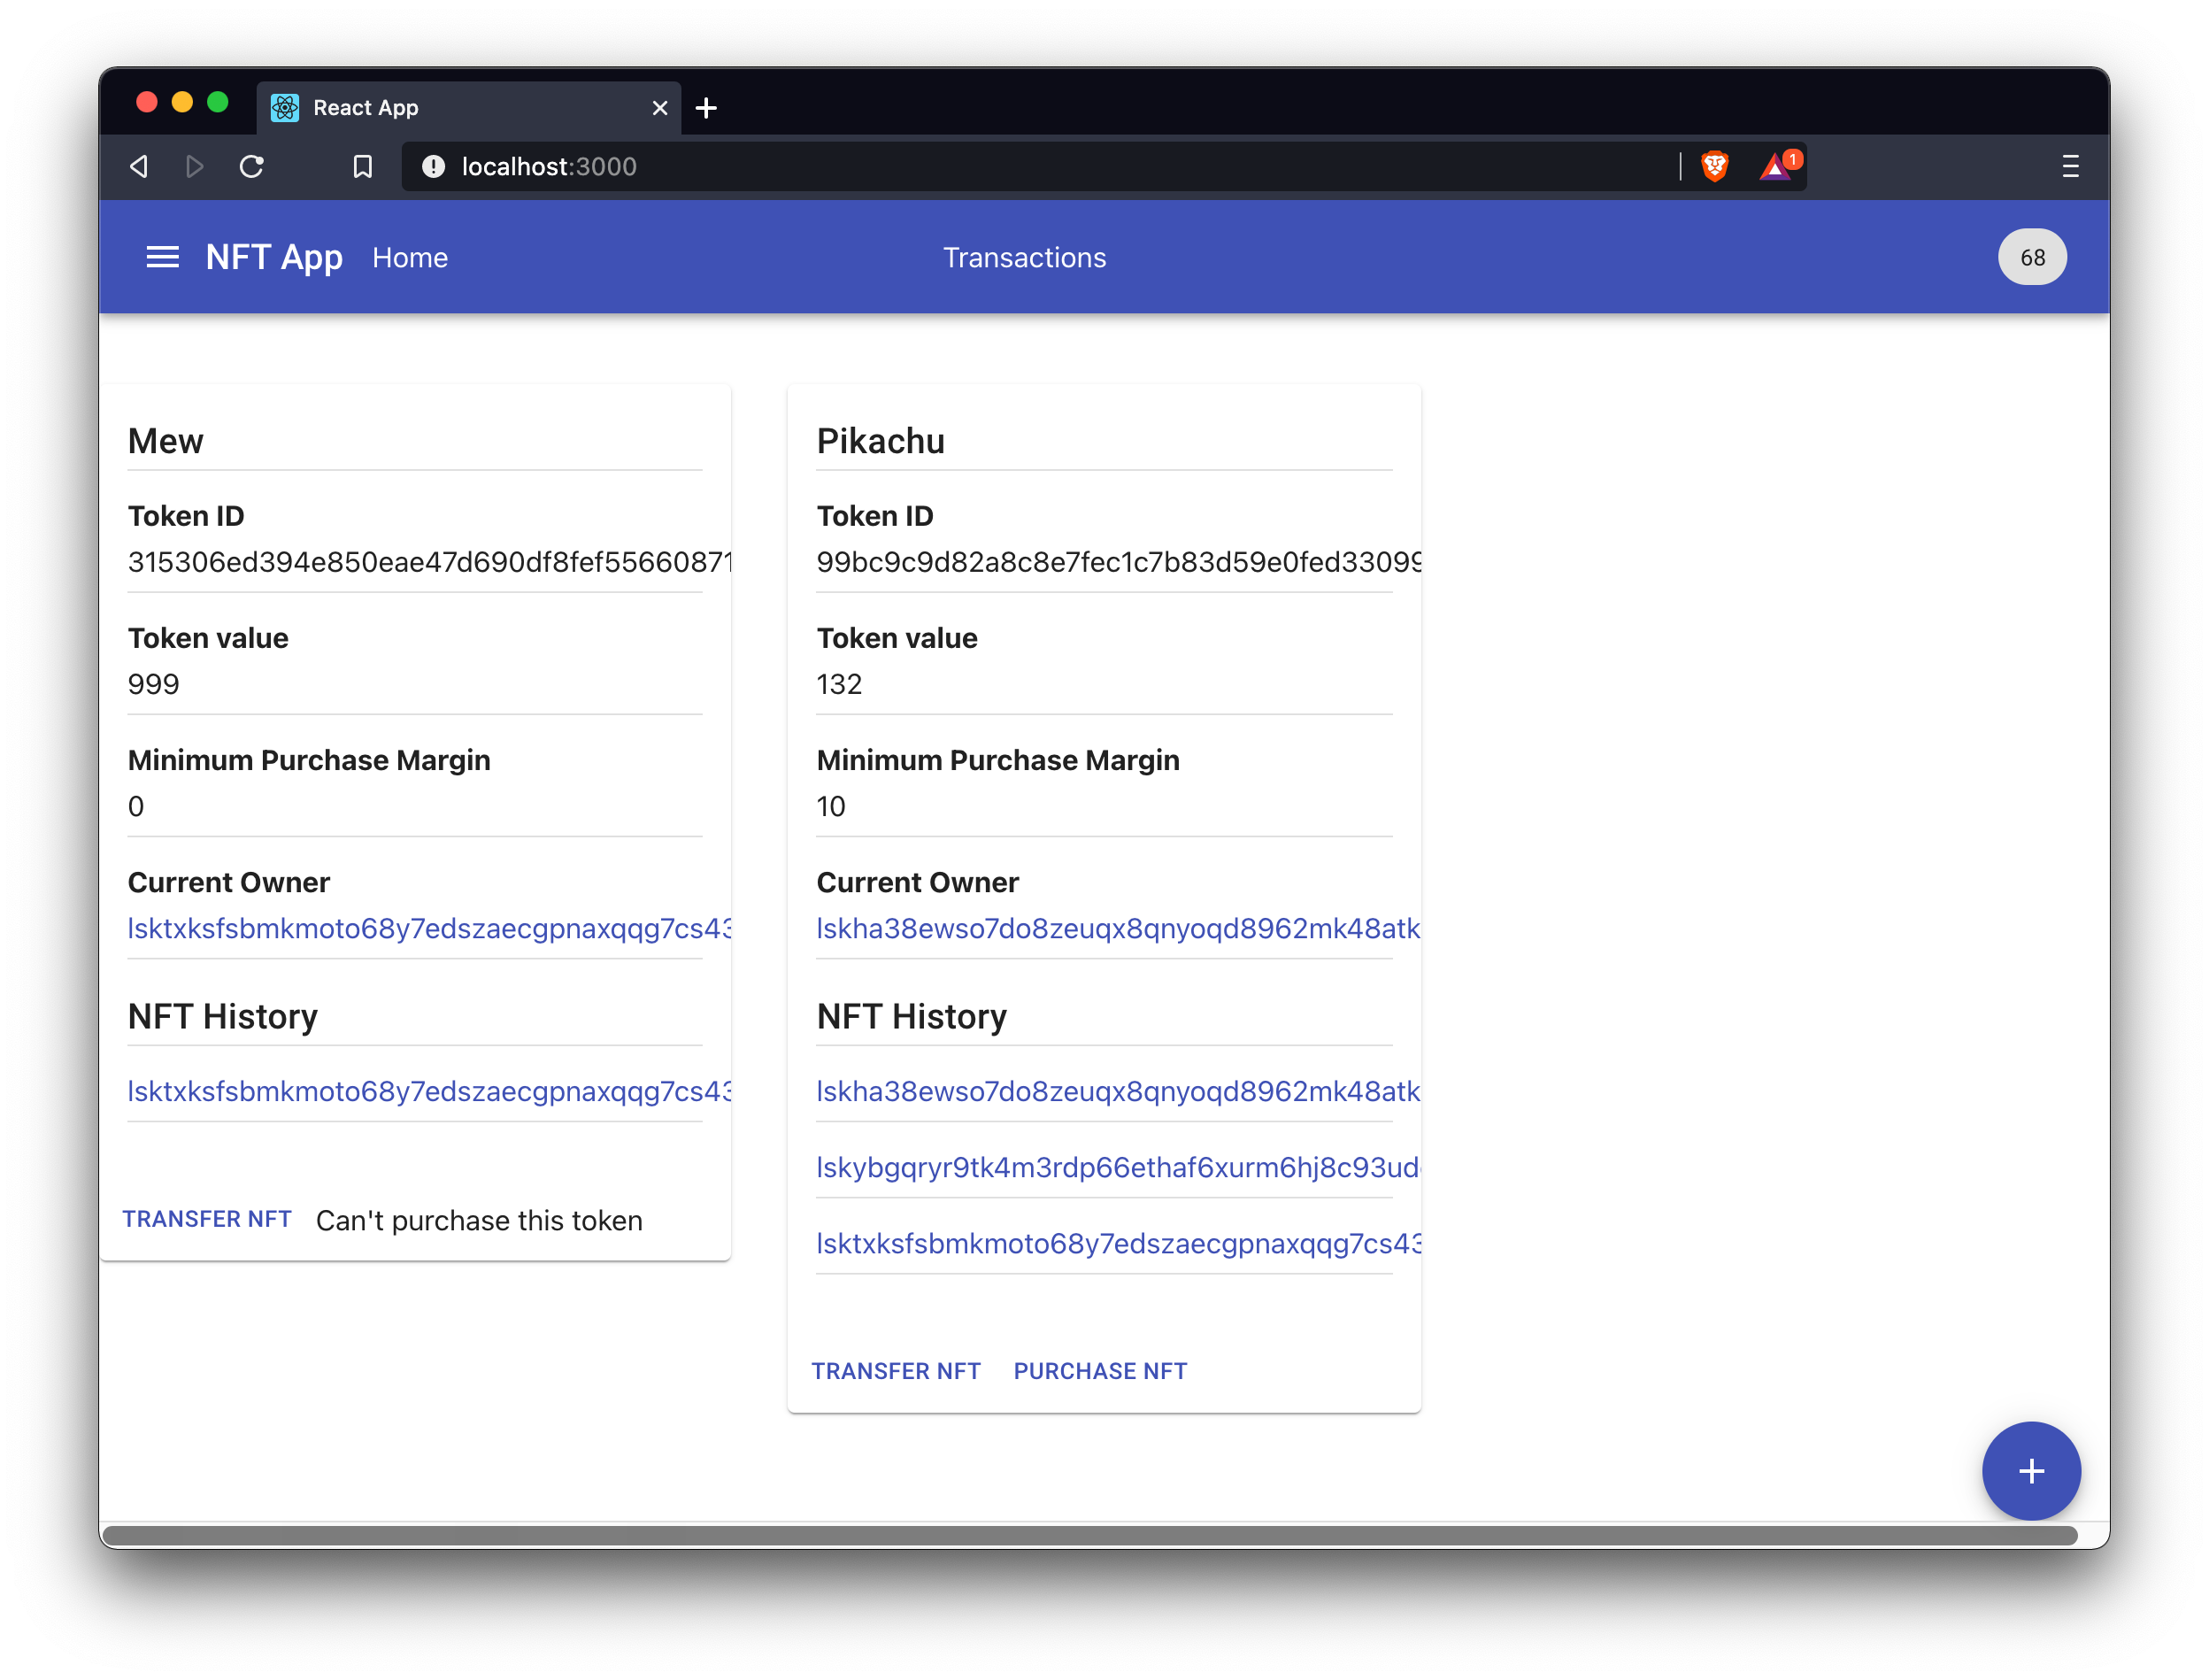
That’s it, the frontend walkabout in the browser is now complete.
Next let’s take a dive into the most important parts of the frontend app, regarding the blockchain related logic.
7.2. API related functions
At first define multiple functions that fetch data from the HTTP API of the blockchain information.
The NFT blockchain app offers two different HTTP APIs:
-
http://localhost:4000/api/ : The API of the
HTTPAPIPlugin. Used to retrieve general blockchain information from the database. -
http://localhost:8080/api/ : The API of the
NFTAPIPlugin. Used to retrieve NFT related information from the database.
We will use both APIs and their provided endpoints to retrieve or post the following data:
-
General blockchain information
-
fetchNodeInfo(): Returns information about the connected node. -
fetchAccountInfo(address): Returns details of a specific account, based on its address. -
sendTransactions(tx): Sends a specified transaction objecttxto the node.
-
-
NFT related information
-
fetchAllNFTTokens(): Fetches a list of all registered NFTs in the network. -
fetchNFTToken(): Returns details of a specific NFT, based on its ID. -
getAllTransactions(): Returns a list of all posted transactions in the network.
-
export const fetchNodeInfo = async () => {
  return fetch("http://localhost:4000/api/node/info")
    .then((res) => res.json())
    .then((res) => res.data);
};

export const fetchAccountInfo = async (address) => {
  return fetch(`http://localhost:4000/api/accounts/${address}`)
    .then((res) => res.json())
    .then((res) => res.data);
};

export const sendTransactions = async (tx) => {
  return fetch("http://localhost:4000/api/transactions", {
    method: "POST",
    headers: {
      "Content-Type": "application/json",
    },
    body: JSON.stringify(tx),
  })
    .then((res) => res.json())
    .then((res) => res.data);
};

export const fetchAllNFTTokens = async () => {
  return fetch("http://localhost:8080/api/nft_tokens")
    .then((res) => res.json())
    .then((res) => res.data);
};

export const fetchNFTToken = async (id) => {
  return fetch(`http://localhost:8080/api/nft_tokens/${id}`)
    .then((res) => res.json())
    .then((res) => res.data);
};

export const getAllTransactions = async () => {
  return fetch(`http://localhost:8080/api/transactions`)
    .then((res) => res.json())
    .then((res) => {
      return res.data;
    });
};
7.3. Functions for creating transactions
The utils/ folder of the frontend app stores certain utility functions for creating the different transaction types.
The functions will be used in the Dialogs below to create and send the transaction objects based on the form data in the dialog.
The transactions are created and signed by utilizing the signTransaction() from the @liskhq/lisk-client package.
The nonce for each transaction is retrieved from the sender account by running fetchAccountInfo() from the API related functions section.
7.3.1. Create NFT
/* global BigInt */

import { transactions, codec, cryptography } from "@liskhq/lisk-client";
import { getFullAssetSchema, calcMinTxFee } from "../common";
import { fetchAccountInfo } from "../../api";

export const createNFTTokenSchema = {
  $id: "lisk/create-nft-asset",
  type: "object",
  required: ["minPurchaseMargin", "initValue", "name"],
  properties: {
    minPurchaseMargin: {
      dataType: "uint32",
      fieldNumber: 1,
    },
    initValue: {
      dataType: "uint64",
      fieldNumber: 2,
    },
    name: {
      dataType: "string",
      fieldNumber: 3,
    },
  },
};

export const createNFTToken = async ({
  name,
  initValue,
  minPurchaseMargin,
  passphrase,
  fee,
  networkIdentifier,
  minFeePerByte,
}) => {
  const { publicKey } = cryptography.getPrivateAndPublicKeyFromPassphrase(
    passphrase
  );
  const address = cryptography.getAddressFromPassphrase(passphrase).toString("hex");

  const {
    sequence: { nonce },
  } = await fetchAccountInfo(address);

  const { id, ...rest } = transactions.signTransaction(
    createNFTTokenSchema,
    {
      moduleID: 1024,
      assetID: 0,
      nonce: BigInt(nonce),
      fee: BigInt(transactions.convertLSKToBeddows(fee)),
      senderPublicKey: publicKey,
      asset: {
        name,
        initValue: BigInt(transactions.convertLSKToBeddows(initValue)),
        minPurchaseMargin: parseInt(minPurchaseMargin),
      },
    },
    Buffer.from(networkIdentifier, "hex"),
    passphrase
  );

  return {
    id: id.toString("hex"),
    tx: codec.codec.toJSON(getFullAssetSchema(createNFTTokenSchema), rest),
    minFee: calcMinTxFee(createNFTTokenSchema, minFeePerByte, rest),
  };
};
7.3.2. Purchase NFT
/* global BigInt */

import { transactions, codec, cryptography } from "@liskhq/lisk-client";
import { getFullAssetSchema, calcMinTxFee } from "../common";
import { fetchAccountInfo } from "../../api";

export const purchaseNFTTokenSchema = {
  $id: "lisk/nft/purchase",
  type: "object",
  required: ["nftId", "purchaseValue"],
  properties: {
    nftId: {
      dataType: "bytes",
      fieldNumber: 1,
    },
    purchaseValue: {
      dataType: "uint64",
      fieldNumber: 2,
    },
    name: {
      dataType: "string",
      fieldNumber: 3,
    },
  },
};

export const purchaseNFTToken = async ({
  name,
  nftId,
  purchaseValue,
  passphrase,
  fee,
  networkIdentifier,
  minFeePerByte,
}) => {
  const { publicKey } = cryptography.getPrivateAndPublicKeyFromPassphrase(
    passphrase
  );
  const address = cryptography.getAddressFromPassphrase(passphrase);
  const {
    sequence: { nonce },
  } = await fetchAccountInfo(address.toString("hex"));

  const { id, ...rest } = transactions.signTransaction(
    purchaseNFTTokenSchema,
    {
      moduleID: 1024,
      assetID: 1,
      nonce: BigInt(nonce),
      fee: BigInt(transactions.convertLSKToBeddows(fee)),
      senderPublicKey: publicKey,
      asset: {
        name,
        nftId: Buffer.from(nftId, "hex"),
        purchaseValue: BigInt(transactions.convertLSKToBeddows(purchaseValue)),
      },
    },
    Buffer.from(networkIdentifier, "hex"),
    passphrase
  );

  return {
    id: id.toString("hex"),
    tx: codec.codec.toJSON(getFullAssetSchema(purchaseNFTTokenSchema), rest),
    minFee: calcMinTxFee(purchaseNFTTokenSchema, minFeePerByte, rest),
  };
};
7.3.3. Transfer funds
/* global BigInt */

import { transactions, codec, cryptography } from "@liskhq/lisk-client";
import { getFullAssetSchema, calcMinTxFee } from "../common";
import { fetchAccountInfo } from "../../api";

export const transferAssetSchema = {
  $id: "lisk/transfer-asset",
  title: "Transfer transaction asset",
  type: "object",
  required: ["amount", "recipientAddress", "data"],
  properties: {
    amount: {
      dataType: "uint64",
      fieldNumber: 1,
    },
    recipientAddress: {
      dataType: "bytes",
      fieldNumber: 2,
      minLength: 20,
      maxLength: 20,
    },
    data: {
      dataType: "string",
      fieldNumber: 3,
      minLength: 0,
      maxLength: 64,
    },
  },
};

export const transfer = async ({
  recipientAddress,
  amount,
  passphrase,
  fee,
  networkIdentifier,
  minFeePerByte,
}) => {
  const { publicKey } = cryptography.getPrivateAndPublicKeyFromPassphrase(
    passphrase
  );
  const address = cryptography.getAddressFromPassphrase(passphrase);
  const {
    sequence: { nonce },
  } = await fetchAccountInfo(address.toString("hex"));
  const recipient = cryptography.getAddressFromBase32Address(recipientAddress);
  const { id, ...rest } = transactions.signTransaction(
    transferAssetSchema,
    {
      moduleID: 2,
      assetID: 0,
      nonce: BigInt(nonce),
      fee: BigInt(transactions.convertLSKToBeddows(fee)),
      senderPublicKey: publicKey,
      asset: {
        amount: BigInt(transactions.convertLSKToBeddows(amount)),
        recipientAddress: recipient,
        data: "",
      },
    },
    Buffer.from(networkIdentifier, "hex"),
    passphrase
  );

  return {
    id: id.toString("hex"),
    tx: codec.codec.toJSON(getFullAssetSchema(transferAssetSchema), rest),
    minFee: calcMinTxFee(transferAssetSchema, minFeePerByte, rest),
  };
};
7.3.4. Transfer NFT
/* global BigInt */

import { transactions, codec, cryptography } from "@liskhq/lisk-client";
import { getFullAssetSchema, calcMinTxFee } from "../common";
import { fetchAccountInfo } from "../../api";

export const transferNFTSchema = {
  $id: "lisk/nft/transfer",
  type: "object",
  required: ["nftId", "recipient"],
  properties: {
    nftId: {
      dataType: "bytes",
      fieldNumber: 1,
    },
    recipient: {
      dataType: "bytes",
      fieldNumber: 2,
    },
    name: {
      dataType: "string",
      fieldNumber: 3,
    },
  },
};

export const transferNFT = async ({
                                         name,
                                         nftId,
                                         recipientAddress,
                                         passphrase,
                                         fee,
                                         networkIdentifier,
                                         minFeePerByte,
                                       }) => {
  const { publicKey } = cryptography.getPrivateAndPublicKeyFromPassphrase(
    passphrase
  );
  const address = cryptography.getAddressFromPassphrase(passphrase);
  const recipient = cryptography.getAddressFromBase32Address(recipientAddress);
  const {
    sequence: { nonce },
  } = await fetchAccountInfo(address.toString("hex"));

  const { id, ...rest } = transactions.signTransaction(
    transferNFTSchema,
    {
      moduleID: 1024,
      assetID: 2,
      nonce: BigInt(nonce),
      fee: BigInt(transactions.convertLSKToBeddows(fee)),
      senderPublicKey: publicKey,
      asset: {
        name,
        nftId: Buffer.from(nftId, "hex"),
        recipient: recipient,
      },
    },
    Buffer.from(networkIdentifier, "hex"),
    passphrase
  );

  return {
    id: id.toString("hex"),
    tx: codec.codec.toJSON(getFullAssetSchema(transferNFTSchema), rest),
    minFee: calcMinTxFee(transferNFTSchema, minFeePerByte, rest),
  };
};
7.4. Dialogs
7.4.1. Create account dialog
The create account dialog creates new account details each time it is opened.
Note, that these account details are only created locally, and are not included in the blockchain yet.
To include an account in the blockchain, simply send some funds to the account with the Transfer funds dialog.
To create the account details, the passphrase and cryptography library of the @liskhq/lisk-client package are used.
import React, { Fragment, useState, useEffect } from "react";
import {
  Dialog,
  DialogTitle,
  DialogContent,
  TextField,
} from "@material-ui/core";
import { makeStyles } from "@material-ui/core/styles";
import { passphrase, cryptography } from "@liskhq/lisk-client";

const useStyles = makeStyles((theme) => ({
  root: {
    "& .MuiTextField-root": {
      margin: theme.spacing(1),
    },
  },
}));

export default function CreateAccountDialog(props) {
  const [data, setData] = useState({ passphrase: "", address: "" });
  const classes = useStyles();

  useEffect(() => {
    const pw = passphrase.Mnemonic.generateMnemonic();
    const address = cryptography.getBase32AddressFromPassphrase(pw).toString("hex");
    setData({ passphrase: pw, address });
  }, [props.open]);

  return (
    <Fragment>
      <Dialog open={props.open} onBackdropClick={props.handleClose} fullWidth>
        <DialogTitle id="alert-dialog-title">
          {"Please copy the address and passphrase"}
        </DialogTitle>
        <DialogContent>
          <form noValidate autoComplete="off" className={classes.root}>
            <TextField
              label="Passphrase"
              value={data.passphrase}
              fullWidth
              InputProps={{
                readOnly: true,
              }}
            />
            <TextField
              label="Address"
              value={data.address}
              fullWidth
              InputProps={{
                readOnly: true,
              }}
            />
          </form>
        </DialogContent>
      </Dialog>
    </Fragment>
  );
}
7.4.2. Create NFT dialog
The create NFT dialog allows a user to create a new NFT.
It renders a form where a user can enter all important information to create the NFT:
-
Name: The name of the NFT.
-
Initial Token value: The inital value of the token. The amount will be debited from the balance of the account which creates the NFT.
-
Minimum Purchase Margin: The minimum margin in %, which is added to the token value on purchase.
-
Fee: The transaction fee for the
createNFTtransaction. -
Passphrase: The passphrase of the account which creates the NFT.
It then uses the createNFTToken() function we defined in the Create NFT section to create the createNFT transaction and the sendTransactions() function from the API related functions section to post the transaction to the blockchain application.
import React, { Fragment, useContext, useState } from "react";
import {
  Dialog,
  DialogTitle,
  DialogContent,
  TextField,
  Button,
  DialogActions,
} from "@material-ui/core";
import { makeStyles } from "@material-ui/core/styles";
import { NodeInfoContext } from "../../context";
import { createNFTToken } from "../../utils/transactions/create_nft_token";
import * as api from "../../api";

const useStyles = makeStyles((theme) => ({
  root: {
    "& .MuiTextField-root": {
      margin: theme.spacing(1),
    },
  },
}));

export default function CreateNFTTokenDialog(props) {
  const nodeInfo = useContext(NodeInfoContext);
  const classes = useStyles();
  const [data, setData] = useState({
    name: "",
    initValue: "",
    minPurchaseMargin: "",
    fee: "",
    passphrase: "",
  });

  const handleChange = (event) => {
    event.persist();
    setData({ ...data, [event.target.name]: event.target.value });
  };

  const handleSend = async (event) => {
    event.preventDefault();

    const res = await createNFTToken({
      ...data,
      networkIdentifier: nodeInfo.networkIdentifier,
      minFeePerByte: nodeInfo.minFeePerByte,
    });
    await api.sendTransactions(res.tx);
    props.handleClose();
  };

  return (
    <Fragment>
      <Dialog open={props.open} onBackdropClick={props.handleClose}>
        <DialogTitle id="alert-dialog-title">{"Create NFT"}</DialogTitle>
        <DialogContent>
          <form className={classes.root} noValidate autoComplete="off">
            <TextField
              label="Name"
              value={data.name}
              name="name"
              onChange={handleChange}
              fullWidth
            />
            <TextField
              label="Initial Token value"
              value={data.initValue}
              name="initValue"
              onChange={handleChange}
              fullWidth
            />
            <TextField
              label="Minimum Purchase Margin (0 - 100)"
              value={data.minPurchaseMargin}
              name="minPurchaseMargin"
              onChange={handleChange}
              fullWidth
            />
            <TextField
              label="Fee"
              value={data.fee}
              name="fee"
              onChange={handleChange}
              fullWidth
            />
            <TextField
              label="Passphrase"
              value={data.passphrase}
              name="passphrase"
              onChange={handleChange}
              fullWidth
            />
          </form>
        </DialogContent>
        <DialogActions>
          <Button onClick={handleSend}>Create NFT</Button>
        </DialogActions>
      </Dialog>
    </Fragment>
  );
}
7.4.3. Purchase NFT dialog
The purchase NFT dialog allows a user to purchase an existing NFT.
It renders a form where a user can enter all important information to purchase the NFT:
-
Token Name(pre-filled): The name of the NFT.
-
Token ID(pre-filled): The ID of the NFT.
-
Purchase Value: The value the purchaser wants to pay for the NFT. For assistance, the minimum valid purchase margin for this particular NFT is displayed below.
-
Fee: The transaction fee for the
purchaseNFTtransaction. -
Passphrase: The passphrase of the account which purchases the NFT.
It then uses the purchaseNFTToken() function we defined in the Purchase NFT section to create the purchaseNFT transaction and the sendTransactions() function from the API related functions section to post the transaction to the blockchain application.
import React, { Fragment, useContext, useState } from "react";
import {
  Dialog,
  DialogTitle,
  DialogContent,
  TextField,
  Button,
  DialogActions,
} from "@material-ui/core";
import { makeStyles } from "@material-ui/core/styles";
import { NodeInfoContext } from "../../context";
import { purchaseNFTToken } from "../../utils/transactions/purchase_nft_token";
import * as api from "../../api";
import { transactions } from "@liskhq/lisk-client";

const useStyles = makeStyles((theme) => ({
  root: {
    "& .MuiTextField-root": {
      margin: theme.spacing(1),
    },
  },
}));

export default function PurchaseNFTTokenDialog(props) {
  const nodeInfo = useContext(NodeInfoContext);
  const classes = useStyles();
  const currentValue = parseFloat(
    transactions.convertBeddowsToLSK(props.token.value)
  );
  const minPurchaseMargin = parseFloat(props.token.minPurchaseMargin);
  const minPurchaseValue =
    currentValue + (currentValue * minPurchaseMargin) / 100.0;

  const [data, setData] = useState({
    name: props.token.name,
    nftId: props.token.id,
    purchaseValue: "",
    fee: "",
    passphrase: "",
  });

  const handleChange = (event) => {
    event.persist();
    setData({ ...data, [event.target.name]: event.target.value });
  };

  const handleSend = async (event) => {
    event.preventDefault();

    const res = await purchaseNFTToken({
      ...data,
      networkIdentifier: nodeInfo.networkIdentifier,
      minFeePerByte: nodeInfo.minFeePerByte,
    });
    await api.sendTransactions(res.tx);
    props.handleClose();
  };

  return (
    <Fragment>
      <Dialog open={props.open} onBackdropClick={props.handleClose}>
        <DialogTitle id="alert-dialog-title">
          {"Purchase NFT"}
        </DialogTitle>
        <DialogContent>
          <form className={classes.root} noValidate autoComplete="off">
            <TextField
              label="Token Name"
              value={data.name}
              name="name"
              onChange={handleChange}
              fullWidth
            />
            <TextField
              label="Token ID"
              value={data.nftId}
              name="nftId"
              onChange={handleChange}
              fullWidth
            />
            <TextField
              label="Purchase Value"
              value={data.purchaseValue}
              name="purchaseValue"
              onChange={handleChange}
              helperText={`Minimum purchase value: ${minPurchaseValue}`}
              fullWidth
            />
            <TextField
              label="Fee"
              value={data.fee}
              name="fee"
              onChange={handleChange}
              fullWidth
            />
            <TextField
              label="Passphrase"
              value={data.passphrase}
              name="passphrase"
              onChange={handleChange}
              fullWidth
            />
          </form>
        </DialogContent>
        <DialogActions>
          <Button onClick={handleSend}>Purchase NFT</Button>
        </DialogActions>
      </Dialog>
    </Fragment>
  );
}
7.4.4. Transfer funds dialog
The transfer funds dialog allows a user to transfer tokens from one account to another.
It renders a form where a user can enter all important information to transfer the tokens:
-
Recipient Address: The base 32 address of the account which receives the funds.
-
Amount: The amount of tokens being transfered.
-
Fee: The transaction fee for the
transfertransaction. -
Passphrase: The passphrase of the account which sends the funds.
It then uses the transfer() function we defined in the Transfer funds section to create the transfer transaction and the sendTransactions() function from the API related functions section to post the transaction to the blockchain application.
import React, { Fragment, useContext, useState } from "react";
import {
  Dialog,
  DialogTitle,
  DialogContent,
  TextField,
  Button,
  DialogActions,
} from "@material-ui/core";
import { makeStyles } from "@material-ui/core/styles";
import { NodeInfoContext } from "../../context";
import { transfer } from "../../utils/transactions/transfer";
import * as api from "../../api";

const useStyles = makeStyles((theme) => ({
  root: {
    "& .MuiTextField-root": {
      margin: theme.spacing(1),
    },
  },
}));

export default function TransferFundsDialog(props) {
  const nodeInfo = useContext(NodeInfoContext);
  const classes = useStyles();
  const [data, setData] = useState({
    recipientAddress: "",
    passphrase: "",
    amount: "",
    fee: "",
  });

  const handleChange = (event) => {
    event.persist();
    setData({ ...data, [event.target.name]: event.target.value });
  };

  const handleSend = async (event) => {
    event.preventDefault();

    const res = await transfer({
      ...data,
      networkIdentifier: nodeInfo.networkIdentifier,
      minFeePerByte: nodeInfo.minFeePerByte,
    });
    await api.sendTransactions(res.tx);
    props.handleClose();
  };

  return (
    <Fragment>
      <Dialog open={props.open} onBackdropClick={props.handleClose}>
        <DialogTitle id="alert-dialog-title">{"Transfer Funds"}</DialogTitle>
        <DialogContent>
          <form className={classes.root} noValidate autoComplete="off">
            <TextField
              label="Recipient Address"
              value={data.recipientAddress}
              name="recipientAddress"
              onChange={handleChange}
              fullWidth
            />
            <TextField
              label="Amount"
              value={data.amount}
              name="amount"
              onChange={handleChange}
              fullWidth
            />
            <TextField
              label="Fee"
              value={data.fee}
              name="fee"
              onChange={handleChange}
              fullWidth
            />
            <TextField
              label="Passphrase"
              value={data.passphrase}
              name="passphrase"
              onChange={handleChange}
              fullWidth
            />

            <Button
              onClick={() => {
                setData({
                  ...data,
                  passphrase:
                    "peanut hundred pen hawk invite exclude brain chunk gadget wait wrong ready",
                });
              }}
            >
              Use Genesis Account
            </Button>
          </form>
        </DialogContent>
        <DialogActions>
          <Button onClick={handleSend}>Send Funds</Button>
        </DialogActions>
      </Dialog>
    </Fragment>
  );
}
7.4.5. Transfer NFT dialog
The transfer NFT dialog allows the owner of a NFT to transfer the NFT.
It renders a form where the current owner can enter all important information to transfer the NFT:
-
Token Name(pre-filled): The name of the NFT.
-
Token ID(pre-filled): The ID of the NFT.
-
Recipient Address: The base 32 address of the account which receives the NFT.
-
Fee: The transaction fee for the
purchaseNFTtransaction. -
Passphrase: The passphrase of the owner of the NFT.
It then uses the transferNFT() function we defined in the Transfer NFT section to create the transferNFT transaction and the sendTransactions() function from the API related functions section to post the transaction to the blockchain application.
import React, { Fragment, useContext, useState } from "react";
import {
  Dialog,
  DialogTitle,
  DialogContent,
  TextField,
  Button,
  DialogActions,
} from "@material-ui/core";
import { makeStyles } from "@material-ui/core/styles";
import { NodeInfoContext } from "../../context";
import { transferNFT } from "../../utils/transactions/transfer_nft";
import * as api from "../../api";

const useStyles = makeStyles((theme) => ({
  root: {
    "& .MuiTextField-root": {
      margin: theme.spacing(1),
    },
  },
}));

export default function TransferNFTDialog(props) {
  const nodeInfo = useContext(NodeInfoContext);
  const classes = useStyles();

  const [data, setData] = useState({
    name: props.token.name,
    nftId: props.token.id,
    recipientAddress: "",
    fee: "",
    passphrase: "",
  });

  const handleChange = (event) => {
    event.persist();
    setData({ ...data, [event.target.name]: event.target.value });
  };

  const handleSend = async (event) => {
    event.preventDefault();

    const res = await transferNFT({
      ...data,
      networkIdentifier: nodeInfo.networkIdentifier,
      minFeePerByte: nodeInfo.minFeePerByte,
    });
    await api.sendTransactions(res.tx);
    props.handleClose();
  };

  return (
    <Fragment>
      <Dialog open={props.open} onBackdropClick={props.handleClose}>
        <DialogTitle id="alert-dialog-title">
          {"Transfer NFT"}
        </DialogTitle>
        <DialogContent>
          <form className={classes.root} noValidate autoComplete="off">
            <TextField
              label="Token Name"
              value={data.name}
              name="name"
              onChange={handleChange}
              fullWidth
            />
            <TextField
              label="Token ID"
              value={data.nftId}
              name="nftId"
              onChange={handleChange}
              fullWidth
            />
            <TextField
              label="Recipient address"
              value={data.recipientAddress}
              name="recipientAddress"
              onChange={handleChange}
              helperText={`Address of the account that will receive the NFT.`}
              fullWidth
            />
            <TextField
              label="Fee"
              value={data.fee}
              name="fee"
              onChange={handleChange}
              fullWidth
            />
            <TextField
              label="Passphrase"
              value={data.passphrase}
              name="passphrase"
              onChange={handleChange}
              fullWidth
            />
          </form>
        </DialogContent>
        <DialogActions>
          <Button onClick={handleSend}>Transfer NFT</Button>
        </DialogActions>
      </Dialog>
    </Fragment>
  );
}
7.5. Components
In React, components are like JavaScript functions. They accept arbitrary inputs (called “props”) and return React elements describing what should appear on the screen.
For the frontend we define the following components:
-
HomePage: A component for rendering The home page. -
NFTToken: A component for rendering an NFT including its details and related actions. -
TransactionsPage: A component for rendering The transactions explorer. -
AccountPage: A component for rendering the account page. -
Account: A component for rendering details to a specific account.
The code examples for the HomePage and NFTToken components can be found below.
|
Account addresses in the frontend
As you may be aware, the account address can be represented in different formats, such as The More information about the different data formats can be found on the Schemas & Codec reference page. |
7.5.1. NFT component
The NFT component renders the following information:
-
Name: The name of the NFT as the title.
-
Token ID: The unique ID of the NFT.
-
Token value: The current value of the token.
-
Minimum Purchase Margin: The minimum margin in %, which is added to the token value on purchase.
-
Current owner: The current owner of the NFT.
-
NFT history: The complete owner history of the NFT.
This component makes use of the previously created PurchaseNFTTokenDialog and TransferNFTDialog Dialogs and attaches them at the bottom of the NFT.
import React, { useState } from "react";
import {
  Card,
  CardContent,
  CardActions,
  Typography,
  Link,
  Divider,
  Button,
} from "@material-ui/core";
import { makeStyles } from "@material-ui/core/styles";
import { Link as RouterLink } from "react-router-dom";
import { transactions, cryptography, Buffer } from "@liskhq/lisk-client";

import PurchaseNFTTokenDialog from "./dialogs/PurchaseNFTTokenDialog";
import TransferNFTDialog from "./dialogs/TransferNFTDialog";

const useStyles = makeStyles((theme) => ({
  propertyList: {
    listStyle: "none",

    "& li": {
      margin: theme.spacing(2, 0),
      borderBottomColor: theme.palette.divider,
      borderBottomStyle: "solid",
      borderBottomWidth: 1,

      "& dt": {
        display: "block",
        width: "100%",
        fontWeight: "bold",
        margin: theme.spacing(1, 0),
      },
      "& dd": {
        display: "block",
        width: "100%",
        margin: theme.spacing(1, 0),
      },
    },
  },
}));

export default function NFTToken(props) {
  const classes = useStyles();
  const [openPurchase, setOpenPurchase] = useState(false);
  const [openTransfer, setOpenTransfer] = useState(false);
  const base32UIAddress = cryptography.getBase32AddressFromAddress(Buffer.from(props.item.ownerAddress, 'hex'), 'lsk').toString('binary');
  return (
    <Card>
      <CardContent>
        <Typography variant="h6">{props.item.name}</Typography>
        <Divider />
        <dl className={classes.propertyList}>
          <li>
            <dt>Token ID</dt>
            <dd>{props.item.id}</dd>
          </li>
          <li>
            <dt>Token value</dt>
            <dd>{transactions.convertBeddowsToLSK(props.item.value)}</dd>
          </li>
          <li>
            <dt>Minimum Purchase Margin</dt>
            <dd>{props.item.minPurchaseMargin}</dd>
          </li>
          {!props.minimum && (
            <li>
              <dt>Current Owner</dt>
              <dd>
                <Link
                  component={RouterLink}
                  to={`/accounts/${base32UIAddress}`}
                >
                  {base32UIAddress}
                </Link>
              </dd>
            </li>
          )}
        </dl>
        <Typography variant="h6">NFT History</Typography>
        <Divider />
        {props.item.tokenHistory.map((base32UIAddress) => (
          <dl className={classes.propertyList}>
            <li>
              <dd>
                <Link
                  component={RouterLink}
                  to={`/accounts/${base32UIAddress}`}
                >
                  {base32UIAddress}
                </Link>
              </dd>
            </li>
          </dl>
        ))}

      </CardContent>
      <CardActions>
        <>
          <Button
            size="small"
            color="primary"
            onClick={() => {
              setOpenTransfer(true);
            }}
          >
            Transfer NFT
          </Button>
          <TransferNFTDialog
            open={openTransfer}
            handleClose={() => {
              setOpenTransfer(false);
            }}
            token={props.item}
          />
        </>
        {props.item.minPurchaseMargin > 0 ? (
          <>
            <Button
              size="small"
              color="primary"
              onClick={() => {
                setOpenPurchase(true);
              }}
            >
              Purchase NFT
            </Button>
            <PurchaseNFTTokenDialog
              open={openPurchase}
              handleClose={() => {
                setOpenPurchase(false);
              }}
              token={props.item}
            />
          </>
        ) : (
          <Typography variant="body">Can't purchase this token</Typography>
        )}
      </CardActions>
    </Card>
  );
}
7.5.2. Home page component
The home page component renders the following information:
A list of all existing NFTs, rendered as an NFT component.
The NFTs are fetched by utilizing the fetchAllNFTTokens() function from the API related functions.
import React, { Fragment, useEffect, useState } from "react";
import NFTToken from "./NFTToken";
import { Grid } from "@material-ui/core";
import { fetchAllNFTTokens } from "../api";

function HomePage() {
  const [NFTAccounts, setNFTAccounts] = useState([]);

  useEffect(() => {
    async function fetchData() {
      setNFTAccounts(await fetchAllNFTTokens());
    }
    fetchData();
  }, []);

  return (
    <Fragment>
      <Grid container spacing={4}>
        {NFTAccounts.map((item) => (
          <Grid item md={4}>
            <NFTToken item={item} key={item.id} />
          </Grid>
        ))}
      </Grid>
    </Fragment>
  );
}

export default HomePage;
Summary
That’s it! You should now have a complete example NFT blockchain application running, including:
-
a blockchain application with the following:
-
a custom module for handling NFTs.
-
a custom plugin that adds additional features for the NFTs.
-
-
a frontend application which allows you to use and test the applications in the browser.