Launch a blockchain application
1. Introduction
This guide describes how to publish a blockchain application. After following this guide it will enable other users to join the network, and will turn your local 1-node Devnet into an actual blockchain network.
1.1. Nodes
The network will consist of many different nodes that store the blockchain, create new blocks, and update each other about events in the network.
Nodes are servers that are connected to a blockchain network. These servers have a node application installed that handles all communication with other nodes in the network.
After receiving a new event and performing the default validations, a node will pass on the information to a set of peer nodes in its peer list.
1.2. Node roles
Nodes can have different roles in the network as described below:
- Seed nodes
-
The seed node is a node that is specified in the config of the node application under
modules.network.seedPeers. Apart from this, the seed node is considered a normal node and exhibits the same properties as all of the other nodes.Newly connected nodes will use the seed peers in their config as a start point to discover the rest of the network. Hence, this is the reason why the seed nodes must always be both reachable and connected to the network.
- Forging nodes
-
As the name suggests, forging nodes are nodes that have forging enabled for a delegate in the network. In order to actively forge, the delegate has to be present in the top 101 delegate list.
- API nodes
-
API nodes are nodes that offer API access to specific whitelisted IPs or to the general public. They are used by client applications to interact with the blockchain network.
1.3. Components of a blockchain application
1.3.1. Node application
The node application is the application that needs to be installed on a server in order to run a node on a particular blockchain network.
1.3.2. Client application(s)
The client application communicates via API requests with one or multiple nodes in the network, in order to provide its services.
The development and publishing of the client application is similar to a regular web application.
|
There can also be several client applications that work together by communicating with the same network. For example, there can be an additional application that connects a particular IoT device to the blockchain. |
1.4. Overview
During development it is both necessary and convenient to have a rather centralized network with only one node connected.
Once the development has reached a proof of concept or a usable product stage, it will be necessary to add more nodes to the network, and hence offer other potential users the opportunity to join the newly created blockchain network.
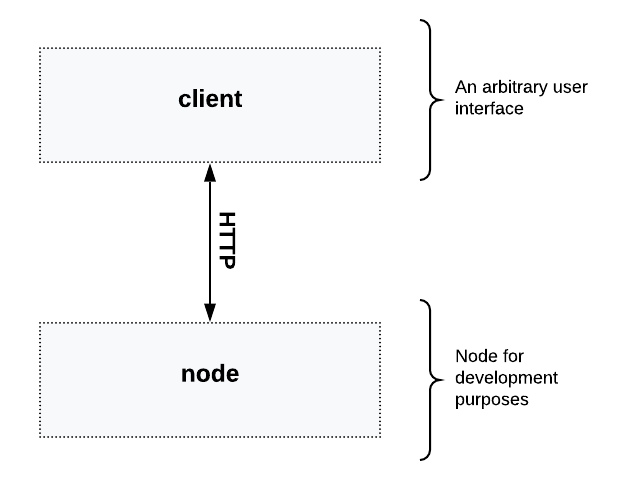
This is how the setup looks during development:
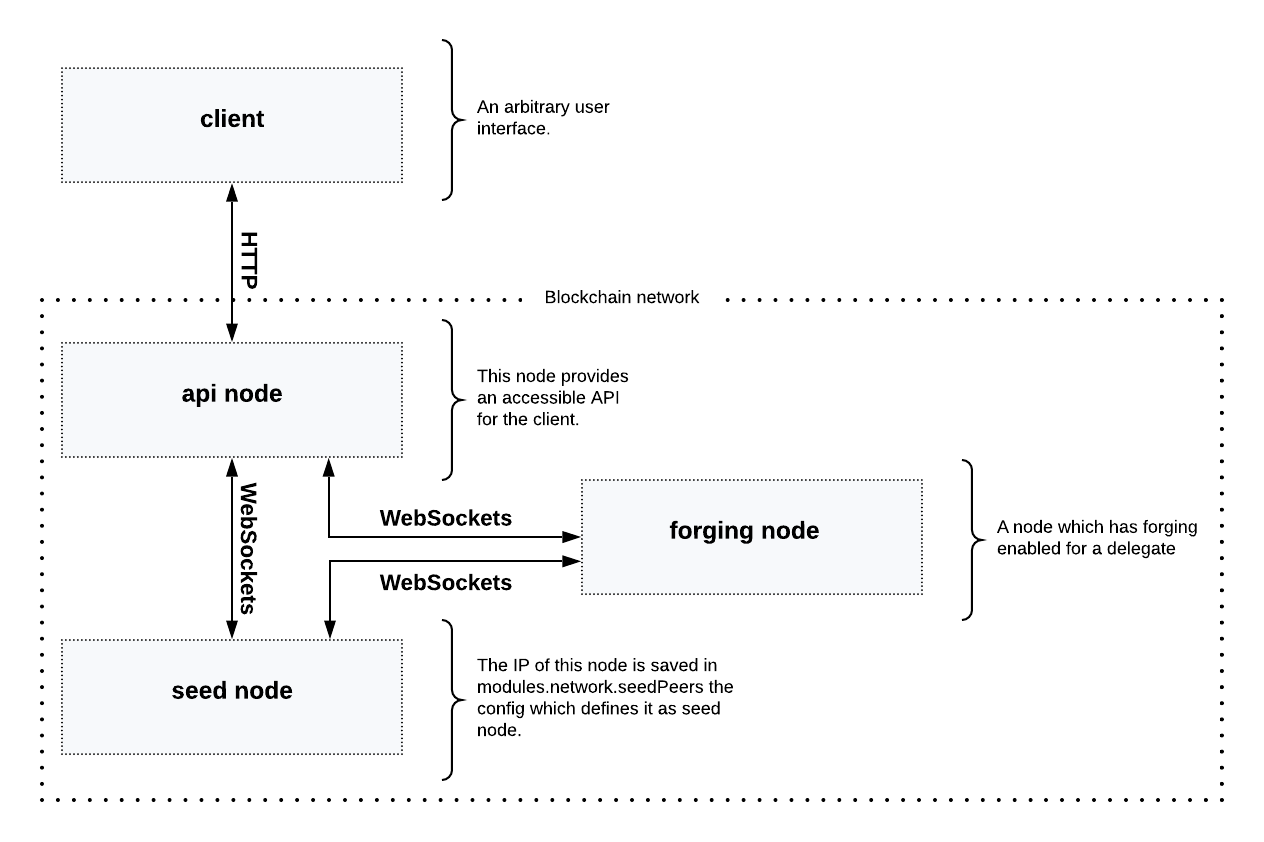
The next step is to create a genesis block and one seed node and to add one API node to the network that communicates with the seed node:
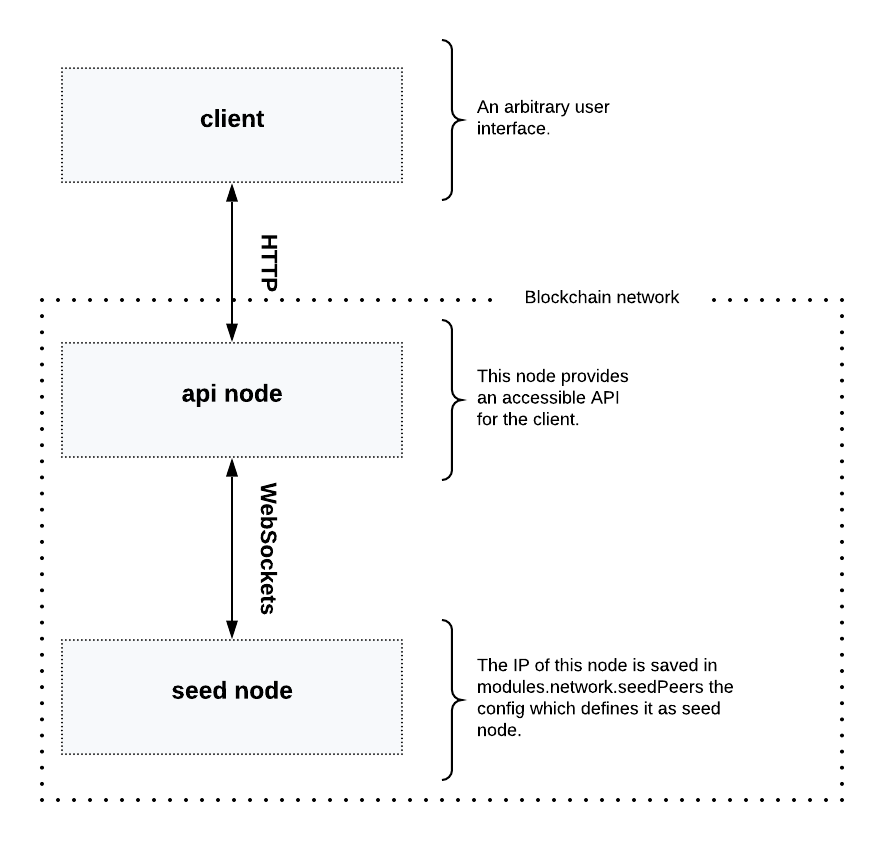
As shown in the diagram above, the plan is to connect a second node with a public API which has forging disabled.
With this type of setup, the client application communicates through the HTTP API with the new node. The seed node communicates simultaneously with the new node via WebSockets. This in turn ensures that the seed node is informed by the API node, each time a new transaction is sent to the network.
| When using this architecture it is convenient to test if the WebSocket connection between the seed node and the new node is established. |
2. Create a new genesis block
|
The exposed Therefore it is required to generate a new genesis block for the blockchain application. This new genesis block should create new genesis accounts, and the created passphrases need to be kept private in order to ensure that the genesis accounts cannot be hijacked. |
|
The current version of the Lisk SDK does not yet support the possibility to create its own genesis blocks. This feature will be added in future releases. In the case whereby it is required to create a new genesis block with the current release, please see the community tools, for example the Genesis block generator by Corbifex. |
3. Define seed nodes
When setting up a new node, each new node will initially connect to the seed nodes when booting for the first time. Starting from the seed node, a new node will discover the rest of the network by requesting their peer list. This is then followed by the peer lists of the newly discovered peers and so on.
To define a node as a seed node, simply add it to the config as described in the section create a configuration object.
3.1. Seed node config
It is convenient to have the genesis delegates actively forging on the seed node, in case the network does not yet have enough real delegates who can take the forging spots.
It is recommended to keep the config of the seed nodes to yourself, especially if it contains the defaultpassword to decrypt the passphrases of the genesis delegates.
|
Include the data of the new genesis delegates in the config (see enable forging), that were created in the genesis block.
4. Create a configuration object
Exchange the configDevnet object that was passed to the node during the development with the customized version.
|
It is recommended to create a config object with all the options that differ from the default config options.
To check the default config options, go to the configuration page or check it directly in the code.
Default options for modules: |
Most of the configurations can remain the same as those already defined in the default config options. However, please note that there is one option that should be updated: The seed node(s).
For example to add 1.2.3.4:5000 as a seed node, add an object with the 2 properties ip and wsPort to the seedPeers list as displayed below:
const myConfig = {
     modules: {
         network: {
             seedPeers: [{ ip: '1.2.3.4', wsPort: 5000}]
         }
     }
 };

const app = new Application(genesisBlockDevnet, myConfig);|
By default, the forging delegates list in the config is empty.
Only the exposed |
5. Publish source code
Add the code for the customized node application (including the custom transactions), to a public code repository.
For example, on Github or Gitlab.
This provides all users with the opportunity to download the application, and deploy it on a server in order to connect with the network.
The minimum amount of files required for a node application can be seen listed below:
-
index.js : The code that initializes and starts the node application.
-
package.json: A project file that lists all needed dependencies, (this should include
lisk-sdkas a dependency). -
transactions: A folder containing all required custom transactions.
-
README: A Readme file which describes the most important steps to setup the node.
The client application should be distributed in a separate project, and may contain any desired structure as required.
6. Add an API node
This new node will not have any forging activated.
The API node is communicating via the API with the client app, and over the WebSocket connection to other peer nodes.
In this example, the only other node in the network is the seed node. Therefore, the seed node is the only node at this point that can forge new blocks, because all of the genesis delegates are actively forging on it.
| How to replace the genesis delegates with real delegates is covered in the next section Add more nodes. |
To set up the node and install the node application on a new server, just follow the instructions of the README file, that was created in the previous step.
| Do not forget to open the corresponding ports for HTTP and WS communication. |
By default, the API access of a node is disabled. So after successful setup of the node, it is required to whitelist specific clients in the config, or alternatively to make the API access public for everyone.
Once a new node is set up, update the API endpoint in the client app, to target the new node:
// Constants
const API_BASEURL = 'http://localhost:4000'; (1)| 1 | Add the correct IP and port here to the newly added node. |
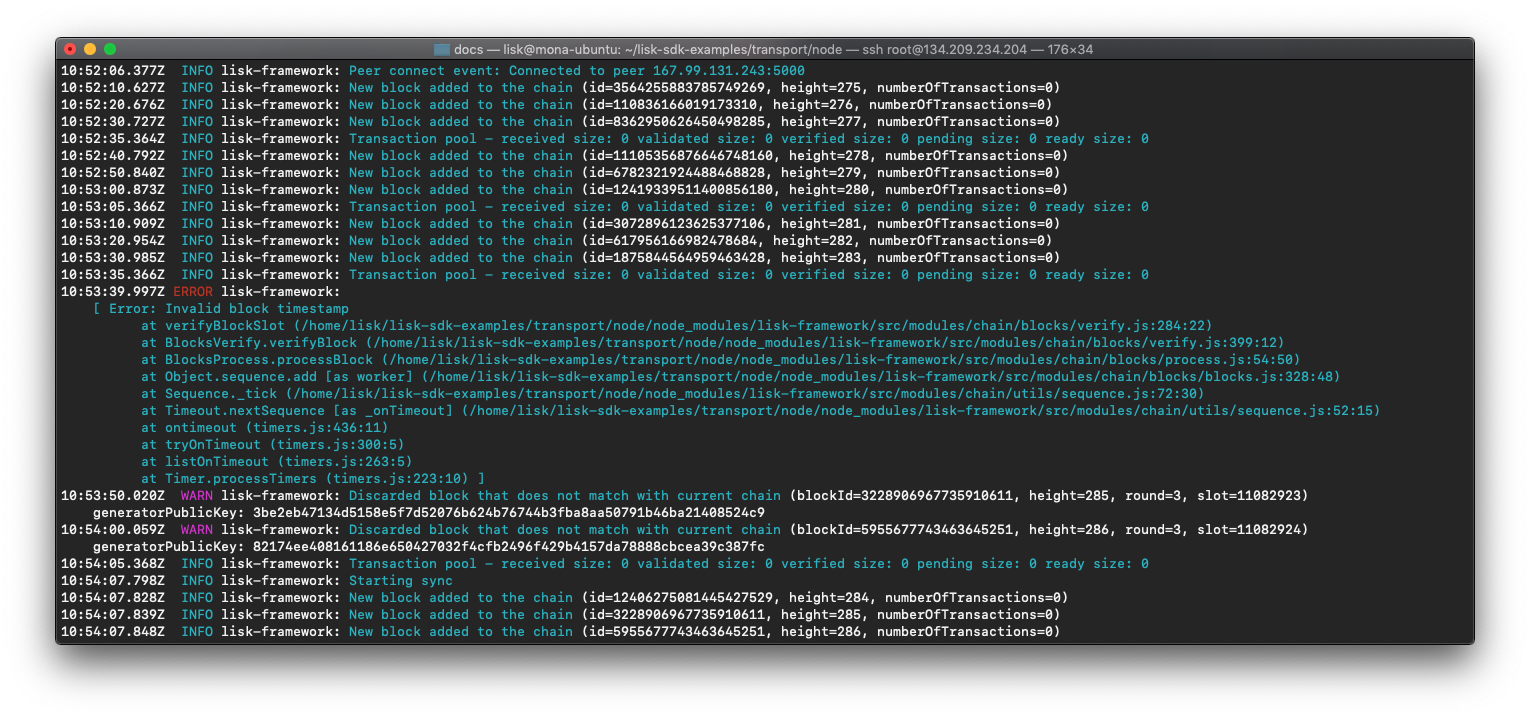
At this point the new API node will now receive transactions from the client app and vice versa.
The received transactions will be visible in the logs of the client node, (assuming the log level is at least info).
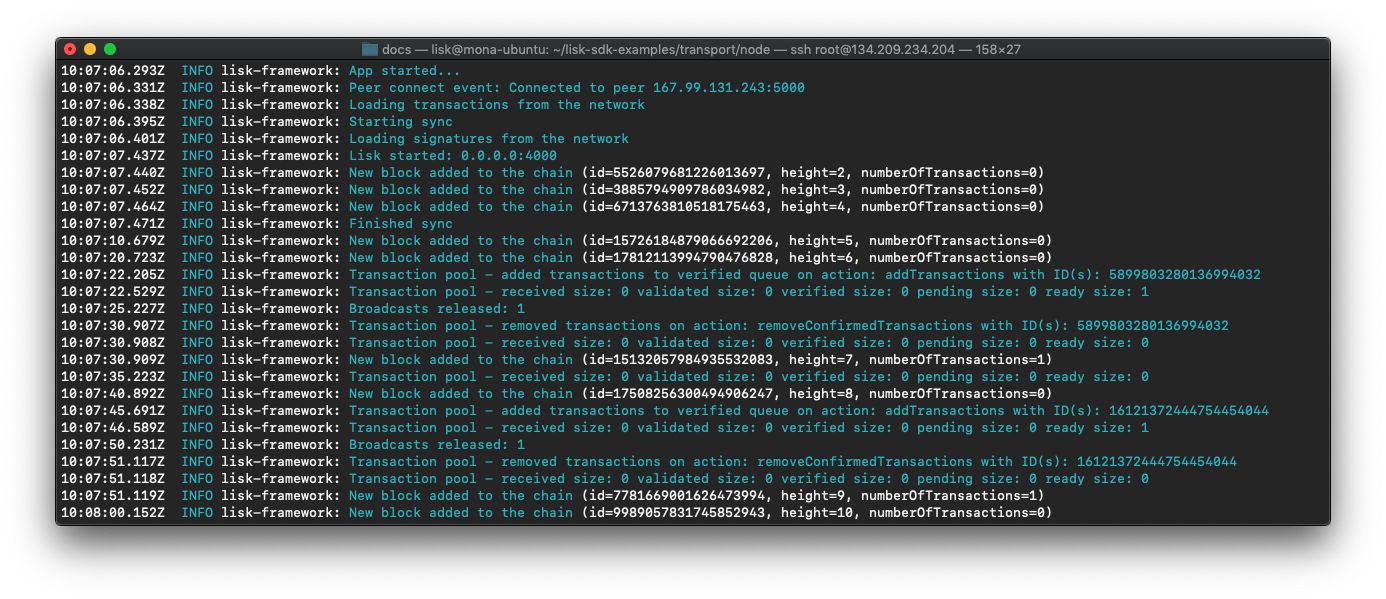
In the logs shown above it can be seen that the seed node was already 3 blocks ahead when the second node was started. It first synchronizes the missing blocks up to the current height, and then broadcasts the received transactions from the client app to the seed node, whereby the delegates can then add the transactions to blocks and forge them.
These new blocks are broadcast again to the new node, and the client app can display the data based on the API calls that it sends to the new node.
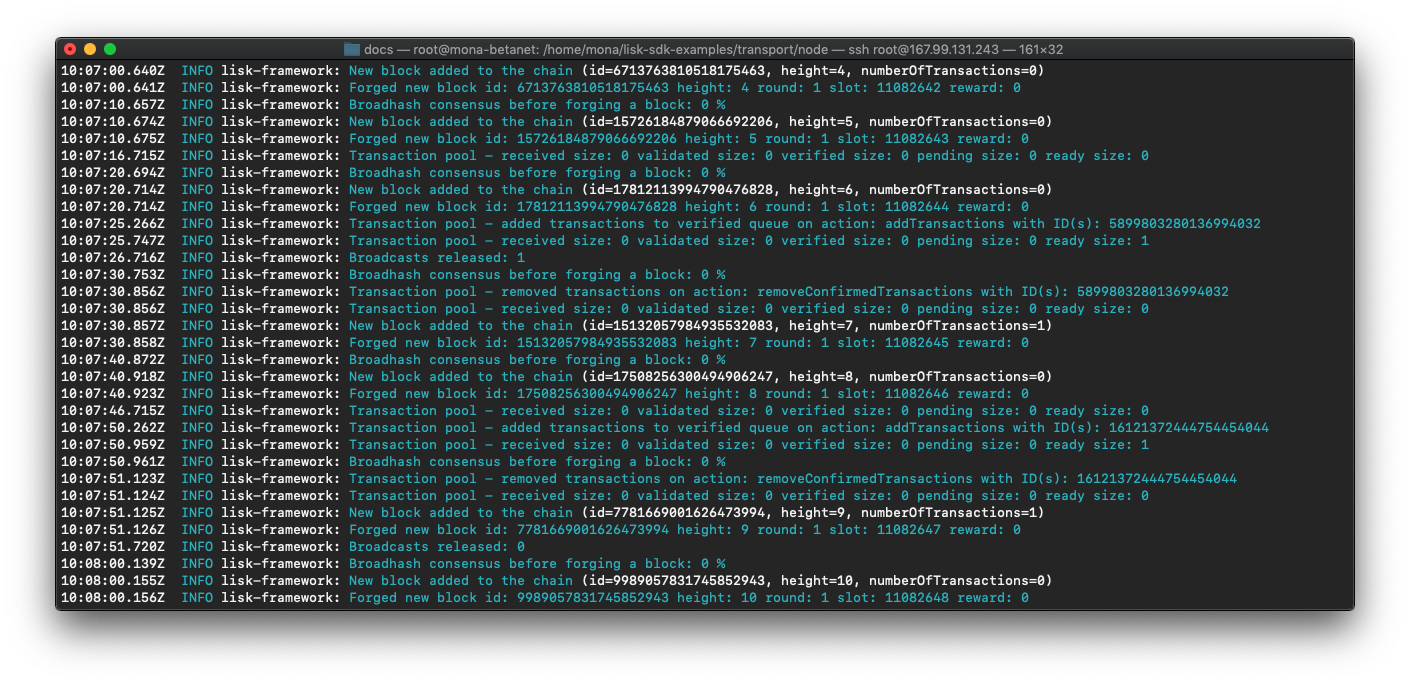
|
Broadcast irregularities are no cause for concern.
Sometimes errors occur when broadcasting transactions between the nodes.
There is no cause for concern here as the node will re-start the sync process again; and in the majority of cases it is successful on the next attempt.
|
7. Add more nodes
During development of the blockchain application, one node was enabled for forging for all 101 genesis delegates.
After the release of the first version of the blockchain application, it is necessary that real delegates take the forging slots of the genesis delegates.
| The network will become decentralized for the first time when at least 51 individual delegates are actively forging in the network. |
To join the network as a new delegate, follow the steps listed below:
-
Create an own, private account on the network.
-
Send some funds (which must be an adequate amount in order to register as a delegate), to the newly generated address.
-
Register a delegate.
-
Broadcast the delegate registration to the network:
Example: Registers a delegate with username "lightcurve"export SECRET_PASSPHRASE=123456 (1) lisk transaction:create:delegate lightcurve -p=env:SECRET_PASSPHRASE | tee >(curl -X POST -H "Content-Type: application/json" -d @- 1.2.3.4:4000/api/transactions) (2)1 Replace 123456with the secret passphrase.2 Replace 1.2.3.4with the IP of a node with a reachable API.
-
Set up a node: Follow the steps in the
READMEfile of the app, (alternatively read the Lisk tutorials, as this process is basically identical). -
People become convinced to vote for a delegate in the network, if the delegate has the following attributes:
-
Is helpful.
-
Is accountable.
-
Is sharing rewards.
-
Is offering useful services or tools.
-
|
How to replace a genesis delegate
If a delegate joins the network at a very early stage, it is likely they will probably replace one of the genesis delegates. The genesis delegates are voted in by the genesis account which holds all the tokens on the initial network start. The genesis account votes with these tokens for the genesis delegates, in order to stabilize the network during the development. Therefore, when replacing a genesis delegate, the new delegate will need to convince the person who controls the genesis account of the network; which will most likely be the app developer. Later, when the majority of the existing tokens are distributed amongst the different private accounts, the new delegate needs to gain the trust of the community in order to be voted into a forging position. |