Sending and retrieving hello
Whilst building the Hello Client, we created the HelloModule to send and store hello messages on the blockchain.
Later, we created the HelloInfoPlugin to aggregate those hello messages in an offline database.
On this page, you’ll learn:
-
How to send a hello message via a simple web interface.
-
How to retrieve the hello messages from the blockchain in the UI.
| The relevant files discussed in this guide are the sendHello.js, the getHello.js, and the messageTimeline.js. |
1. Sending hello
The "Send Hello" page will take the hello message from the user and send it to the blockchain. The blockchain node will verify the validity of the request as per the module’s configuration and various other parameters. If the request is valid, the hello message will be included in the blockchain.
To perform the aforementioned process, let’s update the sendHello.js file in the hello_frontend/src/components/ directory.
Firstly, define the necessary variables and the handleChange event.
// [...]
// UI libraries import
import React, { useState } from "react";
// Lisk libraries import
import { cryptography, transactions } from '@liskhq/lisk-client/browser';
import * as api from '../api';

function SendHello() {
    const [state, updateState] = useState({
        hello: '',
        fee: '',
        error: '',
        passphrase: '',
        keyPath: '0',
        transaction: {},
        response: {}
    });

    const handleChange = (event) => {
        const { name, value } = event.target;
        updateState({
            ...state,
            [name]: value,
        });
    };
    // [...]

}
export default SendHello;
Similar to previous guides, we want the form submission to be handled by the handleSubmit function.
It will take in the information such as a passphrase, hello message, fee, etc., and will create a transaction using the apiClient.
Upon clicking on the Submit button, the createHello transaction will be created and it will then be posted to the node.
// [...]

function SendHello() {

    // [...]

       const handleSubmit = async (event) => {
        event.preventDefault();

        // 1. Get apiClient via api.js.
        const client = await api.getClient();

        // 2. This is the passphrase of the sender of the hello message, based on the passphrase and the keyDerivation path, the identity of the sender will be computed.
        const passphrase = state.passphrase;
        // 3. A private key will be used to sign a transaction. The private key is generated using the keyDerivationPath and the passphrase.
        const privateKey = await cryptography.ed.getPrivateKeyFromPhraseAndPath(passphrase, "m/44'/134'/" + state.keyPath + "'");
        let responseError = '';
        // 4. Here we are creating a transaction by passing the module name, command, fee, and the hello message.
        const signedTx = await client.transaction.create({
            module: 'hello',
            command: 'createHello',
            fee: BigInt(transactions.convertLSKToBeddows(state.fee)),
            params: {
                "message": state.hello,
            },
        }, privateKey).catch(err => {
            responseError = err.message;
        })
        let txResponse = '';

        // 5. Once a transaction is created, it will be sent to the node and after block execution, a hello message will be sent on the chain.
        if (typeof signedTx !== "undefined") {
            txResponse = await client.transaction.send(signedTx).catch(result => {
                console.log(result)
                responseError = result.message;
            });
        }
        // 6. Based on the response, the 'state' object will be updated.
        updateState({
            transaction: signedTx,
            response: txResponse,
            error: responseError,
            hello: '',
            fee: '',
            passphrase: '',
            keyPath: '',
        });
    };
    // [...]
}
export default SendHello;
The UI is now able to send hello messages to the blockchain.
However, it would be nice if the UI could display a request response to the user as well.
To achieve this, let’s add the displayData function:
// [...]

function SendHello() {
    // [...]
    const displayData = () => {
        // If an error occurs, display the appropriate error.
        if (state.error !== '') {
            return (
                <>
                    <div className="ui red segment" style={{ overflow: 'auto' }}>
                        <h3>Something went wrong! :(</h3>
                        <pre><strong>Error:</strong> {JSON.stringify(state.error, null, 2)}</pre>
                    </div>
                </>
            )
        }
        // Check the values of the response received and display data accordingly.
        else if (typeof state.transaction !== 'undefined' && state.transaction.fee > 0) {
            return (
                <>
                    <h3>Your transaction's details are:</h3>
                    <div className="ui green segment" style={{ overflow: 'auto' }}>
                        <pre>Transaction: {JSON.stringify(state.transaction, null, 2)}</pre>
                        <pre>Response: {
                            JSON.stringify(state.response, null, 2)}</pre>
                    </div>
                </>
            )
        }
    }
    // [...]
}

export default SendHello;
Finally, the return function needs an update, so that the form submission, listing of data, and the on-change event can be functional.
// [...]
function SendHello() {
// [...]
return (
<>
<FixedMenuLayout />
<Container>
<div>
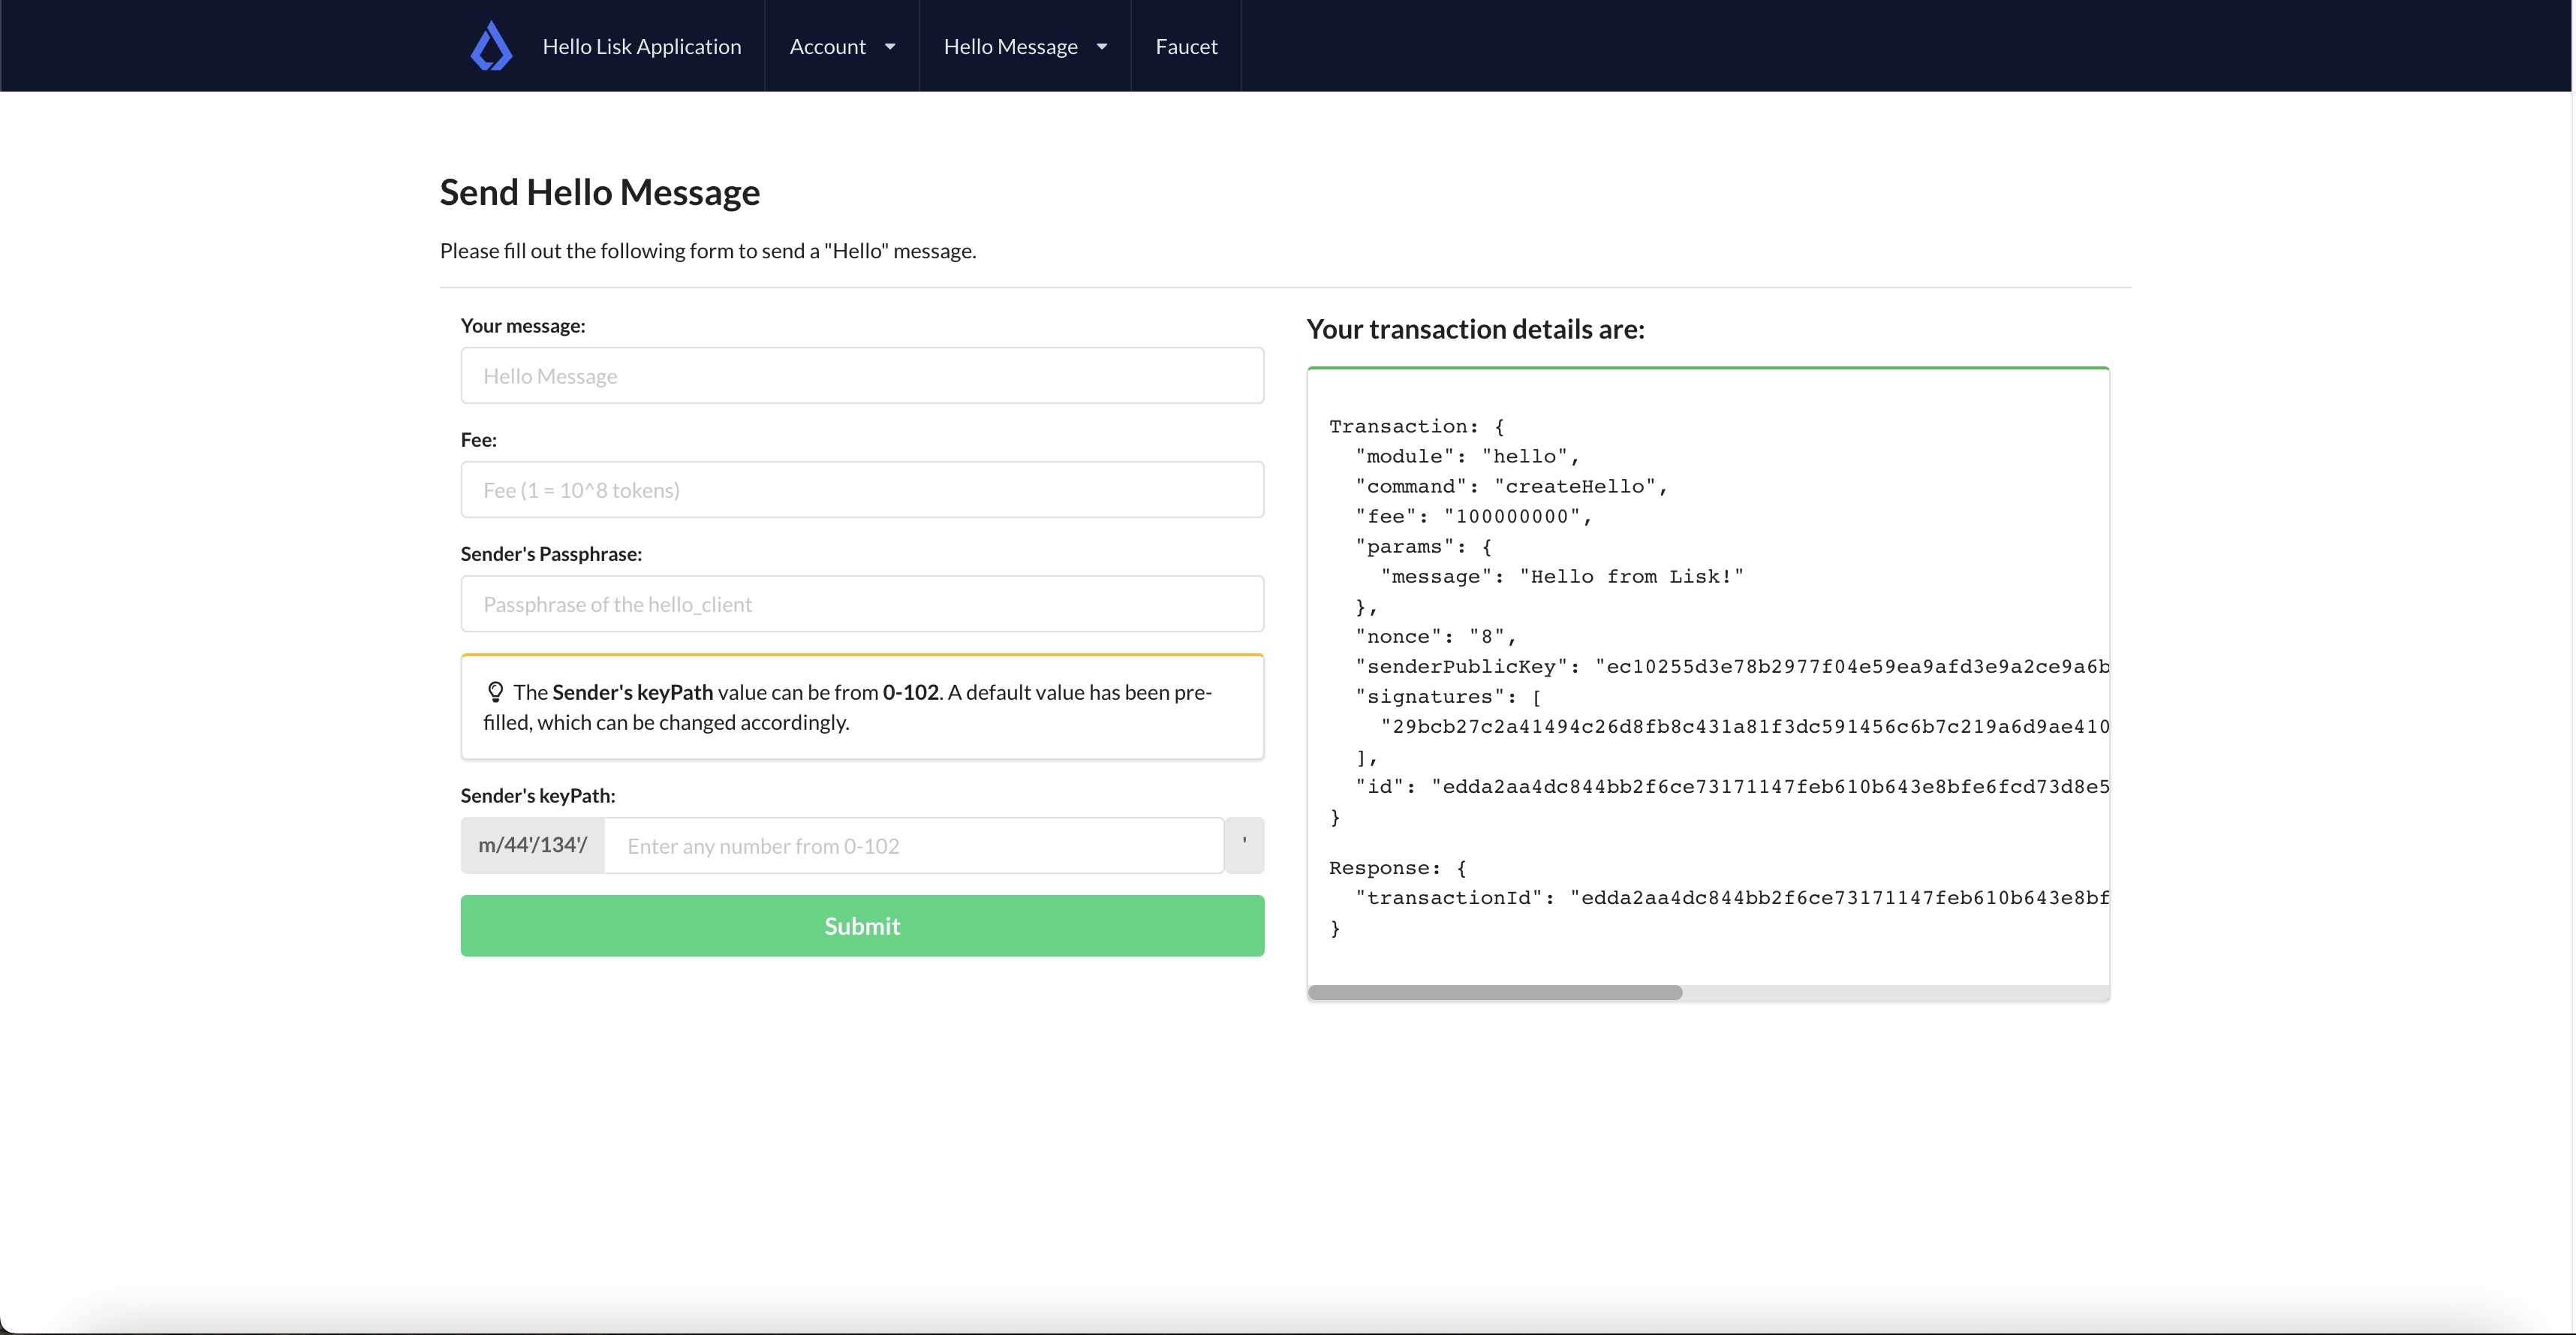
<h2>Send Hello Message</h2>
<p>Please fill out the following form to send a "Hello" message.</p>
<Divider></Divider>
<div className="ui two column doubling stackable grid container">
<div className="column">
<Form onSubmit={handleSubmit} className="ui form">
<Form.Field className="field">
<label>Your message:</label>
<input placeholder="Hello Message" id="hello" name="hello" onChange={handleChange} value={state.hello} />
</Form.Field >
<Form.Field className="field">
<label>Fee:</label>
<input placeholder='Fee (1 = 10^8 tokens)' type="text" id="fee" name="fee" onChange={handleChange} value={state.fee} />
</Form.Field>
<Form.Field className="field">
<label>Sender's Passphrase:</label>
<input placeholder='Passphrase of the hello_client' id="passphrase" name="passphrase" onChange={handleChange} value={state.passphrase} type="password" />
</Form.Field>
<Form.Field className="field">
<div className="ui yellow segment">
<i className="lightbulb outline icon"></i>The <strong>Sender's keyPath</strong> value can be from <strong>0-102</strong>. A default value has been pre-filled, which can be changed accordingly.
</div>
<label>Sender's keyPath:</label>
<div className="ui labeled input">
<div className="ui label">
m/44'/134'/
</div>
<input placeholder='Enter any number from 0-102' id="keyPath" name="keyPath" onChange={handleChange} value={state.keyPath} type="text" />
<div className="ui label">
'
</div>
</div>
</Form.Field>
<Button type='submit' fluid size='large' style={{ backgroundColor: '#2BD67B', color: 'white' }}>Submit</Button>
</Form>
</div>
<div className='column'>
<>
{displayData()}
</>
</div>
</div>
</div>
</Container>
</>
);
}
export default SendHello;Open the Hello Message→Send Hello Message page and fill out the form in it.
Click on the Submit button, if the sender’s account has sufficient balance and the hello message is acceptable as per the module’s config, the transaction will be successful.
After successfully sending a hello message, you can retrieve it by invoking the helloInfo_getMessageList endpoint, as described in the Querying Saved Events section.
2. Getting hello
To display the hello messages sent on the blockchain, let’s update the getHello.js file and define the relevant state variables and the getMessages function.
// [...]
// UI libraries import
import React, { useState, useEffect } from "react";
// Import api.js for apiClient
import * as api from '../api';

export default function GetHello() {
    const [messages, getHelloMessages] = useState('');

    useEffect(() => {
        getMessages()
    }, [])
    // On page load, all the hello messages sent on the blockchain will be retrieved and displayed on the screen.
    async function getMessages() {
        const client = await api.getClient();
        return client.invoke("helloInfo_getMessageList", {
        }).then(res => {
            const responseMessages = res
            getHelloMessages(responseMessages);
        });
    }
    // [...]
}
In the boilerplate project, we already created a messageTimeline.js file to list all the hello messages and other details on the UI.
import React from "react";
import { Divider } from 'semantic-ui-react';

export default function MessageTimeline(props) {

    const displayMessages = (props) => {
        const { messages } = props;

        if (messages.length > 0) {
            return (
                messages.map((message, index) => {
                    return (
                        <>
                            <div className="message" key={message.ID}>
                                <h4>Hello Message # {message.ID}</h4>
                                <p className="senderAddress"><strong>Sender Address:</strong>  {message.senderAddress}</p>
                                <p className="message"><strong>Message:</strong> {message.message}</p>
                                <p className="blockHeight"><strong>Block Height:</strong> {message.blockHeight}</p>
                            </div> <Divider>
                            </Divider>
                        </>
                    )
                })
            )
        } else {
            return (<h4>No Hello messages have been sent so far!</h4>)
        }
    }
    return (
        <>
            {displayMessages(props)}
        </>
    )
}
The return function in the getHello.js is already configured to call the existing MessageTimeline component.
// [...]
export default function GetHello() {
// [...]
return (
<div>
<FixedMenuLayout />
<Container >
<div>
<h2>Hello messages sent so far!</h2>
<Divider>
</Divider>
<MessageTimeline messages={messages} />
</div>
</Container>
</div>
);
// [...]
}
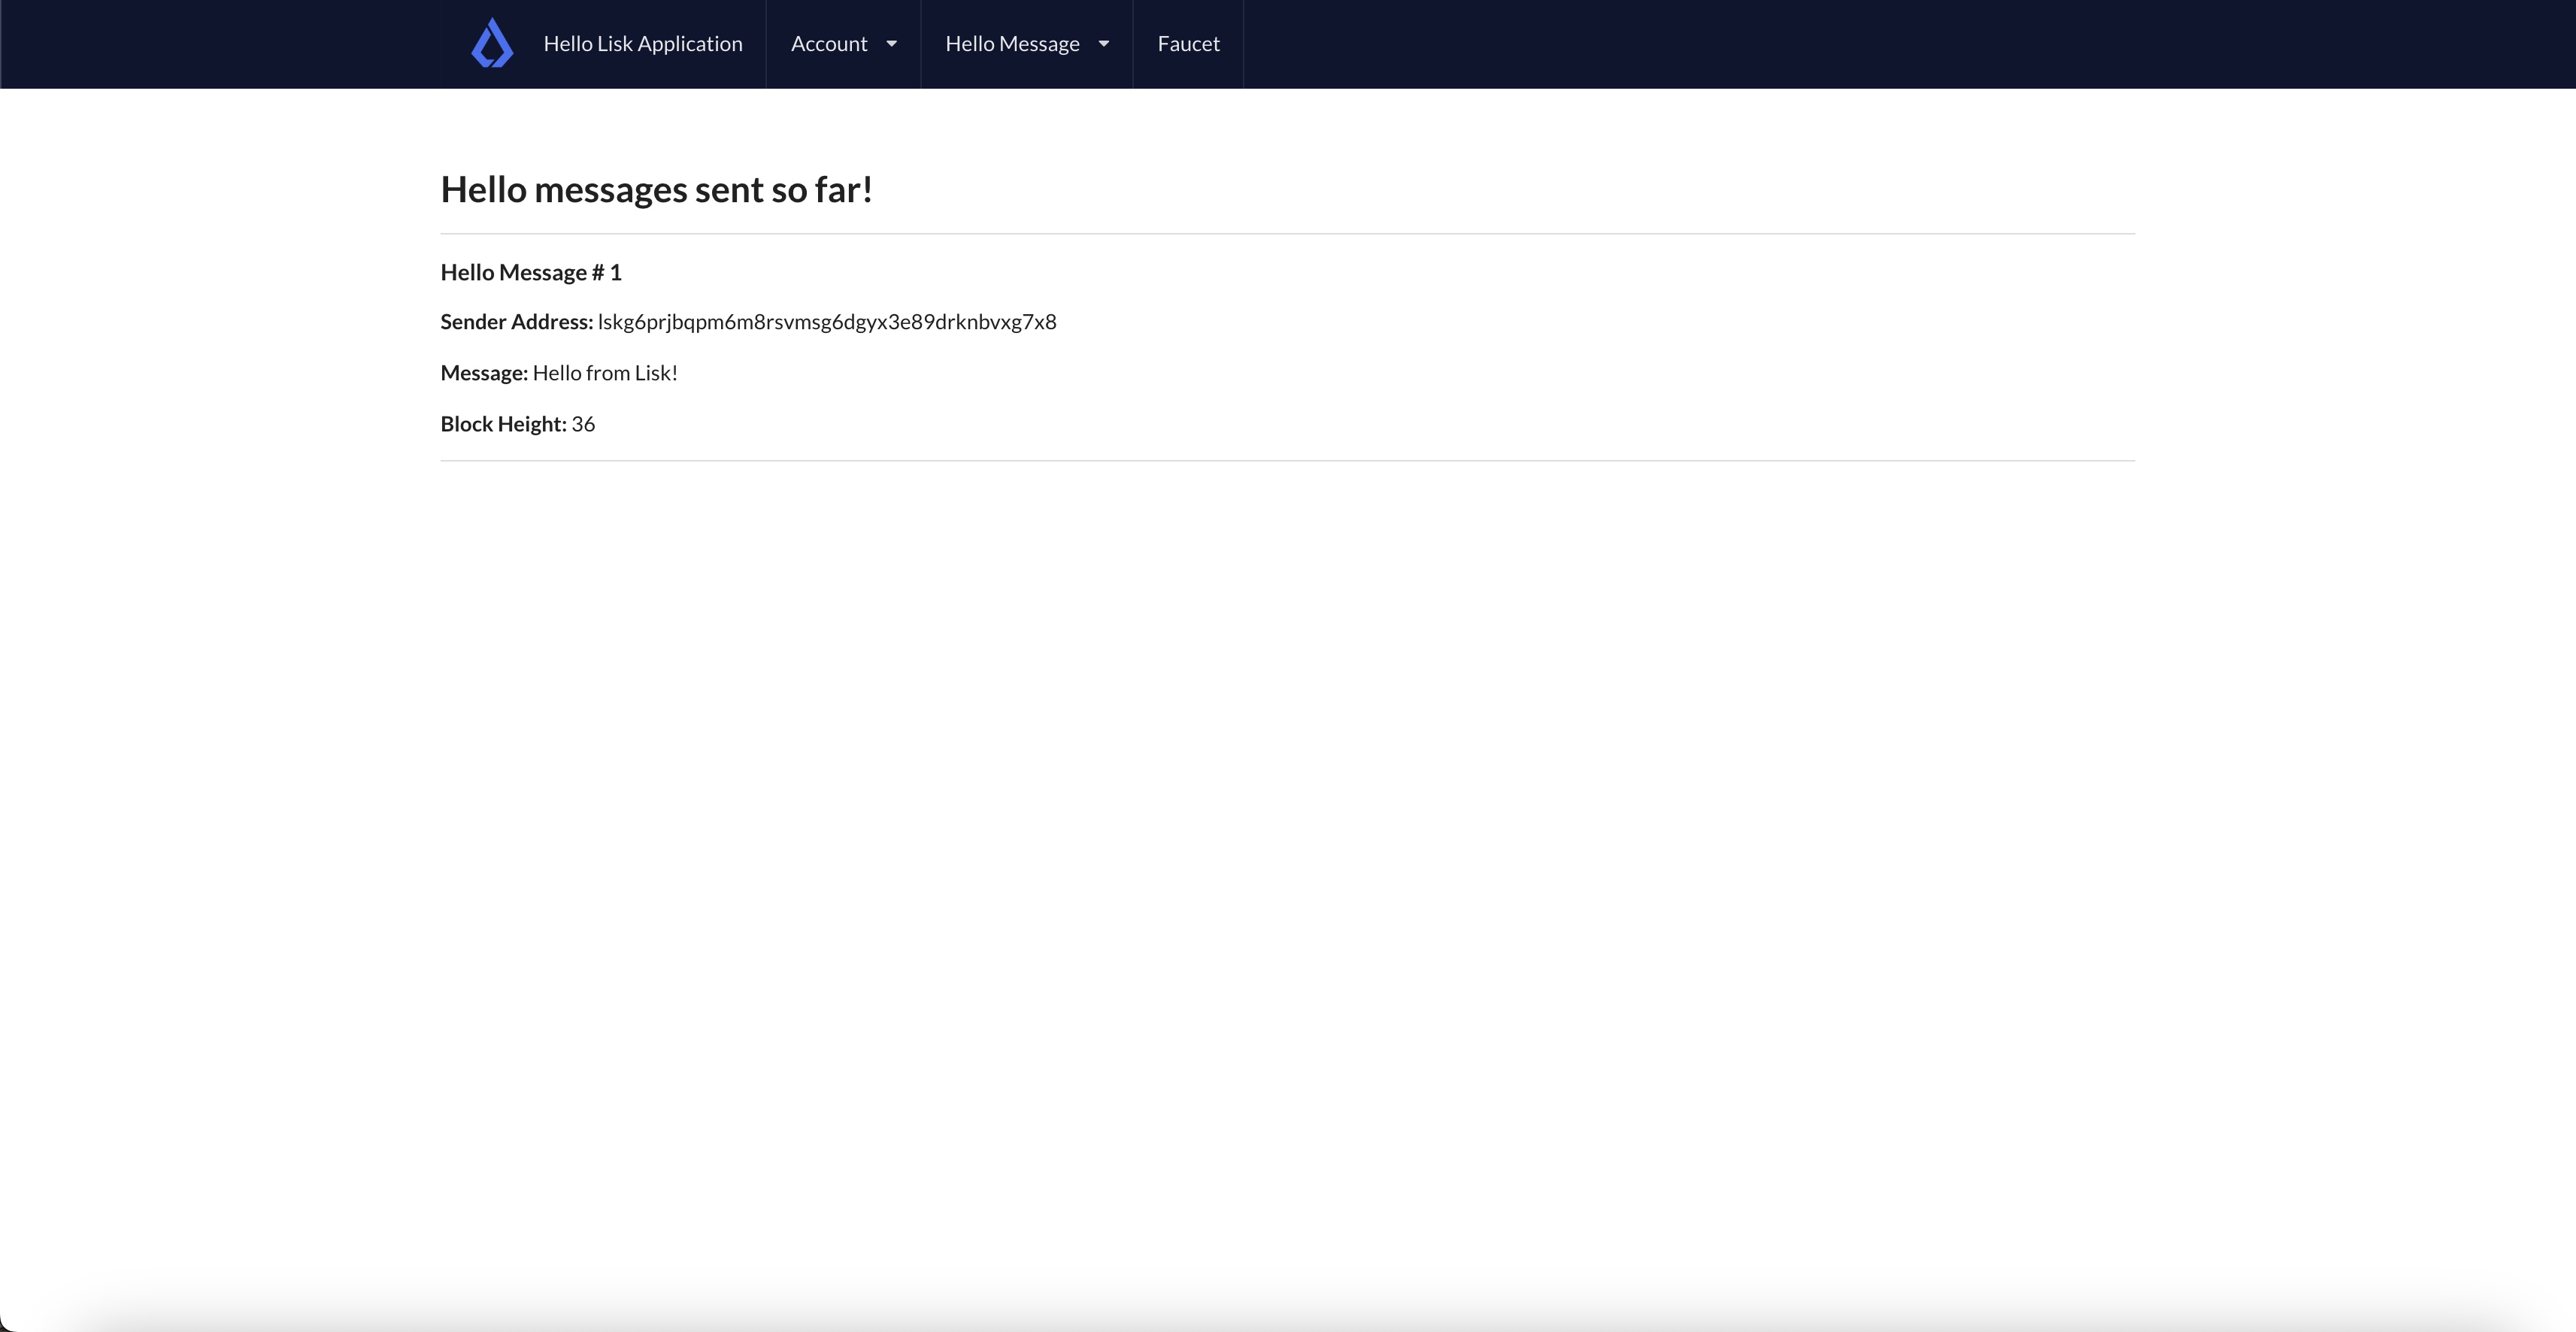
// [...]Everything is in place now, let’s test the Get Hello Messages page.
Click on the Hello Message→Get Hello Messages option. The page will display the message sent in the sending hello section.
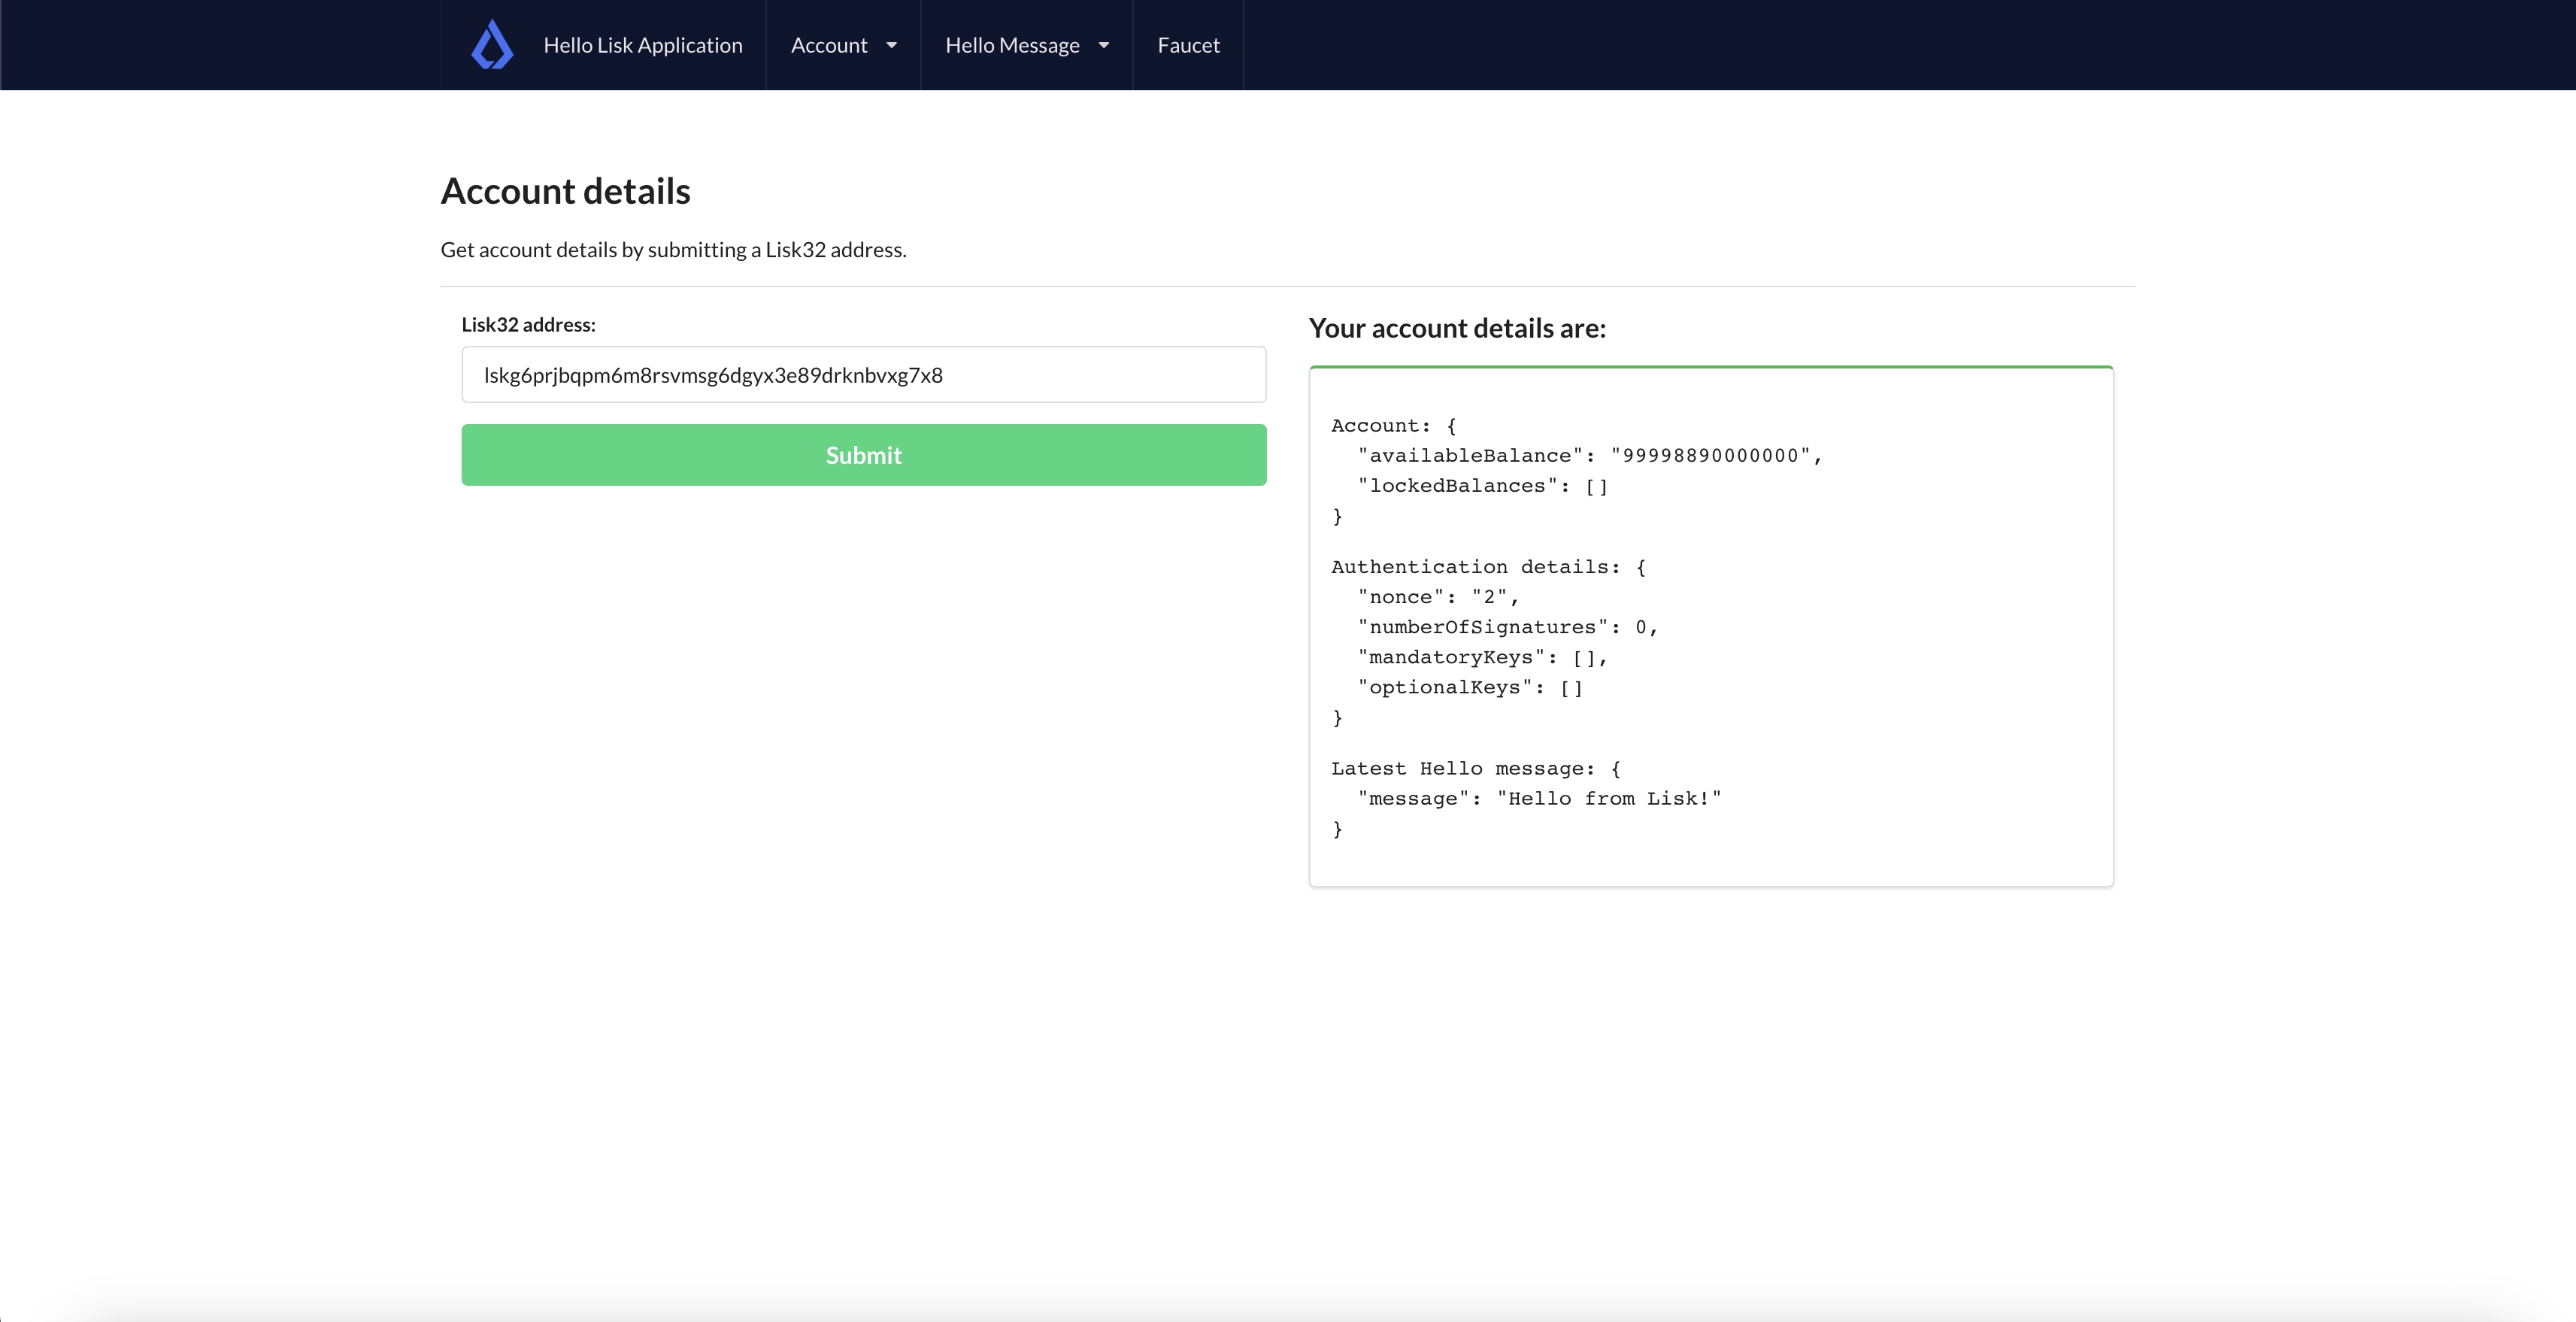
In case you want to fetch the latest hello message sent on the blockchain from an address, use the account detail page.