How to create multi-signature accounts and transactions
On this page, you’ll learn:
-
How to create a multi-signature user account that is managed by multiple users
-
How to create and sign multi-signature transactions
Intro
Multi-signature accounts are user accounts which are managed by a group of users.
As the name suggests, multi-signature accounts need multiple signatures of different members of the multi-signature group to send any transaction.
How many and which members exactly need to sign a transaction is defined during the registration of the multi-signature account.
| A multi-signature account can have 2-64 members. |
Use cases for multi-signature accounts
The uses for multi-signature accounts are numerous and the below examples are only a small selection of the potential possibilities.
Escrow Transactions
In case two users get into a dispute, a multi-signature account could be created to solve it.
For example, Alice makes the payment but Bob does not provide the services or goods as promised. In such a scenario, to resolve the dispute between users, a mutually trusted third party/arbiter steps in.
Considering the wallet is configured to be a 2-of-3 multi-sig wallet, the third key in the above case is given to the arbiter. Based on the arbiter’s judgment the funds can be given either to Alice or to Bob.
Joint Account
A 1-out-of-2 account with no mandatory key can be shared by partners. Each has a key allowing them to spend the tokens in the account. In this way, it is clear who has signed which transaction.
Community Accounts
An account with 1 mandatory signature and 1 optional out-of-N could be used by a social club. The account would require the signature of the accountant and one other member. This way the accountant approves every transaction, which in turn allows them to keep an eye on all the club’s expenditures. Additionally, each transaction is also signed by one member of the club, prohibiting the accountant from stealing any of the funds.
Validator pools
Another use case is of "validator pools". Securing enough self-votes to be an active validator might be easier to achieve for a group than for a single individual. Users could combine their tokens in a multi-signature account in order to reach the required self-stake to be an active validator in the network.
For example, three people could each participate in a multi-signature account with three mandatory keys and register this account as a validator. Now the block generating node can safely be operated by any of the participants without risk of losing any funds.
This way, no single individual controls the account. Instead, the account is controlled together by the members of the multi-signature group. Therefore, a single person can’t issue any transactions for the validator, like staking, changing the commission, or transferring tokens as they would require the authorization of other members of the group.
Two-Factor Authentication
If Alice creates a multi-sig wallet that requires two keys, Alice creates a two-factor authentication mechanism to access the funds. Alice can store the private keys on two different devices and the funds stored in Alice’s multi-signature account can be accessed only if both the keys are provided.
| However, using multi-signature as two-factor authentication can be risky, especially if it is a set of 2-of-2 multi-sig addresses. If one of the keys is lost, you will not be able to access your funds. Thus, it is safer to use a 2-of-3 setup. |
Decision Uniformity
A possible use case for multi-signature might be a family account, where family members manage the funds in the account collaboratively. Or consider a corporation with a board of four directors. Each board member gains access to one private key. No individual member can misuse the funds. Thus, only the decisions agreed upon by majority members can be executed.
How to create a multi-signature account
A multi-signature account is created by sending a "Register Multisignature" transaction. This transaction has to be sent from the account that is supposed to be converted.
| Multi-signature Registration Transactions from multi-signature accounts are invalid. |
The following parameters are required to send a "Register Multisignature" transaction:
-
numberOfSignatures: The number of private keys that must sign a transaction. -
mandatoryKeys: An array of public keys in lexicographical order. Once the account is registered as a multi-signature account, every outgoing transaction requires a signature for every public key inmandatoryKeys. -
optionalKeys: An array of public keys in lexicographical order. Once the account is registered as a multi-signature account, every outgoing transaction requires some signatures for some public keys inoptionalKeys(the number of needed signatures depends on thenumberOfSignaturesproperty and may also be zero). -
signatures: An array of signatures, corresponding to the public keys contained inmandatoryKeysandoptionalKeys. All public keys must have a corresponding signature. The signatures corresponding tomandatoryKeysare appended first, followed by those corresponding tooptionalKeys, where the order of signatures is the same as the order of public keys in the respective array.
Considering the use case example Escrow Transactions from above, the multi-signature registration parameters would look like this:
-
numberOfSignatures: 2 -
mandatoryKeys: [] -
optionalKeys: [AliceKey, BobKey, ArbiterKey] -
signatures: [AliceSignature, BobSignature, ArbiterSignature]
Pick an account to become multi-signature
Please be aware that the address of the multi-signature account is the same as the one before the multi-signature registration. Depending on the use case, you might want to turn one of your existing accounts into a multi-signature account or create a new account that will be used as a multi-signature account.
| If you create a new account, don’t forget to send over sufficient tokens to send the multi-signature registration. |
For a step-by-step guide about how to create a new account with Lisk Desktop, please refer to: Create an Account.
For a step-by-step guide on creating a new account with Lisk SDK, please refer to the Handling accounts guide.
Following our example in the parameters section, we need three different account credentials to register the multi-signature account.
Each account will be used to sign the registerMultiSignature transaction individually.
The first account among the three will also be used to send the registerMultisignature transaction.
Create three accounts, one for each optionalKey and then add them into an accounts.json file, like this:
{
   "accounts": [
      {
         "address": "lsk6oqambp2mgqvqxxxm5aohs6s6329sgwftax2rf",
         "keyPath": "m/44'/134'/0'",
         "publicKey": "e98e8a6325730be6bf2644af83d5a0b004bb31c15858fedbd0ac2c1f89e2eece",
         "privateKey": "5f6b8fab4419d78e7e5620c03dd4c54dbf82e14f7b18e68b983c1c1884252dd8e98e8a6325730be6bf2644af83d5a0b004bb31c15858fedbd0ac2c1f89e2eece"
      },
      {
         "address": "lskgmmkgyc67n5jrpf2trgtxtc4yjg7bpu992chba",
         "keyPath": "m/44'/134'/1'",
         "publicKey": "c61cd862a8b7f73857b248a4358a7b35c29ca273d76ba3819e8c54b62801f16e",
         "privateKey": "df4f52c787f9cb993384c42c2c146bd1d4d433790d1e175baa03c484543bf760c61cd862a8b7f73857b248a4358a7b35c29ca273d76ba3819e8c54b62801f16e"
      },
      {
         "address": "lskrw8gmg6fgdkkgj48q364quzkoqzya479x7rc3d",
         "keyPath": "m/44'/134'/2'",
         "publicKey": "fad413df3fe5e7961b81ee8dc168d13d7e1f5cccdd062ed77da77142c7d571f0",
         "privateKey": "dfe7b84b3a919bd7d170509072aaf92ab9a817384a0c315b72960f62764c13c4fad413df3fe5e7961b81ee8dc168d13d7e1f5cccdd062ed77da77142c7d571f0"
      }
   ]
}|
The script mentioned in this guide is for educational purposes only.
|
Converting a user account into a multi-signature account
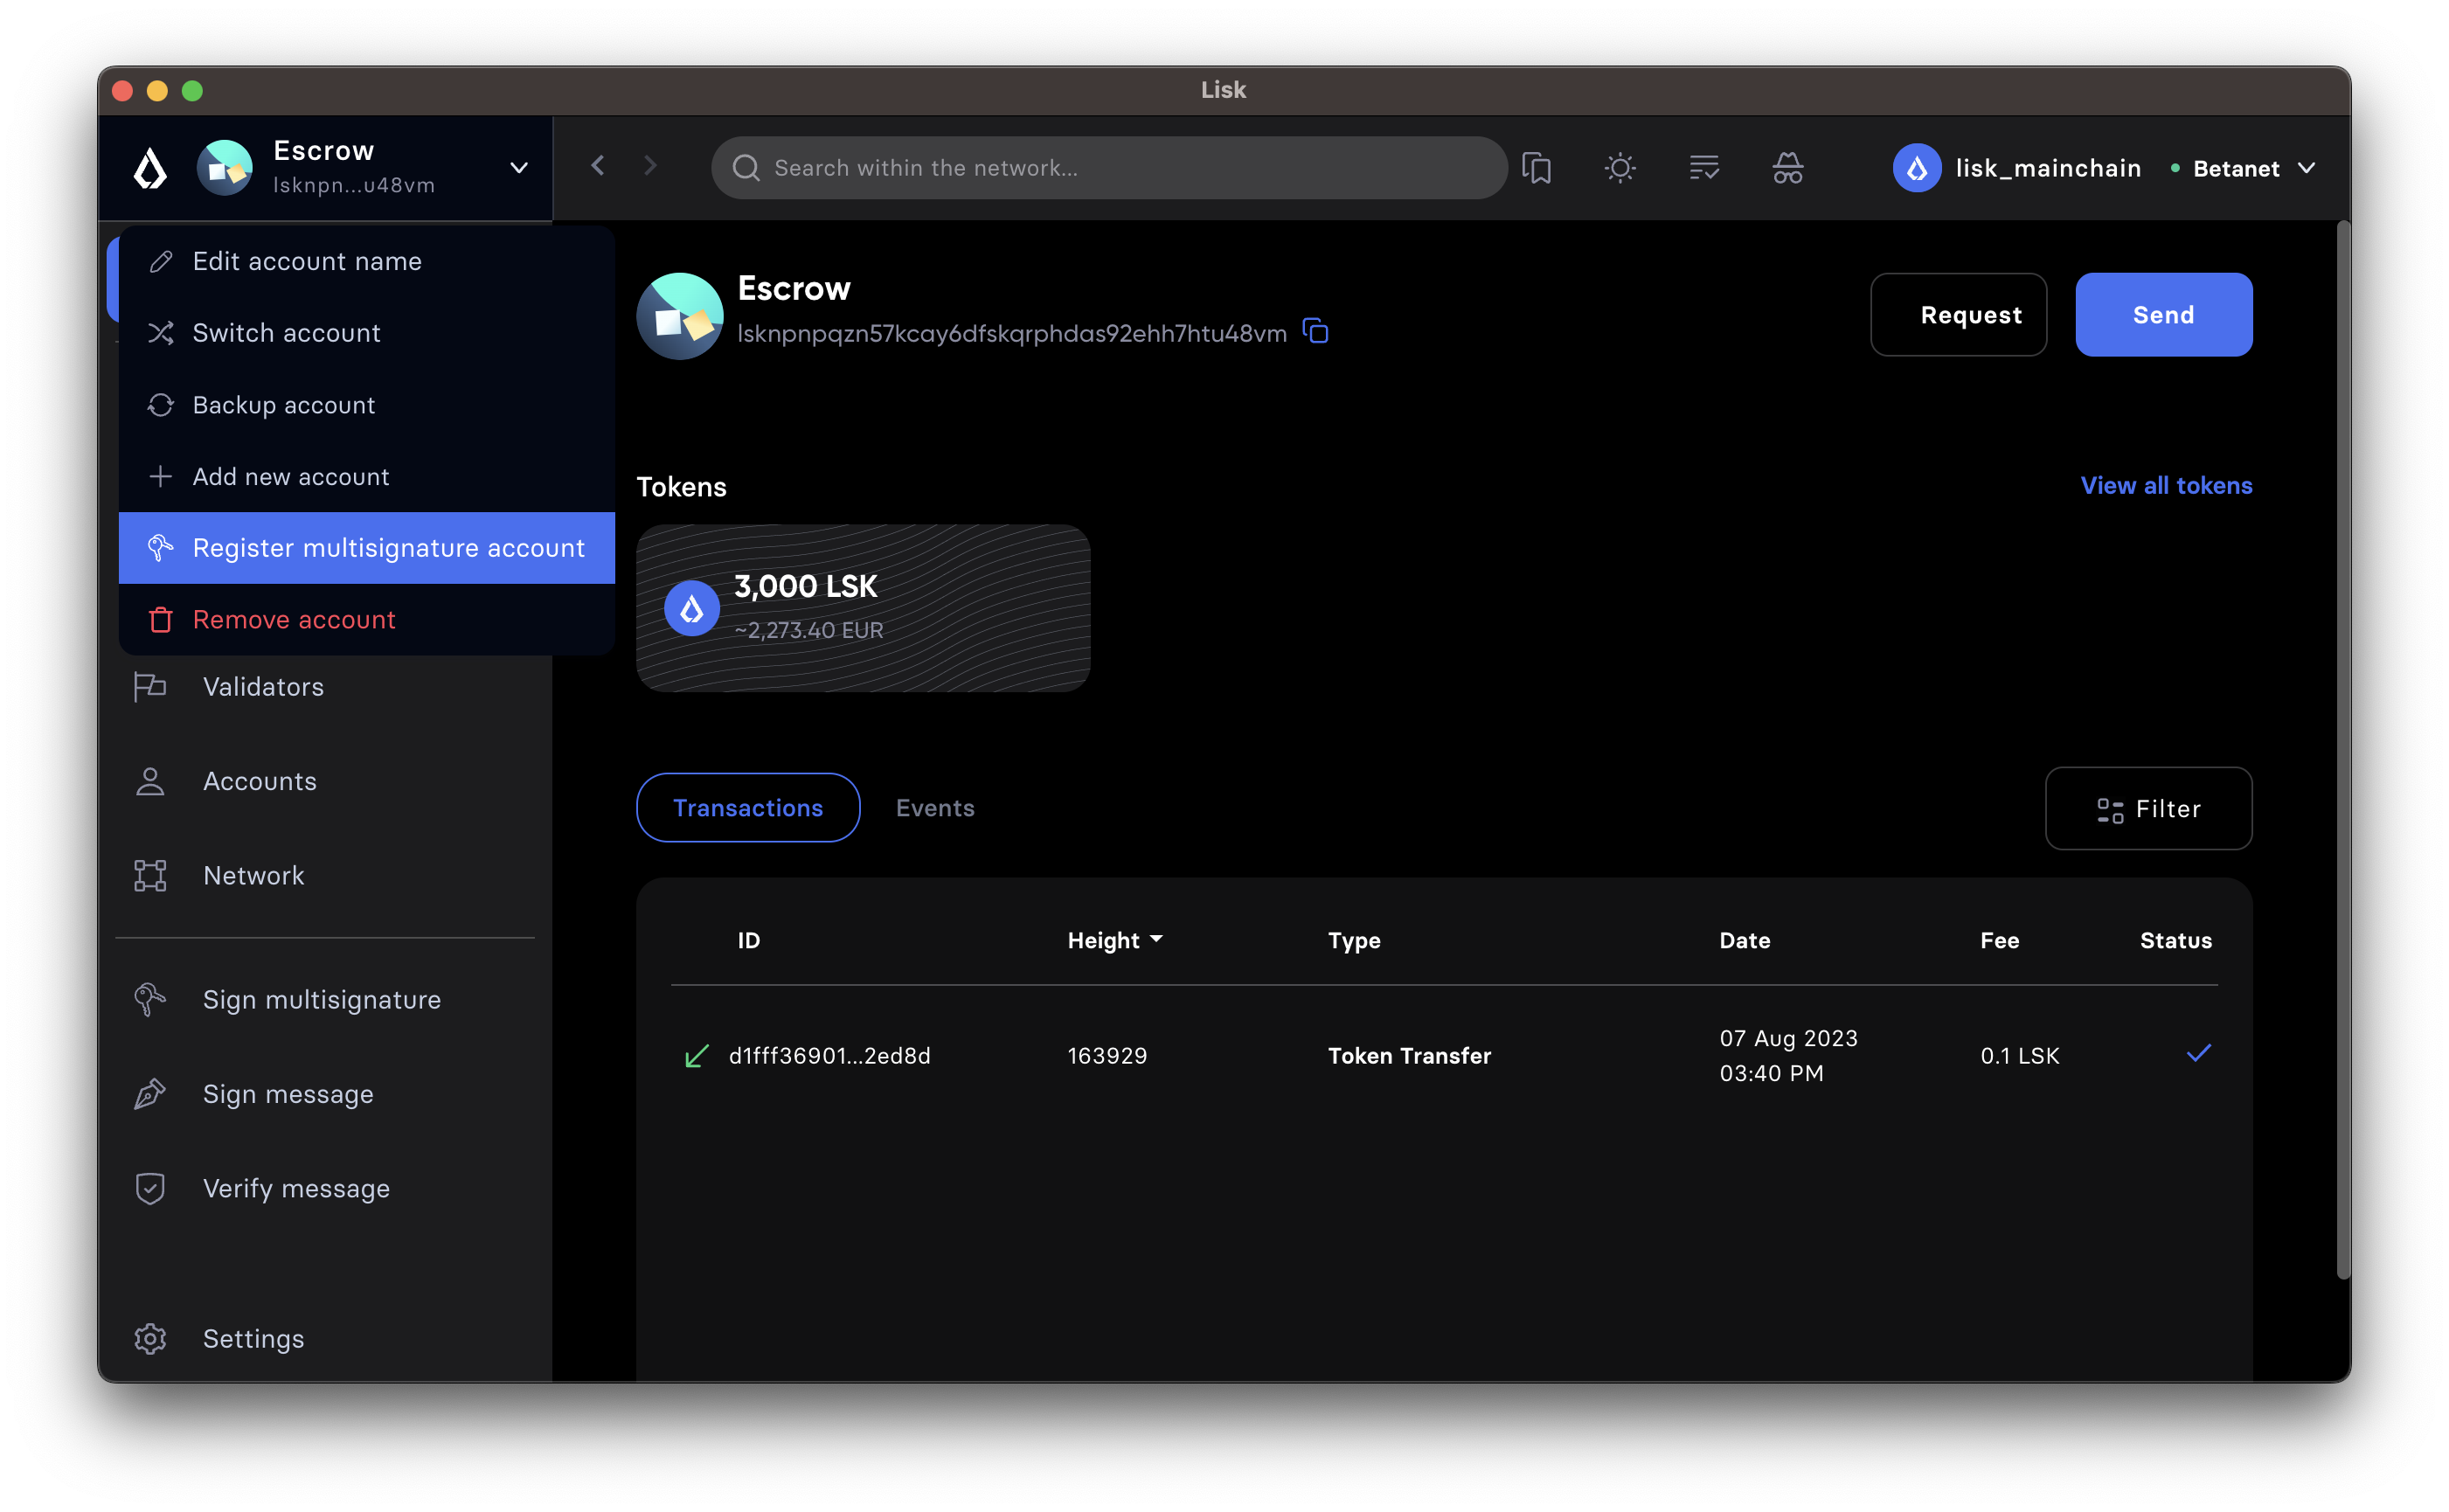
- Click on the "Register multisignature account" button in the top left menu
-
To convert the current account into a multi-signature account, click on the top-left menu and select Register multisignature account.
- Define required signatures and group members
-
This will open a new window where it is possible to define all required parameters like the required amount of signatures and the members of the group.
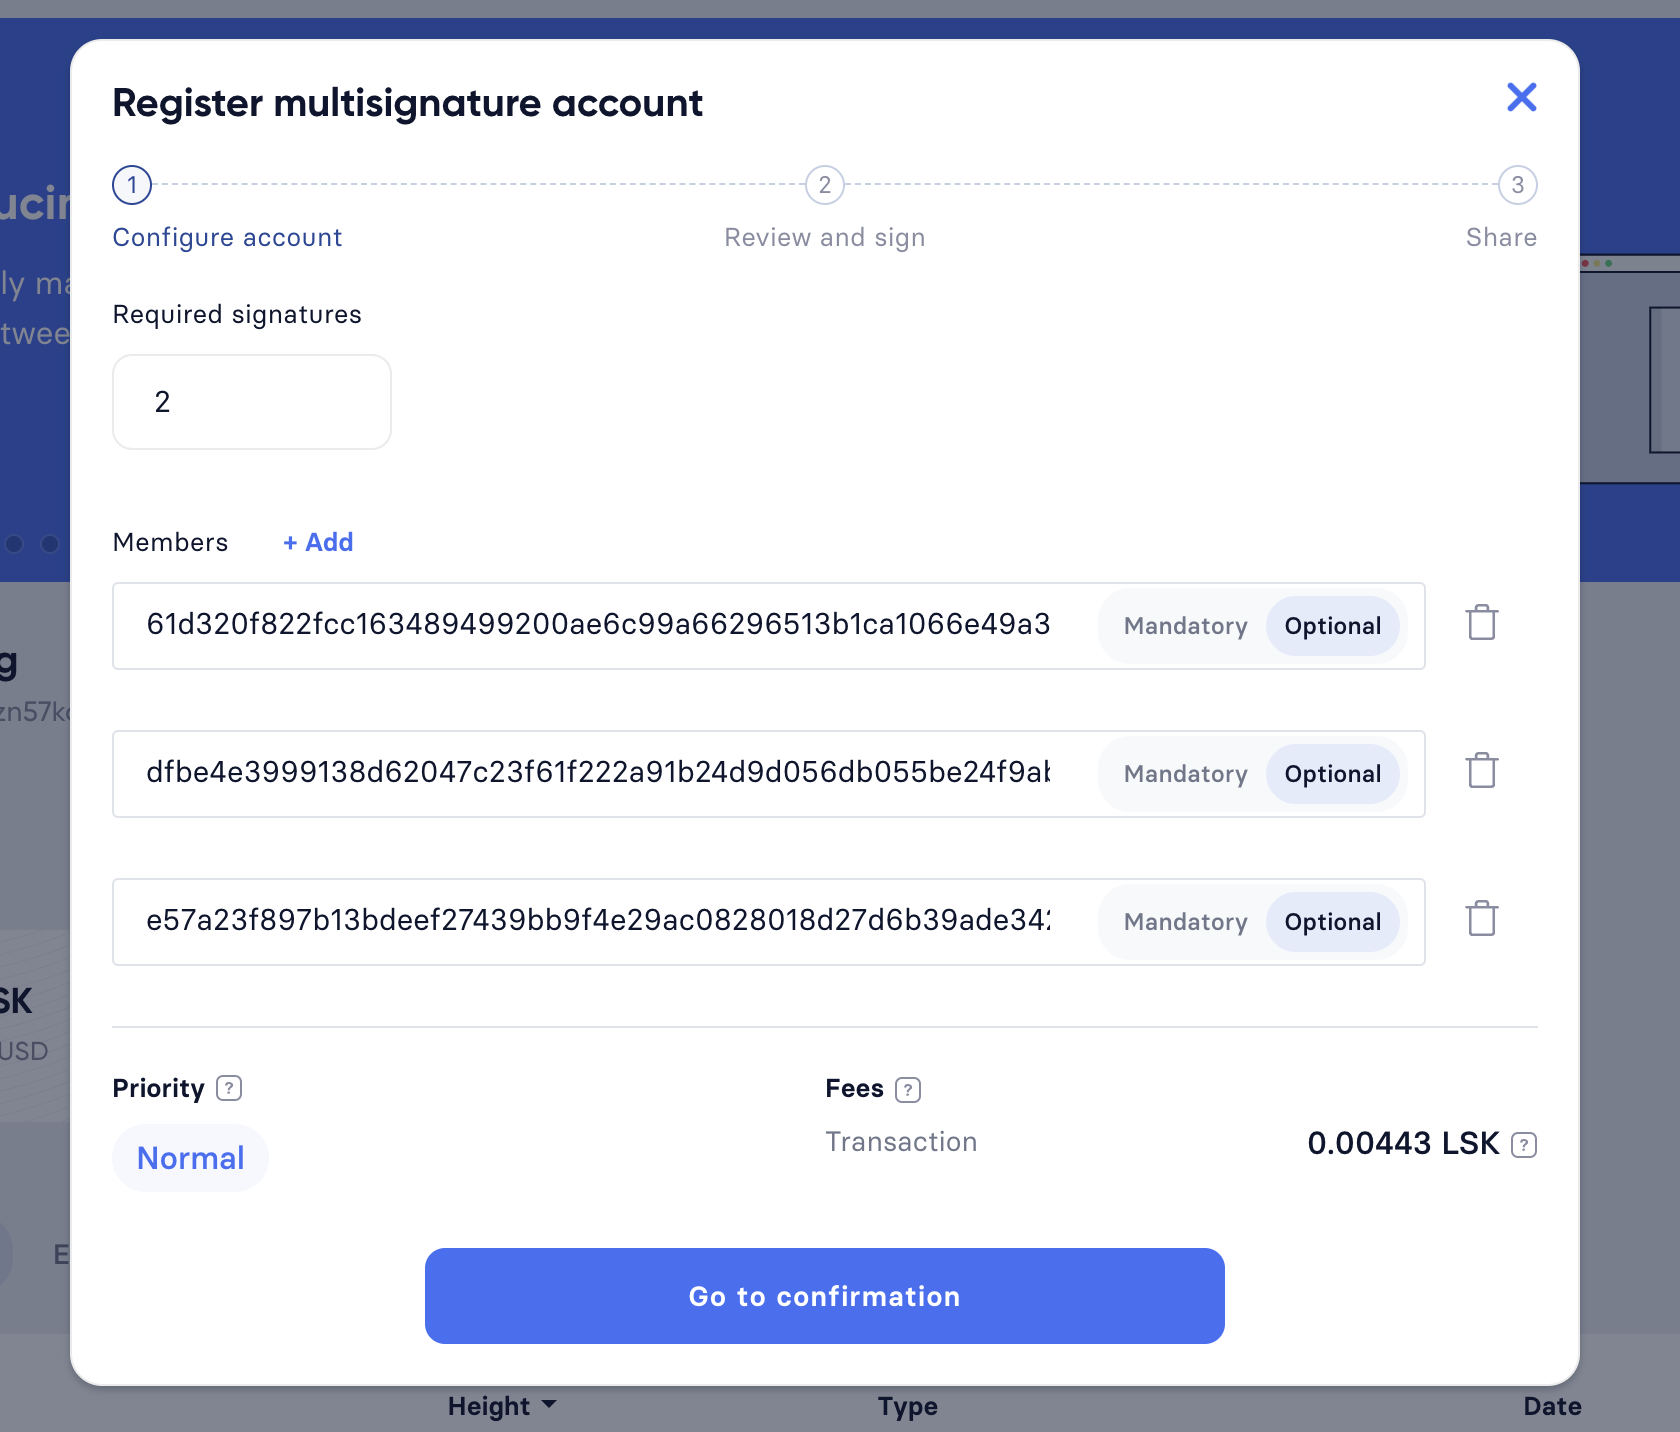
Members are added by pasting their respective public keys and selecting Mandatory or Optional for the specific member.
When all parameters are defined, click on the Go to confirmation button to proceed with the next step.
- Verify correct parameters and sign
-
On the confirmation page, it is possible to verify all provided parameters, before the transaction object is created.
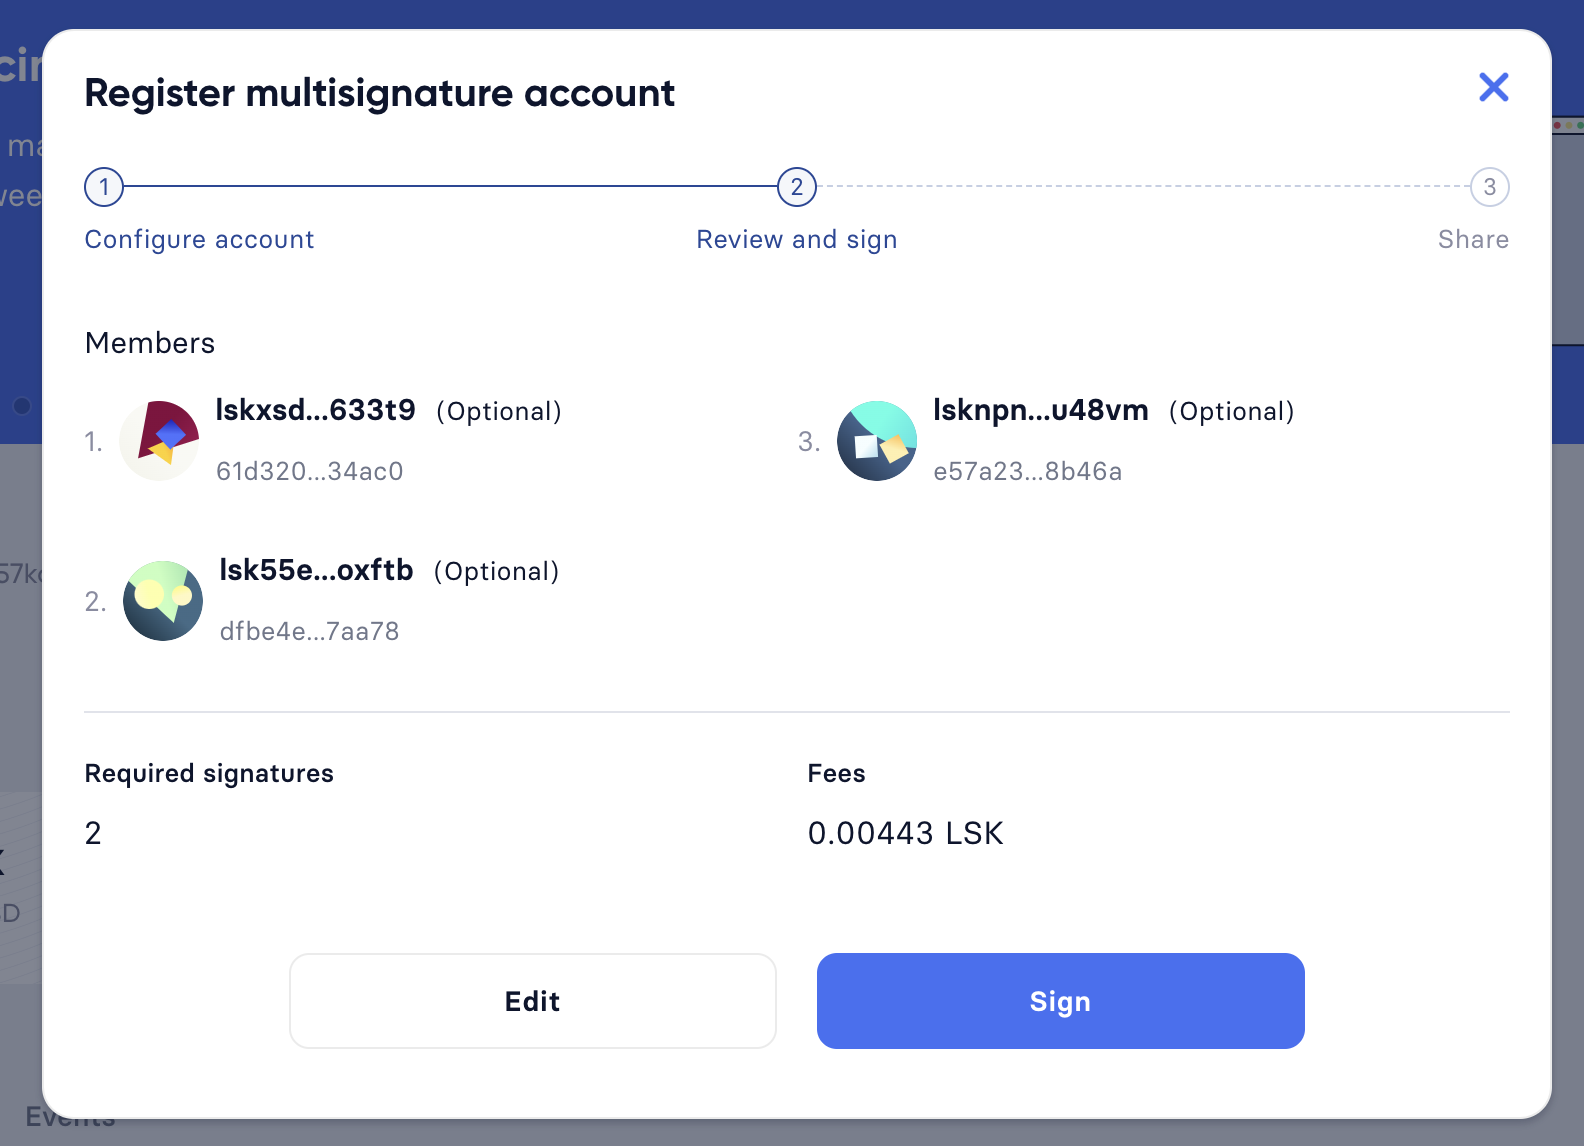
If you wish to edit any of the values, click the Edit button. Otherwise, confirm the correctness of the values by clicking the Sign button.
- Share the transaction
-
After all necessary parameters are defined, it is required that all members of the group (this includes all mandatory and all optional group members) verify the correctness of the transaction by signing it.
This is done to ensure that no account is added to a multi-signature group without their consent.
The transaction to be signed is provided as a JSON file or can be directly copied to the clipboard.
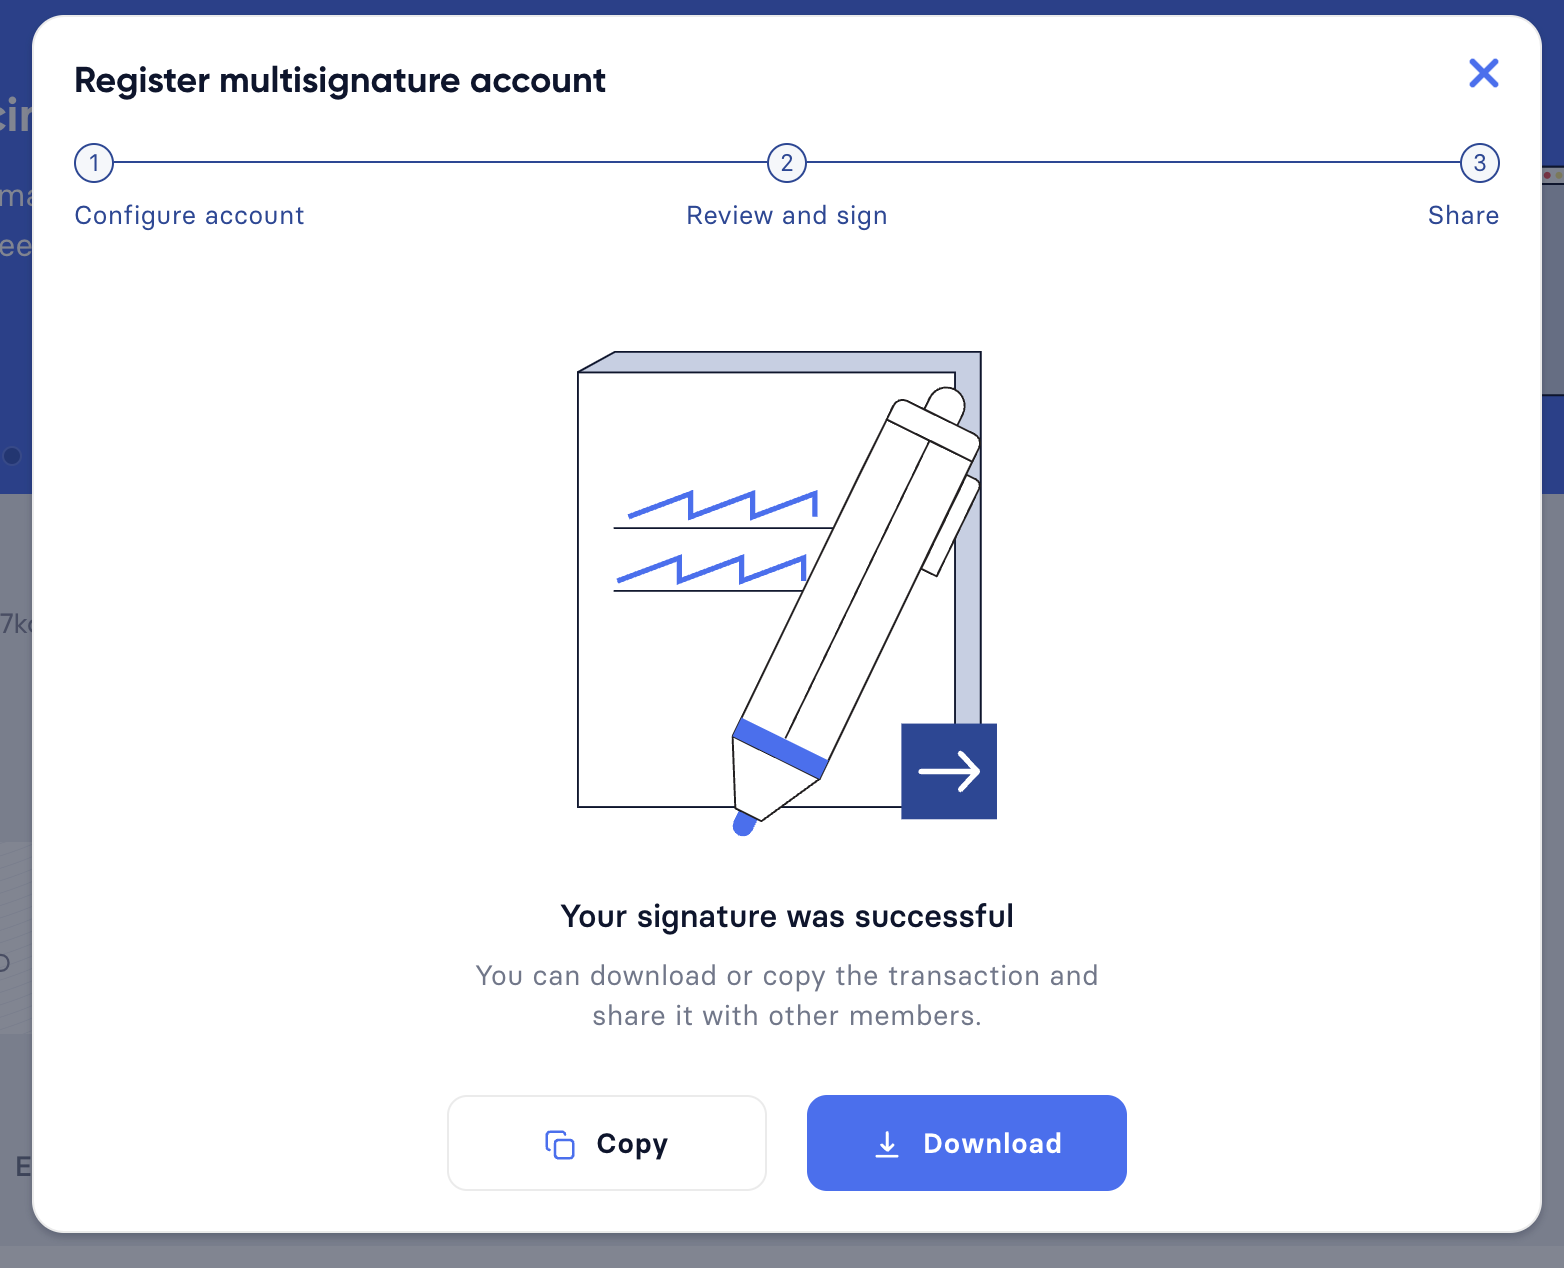
Share the transaction off-chain with the group members as described in the next section Collecting signatures.
Transaction to be signed by all group members{ "module":"auth", "command":"registerMultisignature", "nonce":"0", "fee":"443000", "senderPublicKey":"e57a23f897b13bdeef27439bb9f4e29ac0828018d27d6b39ade342879928b46a", "params":{ "mandatoryKeys":[], "optionalKeys":[ "61d320f822fcc163489499200ae6c99a66296513b1ca1066e49a37a026434ac0", "dfbe4e3999138d62047c23f61f222a91b24d9d056db055be24f9ab6d95d7aa78", "e57a23f897b13bdeef27439bb9f4e29ac0828018d27d6b39ade342879928b46a" ], "numberOfSignatures":2, "signatures":[ "00000000000000000000000000000000000000000000000000000000000000000000000000000000000000000000000000000000000000000000000000000000", "00000000000000000000000000000000000000000000000000000000000000000000000000000000000000000000000000000000000000000000000000000000", "00000000000000000000000000000000000000000000000000000000000000000000000000000000000000000000000000000000000000000000000000000000" ] }, "signatures":[], "id":"" }
The 000..0 signatures are placeholders for the pending signatures from the members of the multi-signature group.
They will be replaced automatically with the correct signatures, once the members sign the transaction.
|
Let’s prepare a script that takes the accounts' data and uses it to create and later sign a registerMultisignature transaction.
| The register-multiSig-account.js script can be found in the register-multi-sig-accounts folder. |
-
Create a
register-multiSig-account.jsfile. Import all the relevant classes and schemas.register-multiSig-account.jsconst { apiClient, cryptography, codec, Transaction, multisigRegMsgSchema } = require('lisk-sdk'); const { ed, address } = cryptography; const { accounts } = require('./accounts.json'); const { registerMultisignatureParamsSchema, } = require('lisk-framework/dist-node/modules/auth/schemas'); -
Create an
apiClientto communicate with the node and also define thechainIDof the node.const RPC_ENDPOINT = 'ws://127.0.0.1:7887/rpc-ws'; (async () => { const appClient = await apiClient.createWSClient(RPC_ENDPOINT); const chainID = Buffer.from('00000001', 'hex'); -
Add details such as the sender of the transaction, all the optional keys, and mandatory keys in sorted form.
// The account which will be used to send the multiSignature account registration transaction. const senderKeyInfo = accounts[0]; // For this example, we are using three Optional accounts. const optionalAccount1 = accounts[0]; const optionalAccount2 = accounts[1]; const optionalAccount3 = accounts[2]; const sortedMandatoryKeys = []; // Empty mandatory accounts array since we are not using any mandatory account for a multisig account registration in this guide. const sortedOptionalKeys = [Buffer.from(optionalAccount1.publicKey, 'hex'), Buffer.from(optionalAccount2.publicKey, 'hex'), Buffer.from(optionalAccount3.publicKey, 'hex')].sort((a, b) => a.compare(b)); -
Retrieve the
nonceof the sender account from the auth_getAuthAccount, and create anunSignedDataobject.const { nonce } = await appClient.invoke('auth_getAuthAccount', { address: address.getLisk32AddressFromPublicKey(Buffer.from(senderKeyInfo.publicKey, 'hex')), }); const unSignedData = { address: address.getAddressFromLisk32Address(senderKeyInfo.address), nonce: BigInt(nonce), numberOfSignatures: 2, mandatoryKeys: sortedMandatoryKeys, optionalKeys: sortedOptionalKeys, }; console.log('Unsigned data -------->', unSignedData); -
Encode the
unSignedDataas per themultisigRegMsgSchemaand also define an emptysignaturesarray.// Each multisig account registration data must be encoded with the multisigRegMsgSchema const msgBytes = codec.encode(multisigRegMsgSchema, unSignedData); var signatures = []; })(); -
In the next step, we will collect signatures from each optional account. But before that, run the script to see if the unsigned transaction object looks correct or not.
node register-multiSig-account.jsResponse
Unsigned data --------> {
  address: <Buffer 53 2b 92 98 98 2f ea 2a 84 21 2a f2 ce ed 5b 52 30 dd fe fe>,
  nonce: 2n,
  numberOfSignatures: 2,
  mandatoryKeys: [],
  optionalKeys: [
    <Buffer c6 1c d8 62 a8 b7 f7 38 57 b2 48 a4 35 8a 7b 35 c2 9c a2 73 d7 6b a3 81 9e 8c 54 b6 28 01 f1 6e>,
    <Buffer e9 8e 8a 63 25 73 0b e6 bf 26 44 af 83 d5 a0 b0 04 bb 31 c1 58 58 fe db d0 ac 2c 1f 89 e2 ee ce>,
    <Buffer fa d4 13 df 3f e5 e7 96 1b 81 ee 8d c1 68 d1 3d 7e 1f 5c cc dd 06 2e d7 7d a7 71 42 c7 d5 71 f0>
  ]
}
Collecting signatures
How to create and collect the signatures from other members of the multi-sig group.
To share the generated JSON with the multi-signature registration with all group members, the JSON should be shared off-chain, e.g. by sending the JSON file to a group member via email.
|
The same transaction object should be signed by all members consecutively. Therefore, it is recommended to choose the first member of the group to share the transaction, and as soon as the member has signed the transaction, pass the resulting JSON on to the next member. |
When the member receives the JSON, they can use Lisk Desktop to sign the JSON like so:
-
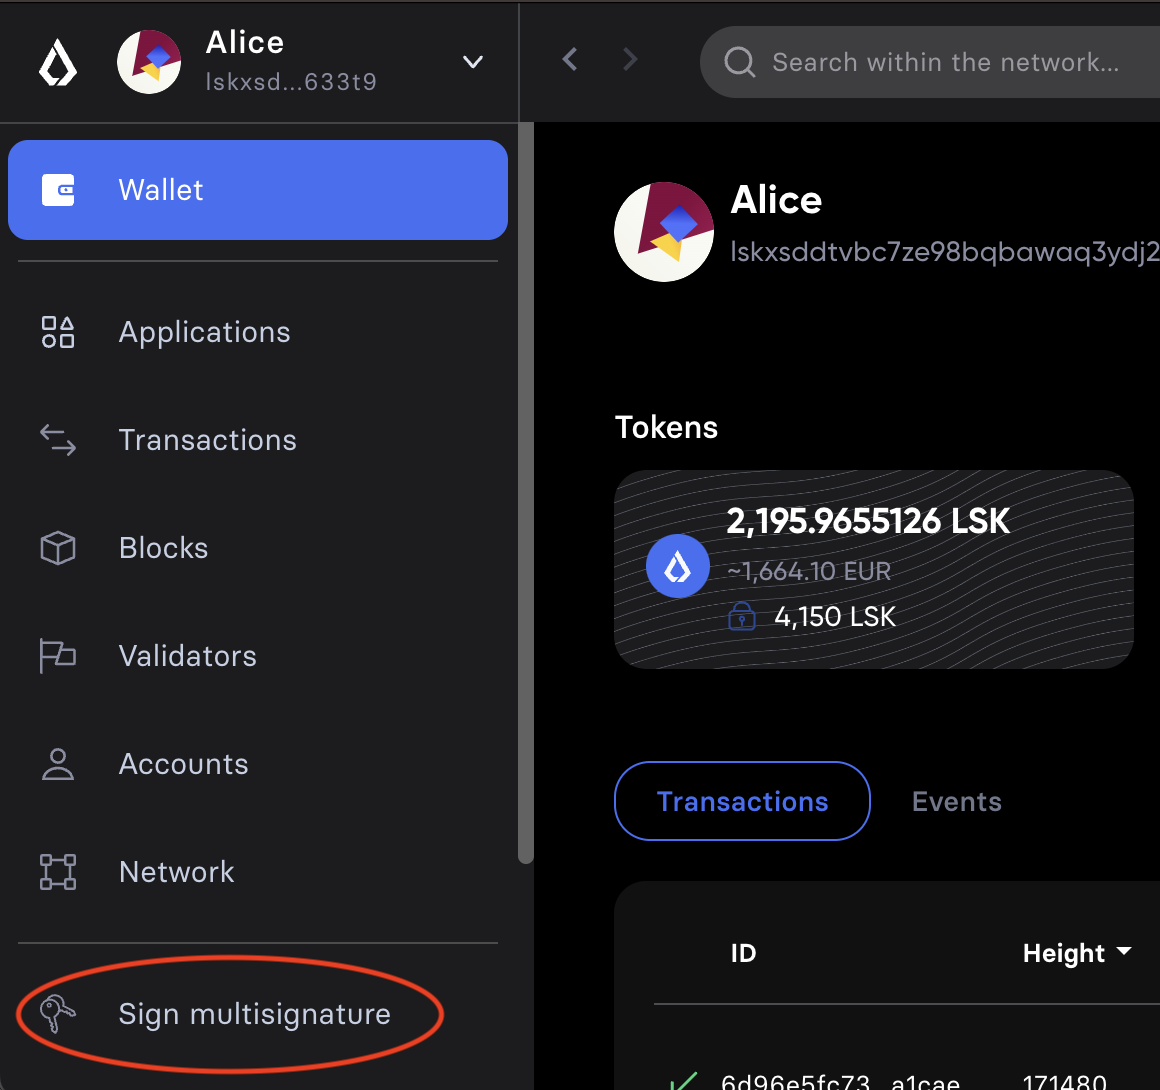
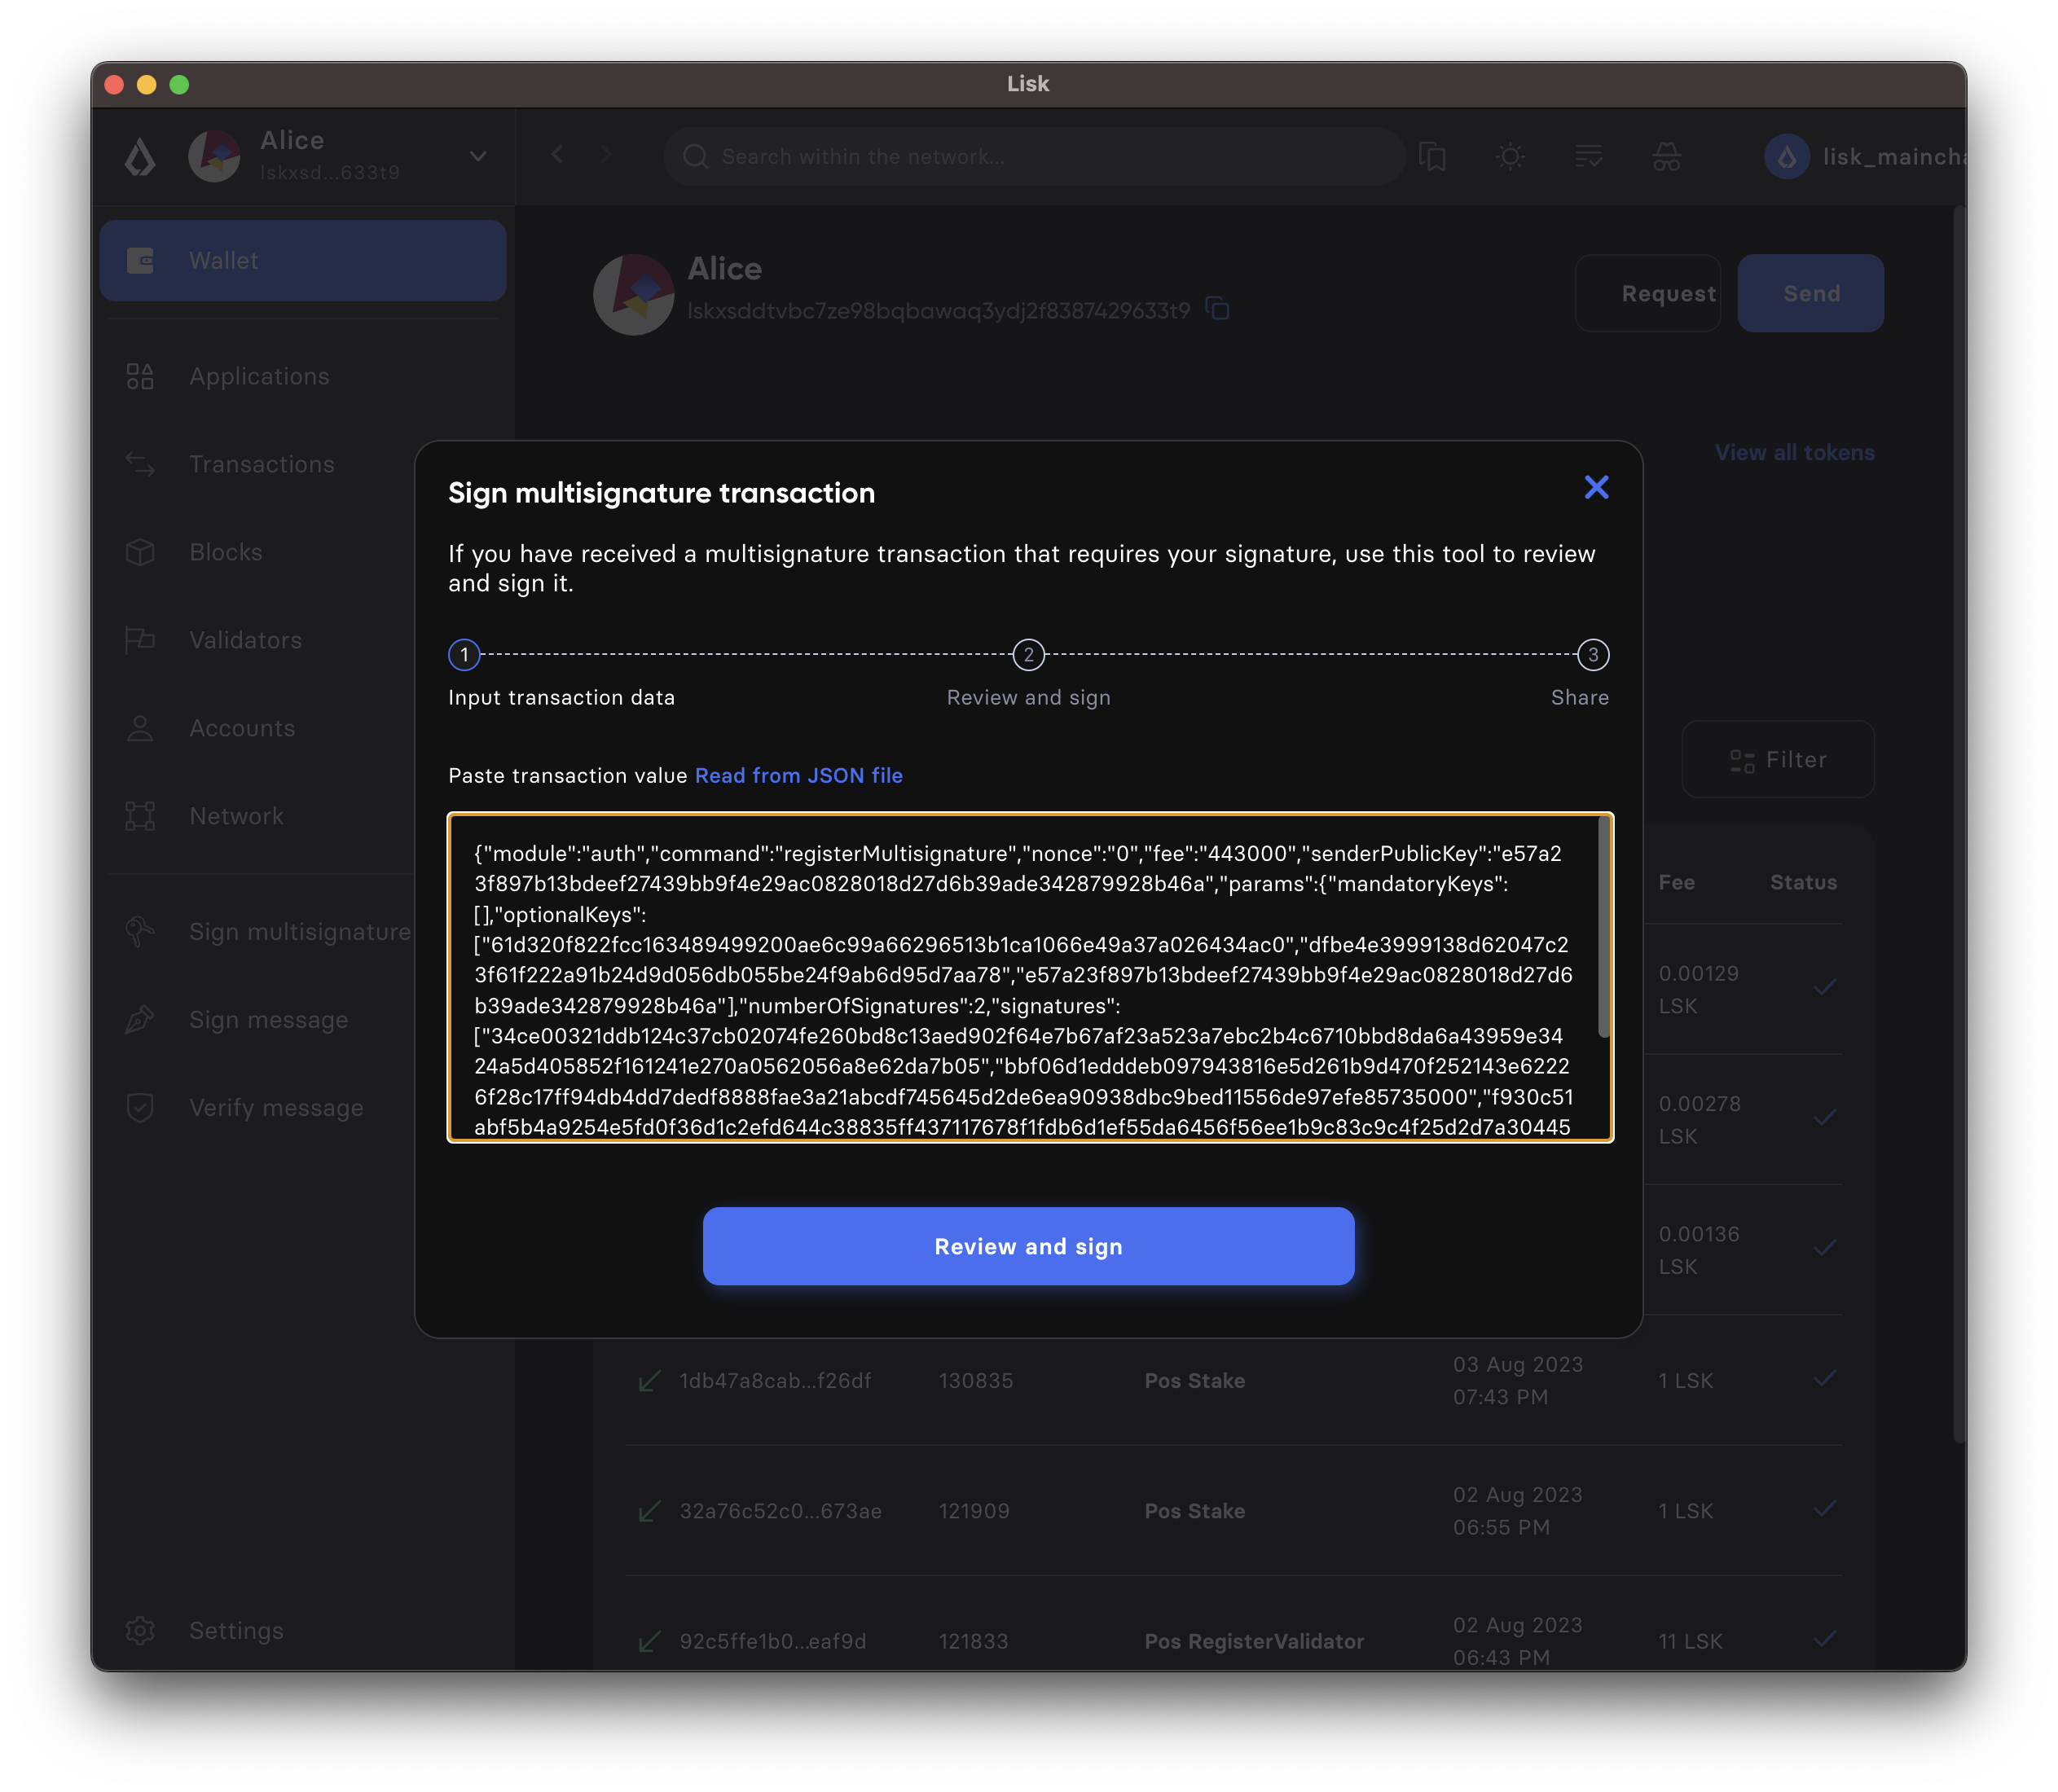
After logging in to your account, click on the Sign multisignature button in the navigation.
-
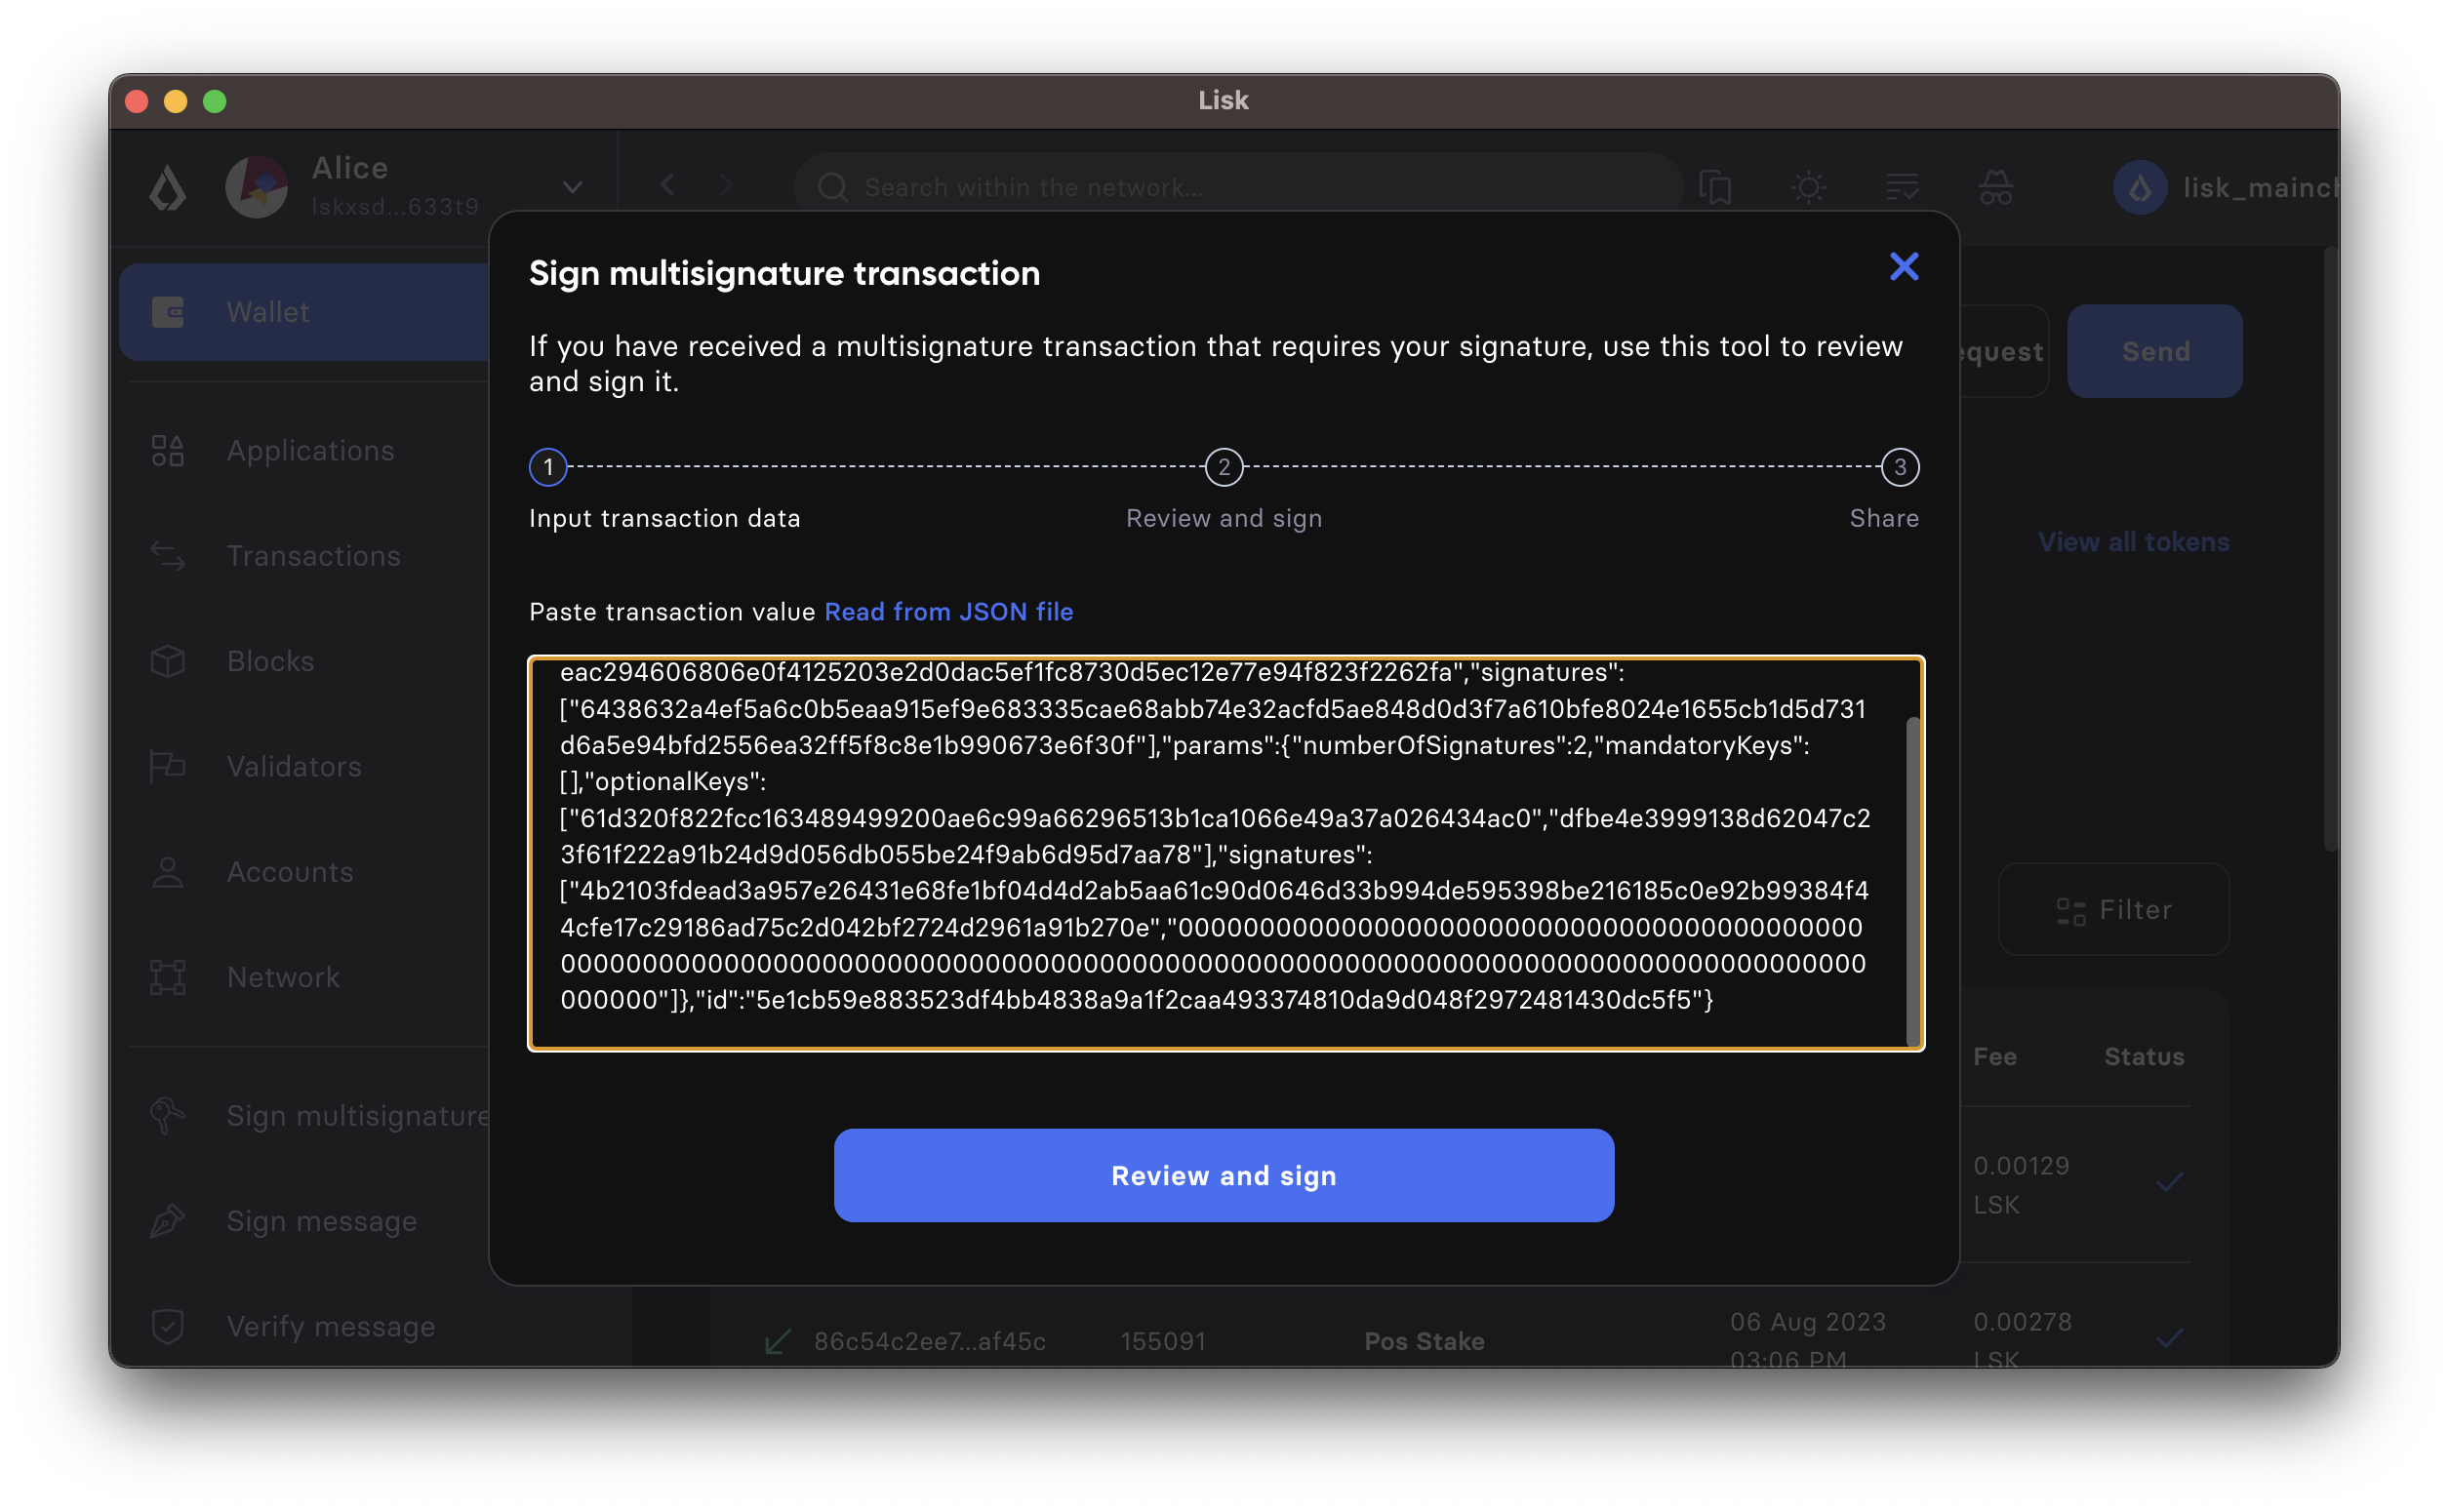
This will open a new window where you are able to paste the JSON you received.
-
On the next page, you have the opportunity to review the respective parameters for the multi-signature registration.
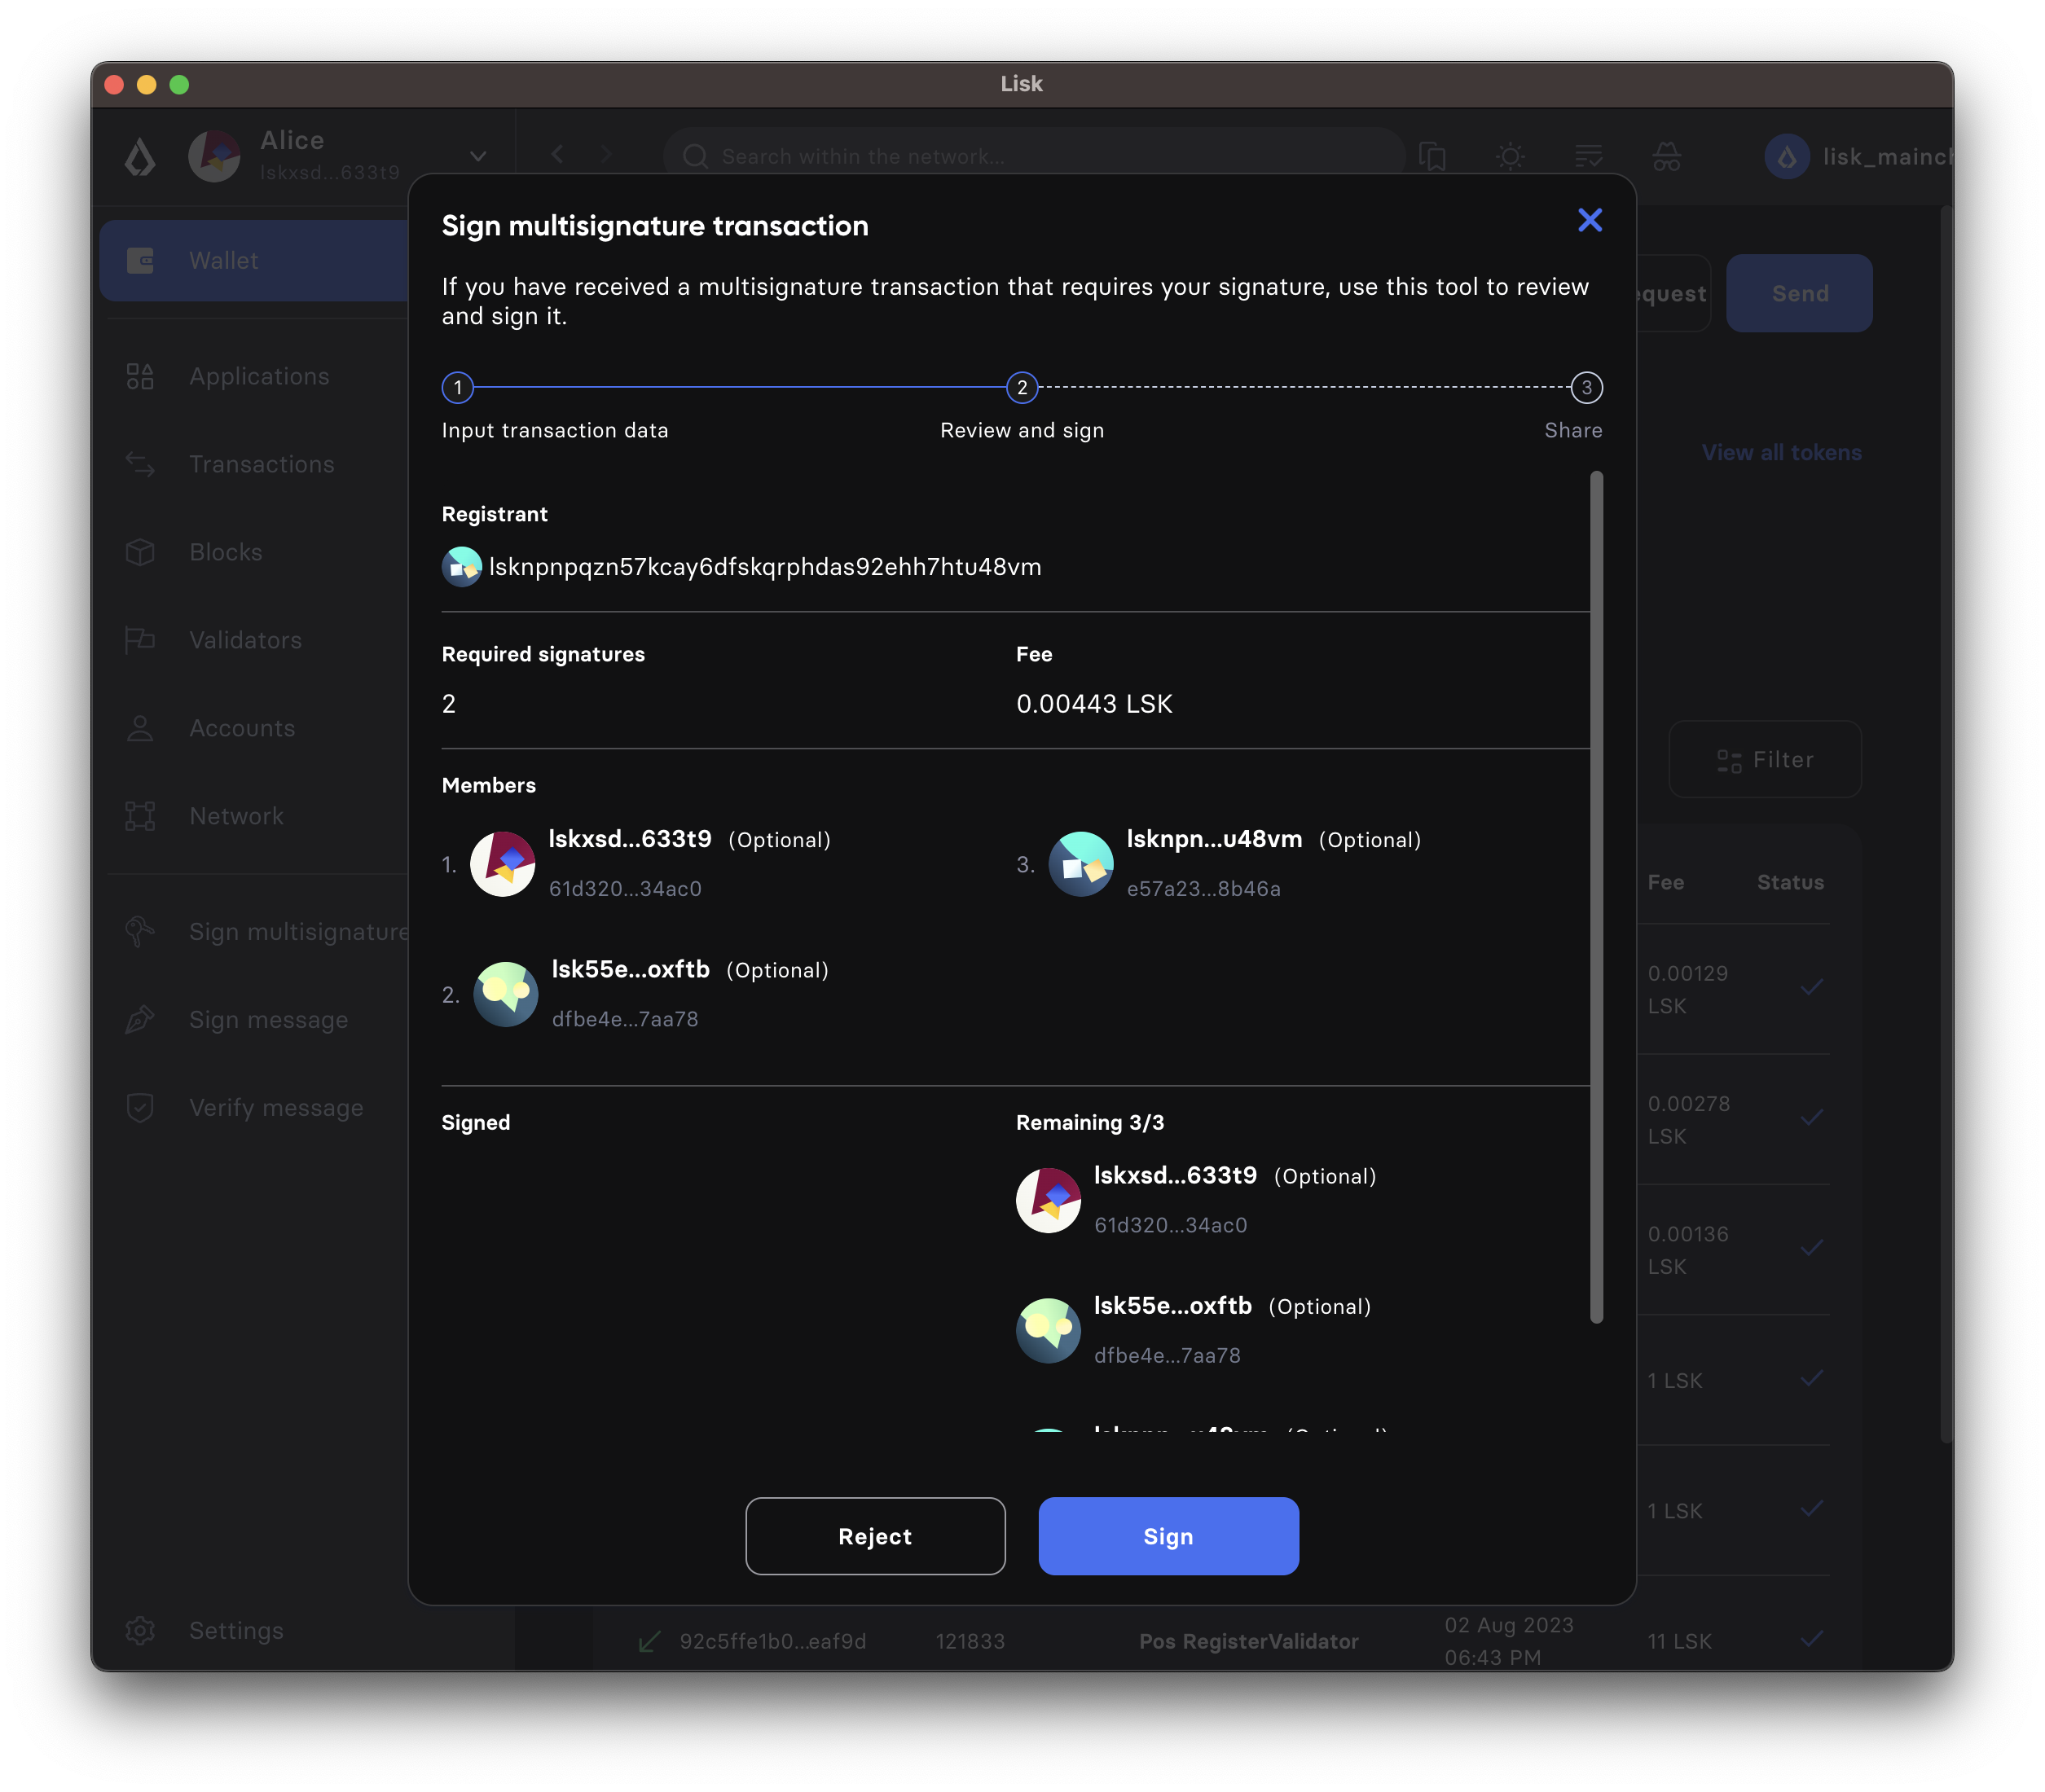
Double-check that all values are set correctly, before signing the transaction in the next step.
If you spot anything that should be changed in the transaction, or if you want to reject it entirely, simply click the Reject button and communicate your reason to the person who shared the JSON with you, if needed.
If all values are correct, proceed to sign the transaction by clicking the Sign button.
-
As a result, you will receive the new JSON which has your signature appended.
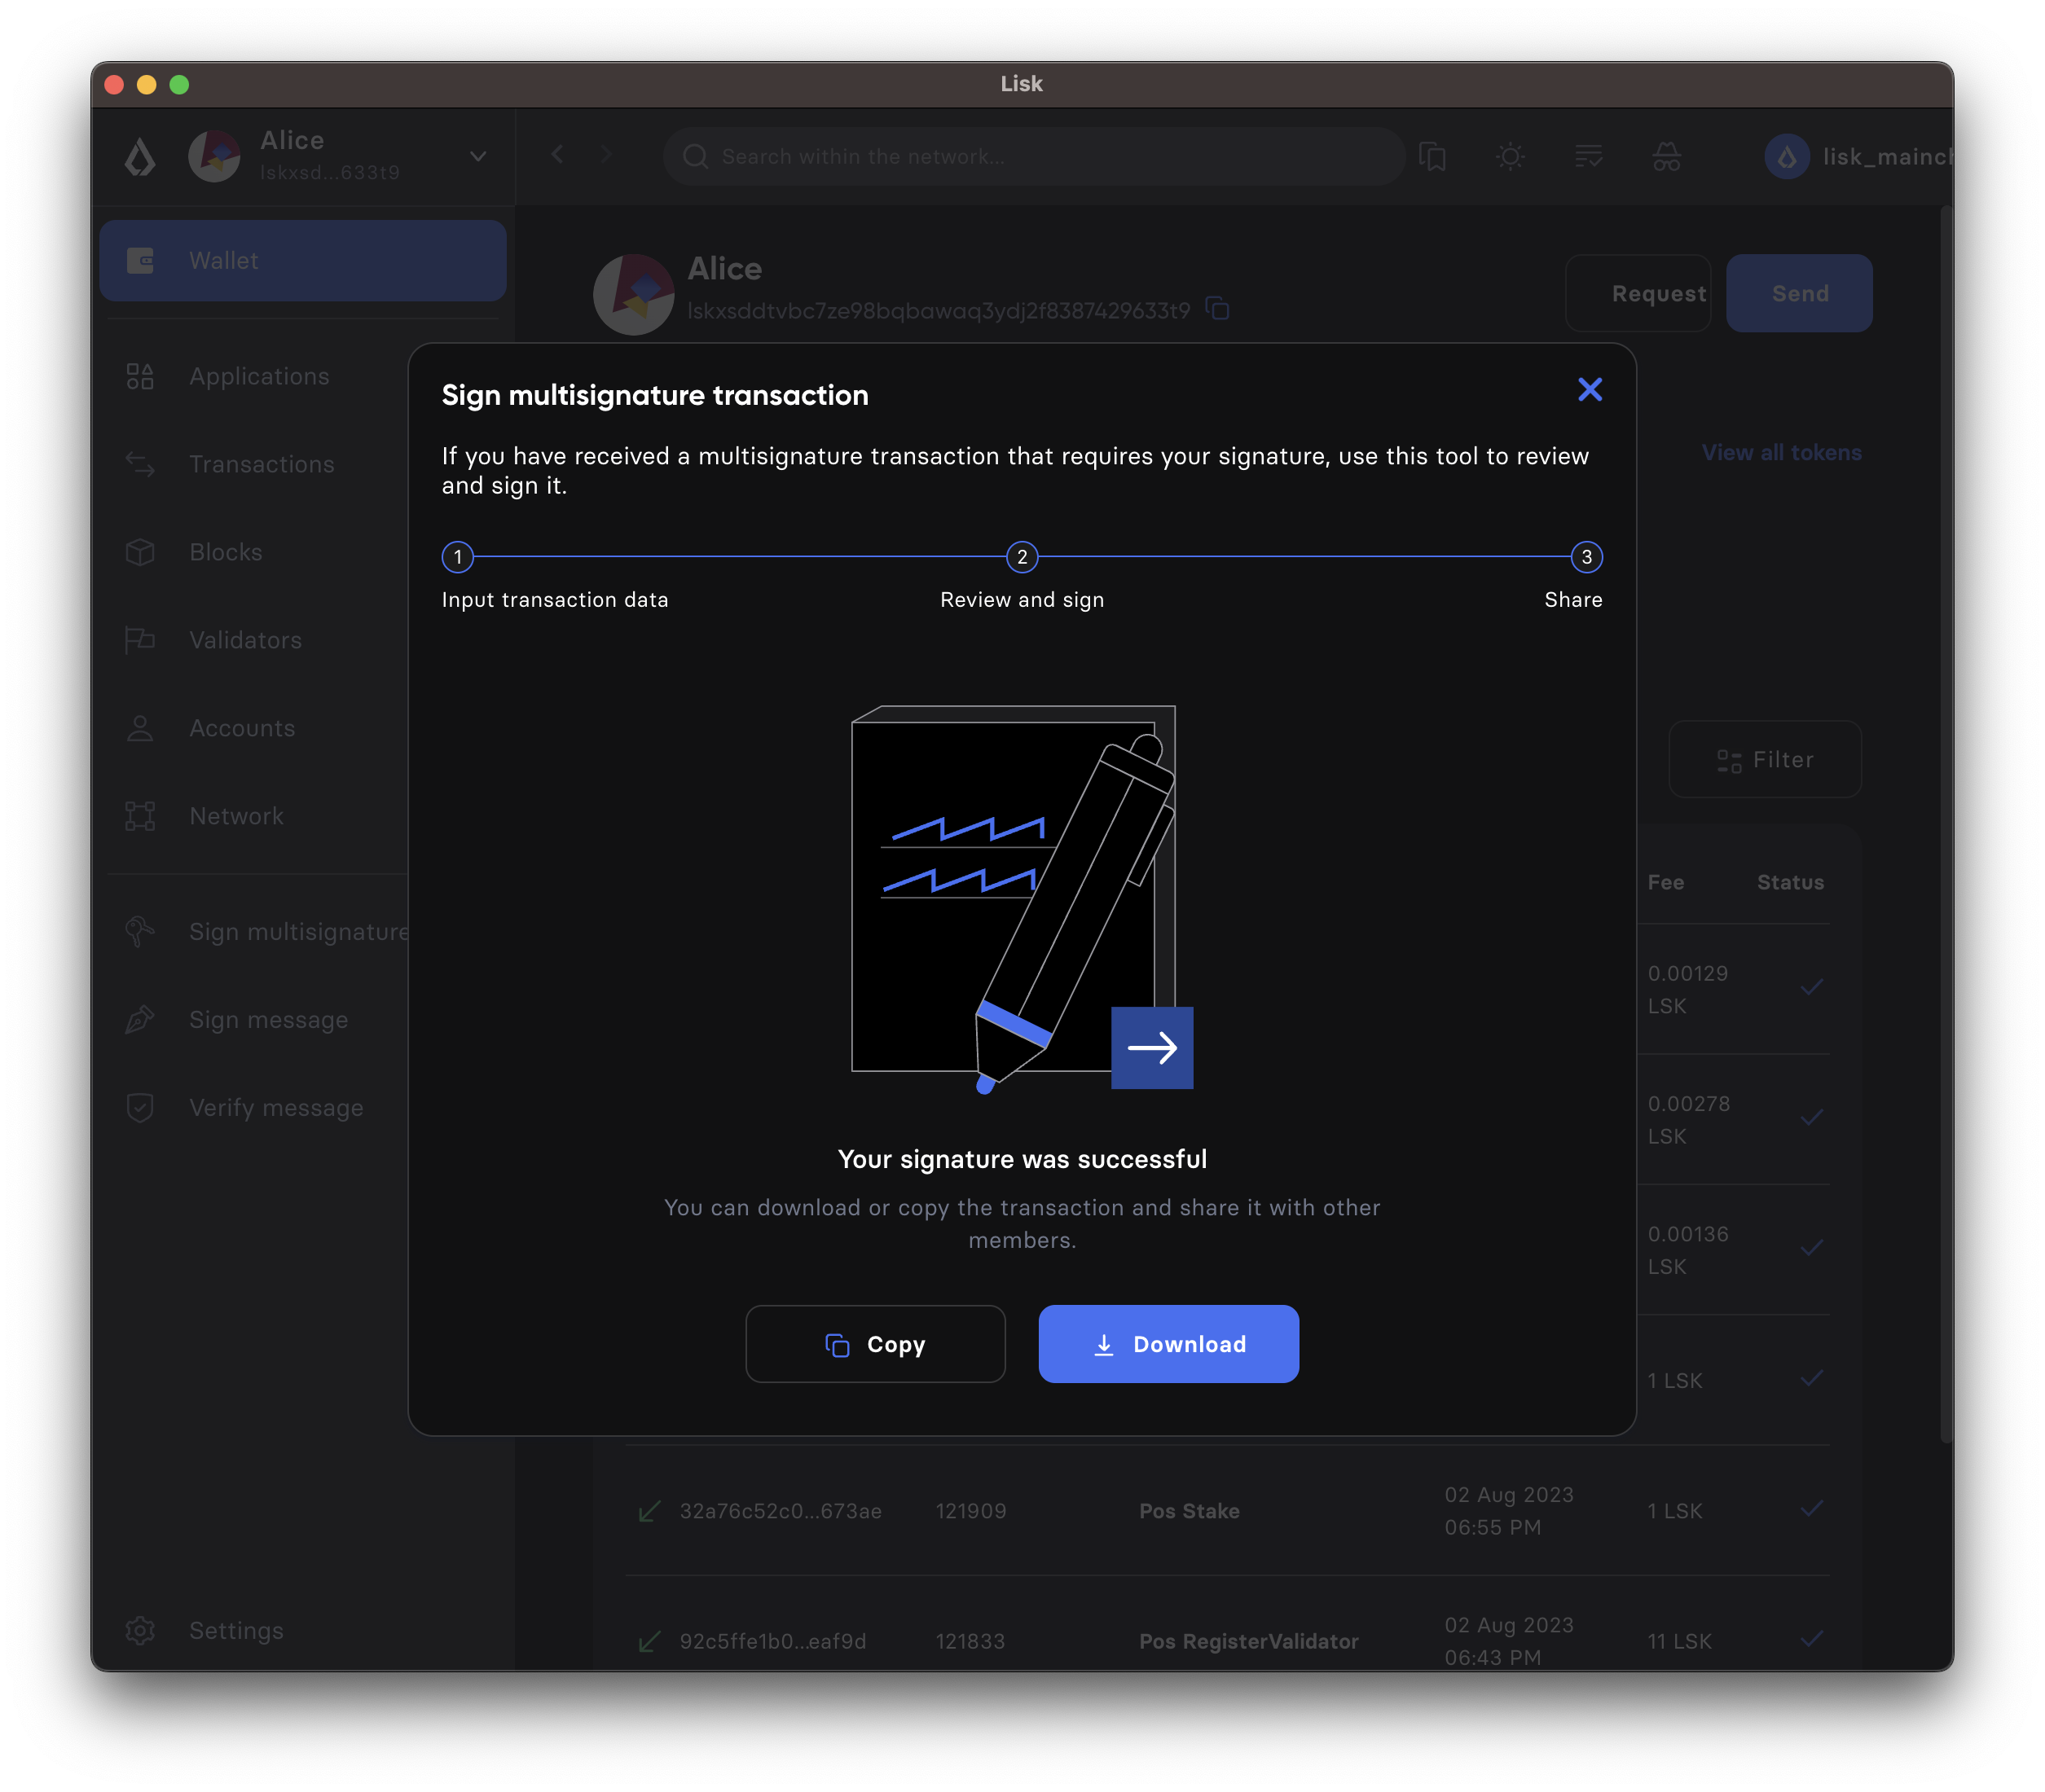
Now either send the JSON back to the person who shared the JSON with you, or forward it directly to one of the remaining group members, whose signature is still missing.
After Alice signed the transaction
{
   "module":"auth",
   "command":"registerMultisignature",
   "nonce":"0",
   "fee":"443000",
   "senderPublicKey":"e57a23f897b13bdeef27439bb9f4e29ac0828018d27d6b39ade342879928b46a",
   "params":{
      "mandatoryKeys":[],
      "optionalKeys":[
         "61d320f822fcc163489499200ae6c99a66296513b1ca1066e49a37a026434ac0",
         "dfbe4e3999138d62047c23f61f222a91b24d9d056db055be24f9ab6d95d7aa78",
         "e57a23f897b13bdeef27439bb9f4e29ac0828018d27d6b39ade342879928b46a"
      ],
      "numberOfSignatures":2,
      "signatures":[
         "34ce00321ddb124c37cb02074fe260bd8c13aed902f64e7b67af23a523a7ebc2b4c6710bbd8da6a43959e3424a5d405852f161241e270a0562056a8e62da7b05",
         "00000000000000000000000000000000000000000000000000000000000000000000000000000000000000000000000000000000000000000000000000000000",
         "00000000000000000000000000000000000000000000000000000000000000000000000000000000000000000000000000000000000000000000000000000000"
      ]
   },
   "signatures":[],
   "id":""
}
After Bob signed the transaction
{
   "module":"auth",
   "command":"registerMultisignature",
   "nonce":"0",
   "fee":"443000",
   "senderPublicKey":"e57a23f897b13bdeef27439bb9f4e29ac0828018d27d6b39ade342879928b46a",
   "params":{
      "mandatoryKeys":[],
      "optionalKeys":[
         "61d320f822fcc163489499200ae6c99a66296513b1ca1066e49a37a026434ac0",
         "dfbe4e3999138d62047c23f61f222a91b24d9d056db055be24f9ab6d95d7aa78",
         "e57a23f897b13bdeef27439bb9f4e29ac0828018d27d6b39ade342879928b46a"
      ],
      "numberOfSignatures":2,
      "signatures":[
         "34ce00321ddb124c37cb02074fe260bd8c13aed902f64e7b67af23a523a7ebc2b4c6710bbd8da6a43959e3424a5d405852f161241e270a0562056a8e62da7b05",
         "bbf06d1edddeb097943816e5d261b9d470f252143e62226f28c17ff94db4dd7dedf8888fae3a21abcdf745645d2de6ea90938dbc9bed11556de97efe85735000",
         "00000000000000000000000000000000000000000000000000000000000000000000000000000000000000000000000000000000000000000000000000000000"
      ]
   },
   "signatures":[],
   "id":""
}
After the arbiter signed the transaction
{
   "module":"auth",
   "command":"registerMultisignature",
   "nonce":"0",
   "fee":"443000",
   "senderPublicKey":"e57a23f897b13bdeef27439bb9f4e29ac0828018d27d6b39ade342879928b46a",
   "params":{
      "mandatoryKeys":[],
      "optionalKeys":[
         "61d320f822fcc163489499200ae6c99a66296513b1ca1066e49a37a026434ac0",
         "dfbe4e3999138d62047c23f61f222a91b24d9d056db055be24f9ab6d95d7aa78",
         "e57a23f897b13bdeef27439bb9f4e29ac0828018d27d6b39ade342879928b46a"
      ],
      "numberOfSignatures":2,
      "signatures":[
         "34ce00321ddb124c37cb02074fe260bd8c13aed902f64e7b67af23a523a7ebc2b4c6710bbd8da6a43959e3424a5d405852f161241e270a0562056a8e62da7b05",
         "bbf06d1edddeb097943816e5d261b9d470f252143e62226f28c17ff94db4dd7dedf8888fae3a21abcdf745645d2de6ea90938dbc9bed11556de97efe85735000",
         "f930c51abf5b4a9254e5fd0f36d1c2efd644c38835ff437117678f1fdb6d1ef55da6456f56ee1b9c83c9c4f25d2d7a3044561498c8412393e19063cf2049330e"
      ]
   },
   "signatures":[
      "355727c5a2e144e714303fb3ed37113c2245b4a2e5fbb938979e747036cfdd3b618ec58ca58ffa98f0da6662ab58d1f81113950c25af9e89824b80ba16057404"
   ],
   "id":"46335ce10e8c8b01162b9b4da0bd48ed253ab68afdcaa043487c54e115427149"
}-
Use each optional account’s details to add a signature for each account. To add a signature to a transaction, use the
ed.signDataWithPrivateKey()method of the lisk-cryptography package. This package is also part of thelisk-sdkpackage. Add the following after thevar signatures = [];line of code.register-multiSig-account.jsfor (const account of [optionalAccount1, optionalAccount2, optionalAccount3].sort((a, b) => Buffer.from(a.publicKey, 'hex').compare(Buffer.from(b.publicKey, 'hex')))) { signatures.push(ed.signDataWithPrivateKey( 'LSK_RMSG_', chainID, msgBytes, Buffer.from(account.privateKey, 'hex'), )); } -
Next, define a
transactionParamsobject. This object will be added to the transaction in the next step.const transactionParams = { numberOfSignatures: 2, mandatoryKeys: sortedMandatoryKeys, // Empty array optionalKeys: sortedOptionalKeys, // Contains public keys of all three optional accounts signatures, // Contains signatures from all three optional accounts }; console.log('Transaction params with signatures for all the given keys-------->', transactionParams); -
Using the
Transactionclass, initialize a new object that takes all the details mentioned earlier as part of the registration transaction.const transactionObject = new Transaction({ module: 'auth', command: 'registerMultisignature', fee: BigInt(200000000), params: codec.encode(registerMultisignatureParamsSchema, transactionParams), nonce: BigInt(nonce), senderPublicKey: Buffer.from(senderKeyInfo.publicKey, 'hex'), signatures: [], }); -
Sign the transaction using the sender’s private key. After signing the transaction, the transaction is ready to be sent to the node for execution.
transactionObject.sign( chainID, Buffer.from(senderKeyInfo.privateKey, 'hex'), ); console.log("Signed Transaction with the sender's key ------->", transactionObject) -
Let’s execute the script again. The code should now prepare the registration parameters correctly including the signatures for each optional key. It should also sign the transaction object with the sender’s private key and make the transaction ready to be sent to the node.
node register-multiSig-account.jsResponse
Unsigned data --------> {
  address: <Buffer 53 2b 92 98 98 2f ea 2a 84 21 2a f2 ce ed 5b 52 30 dd fe fe>,
  nonce: 2n,
  numberOfSignatures: 2,
  mandatoryKeys: [],
  optionalKeys: [
    <Buffer c6 1c d8 62 a8 b7 f7 38 57 b2 48 a4 35 8a 7b 35 c2 9c a2 73 d7 6b a3 81 9e 8c 54 b6 28 01 f1 6e>,
    <Buffer e9 8e 8a 63 25 73 0b e6 bf 26 44 af 83 d5 a0 b0 04 bb 31 c1 58 58 fe db d0 ac 2c 1f 89 e2 ee ce>,
    <Buffer fa d4 13 df 3f e5 e7 96 1b 81 ee 8d c1 68 d1 3d 7e 1f 5c cc dd 06 2e d7 7d a7 71 42 c7 d5 71 f0>
  ]
}
Transaction params with signatures for all the given keys--------> {
  numberOfSignatures: 2,
  mandatoryKeys: [],
  optionalKeys: [
    <Buffer c6 1c d8 62 a8 b7 f7 38 57 b2 48 a4 35 8a 7b 35 c2 9c a2 73 d7 6b a3 81 9e 8c 54 b6 28 01 f1 6e>,
    <Buffer e9 8e 8a 63 25 73 0b e6 bf 26 44 af 83 d5 a0 b0 04 bb 31 c1 58 58 fe db d0 ac 2c 1f 89 e2 ee ce>,
    <Buffer fa d4 13 df 3f e5 e7 96 1b 81 ee 8d c1 68 d1 3d 7e 1f 5c cc dd 06 2e d7 7d a7 71 42 c7 d5 71 f0>
  ],
  signatures: [
    <Buffer 7d 20 6e b6 2d b0 32 a6 17 47 dd 93 82 a2 84 c3 78 2e a2 64 7c 10 30 f7 47 d8 fd e9 76 be fe e3 74 e9 dc 7a 17 58 fc 9b c3 94 04 ed e3 c4 53 7a 1f 8f ... 14 more bytes>,
    <Buffer 80 01 12 b7 c2 3b 38 d0 a8 82 f4 c5 37 3a 71 eb 7e 80 cb ea b2 8e af a1 16 2d e4 bb a0 e4 9b 13 75 bd 5a f4 6d 3d 08 a1 4c 5e 3f 63 8c 93 ea c3 f6 ab ... 14 more bytes>,
    <Buffer 26 b8 e1 f1 8d 51 69 78 74 bc 04 4a 6c d6 02 78 98 43 9d 16 e7 a5 36 f9 a9 42 eb b2 16 38 05 7b 1c e5 5c 8b c6 4c 98 e7 5b f7 48 28 76 f1 e0 62 79 59 ... 14 more bytes>
  ]
}
Signed Transaction with the sender's key -------> Transaction {
  module: 'auth',
  command: 'registerMultisignature',
  params: <Buffer 08 02 1a 20 c6 1c d8 62 a8 b7 f7 38 57 b2 48 a4 35 8a 7b 35 c2 9c a2 73 d7 6b a3 81 9e 8c 54 b6 28 01 f1 6e 1a 20 e9 8e 8a 63 25 73 0b e6 bf 26 44 af ... 252 more bytes>,
  nonce: 2n,
  fee: 200000000n,
  senderPublicKey: <Buffer e9 8e 8a 63 25 73 0b e6 bf 26 44 af 83 d5 a0 b0 04 bb 31 c1 58 58 fe db d0 ac 2c 1f 89 e2 ee ce>,
  signatures: [
    <Buffer ba 8b df e6 1c 51 ad 83 36 dd 6d f6 87 df 29 be d2 c3 09 51 ed be ac 6c a4 53 ae 23 78 8c 80 31 8f 45 68 30 67 fc b6 f6 ef 95 85 84 cf 50 63 a3 7e e9 ... 14 more bytes>
  ]
}
How to send the transaction is described in the next step.
How to send the multi-signature registration
After all group members have signed the transaction object, it is possible to send it to the network:
If the transaction was sent successfully, it will show a confirmation message.
-
Use the txpool_postTransaction endpoint to send the transaction to the node. The following code will also display the output of sending a transaction as well.
const result = await appClient.invoke('txpool_postTransaction', { transaction: transactionObject.getBytes().toString('hex'), }); console.log(`Result from transaction pool is: `, result, ); process.exit(0); })(); -
Once the transaction becomes part of the blockchain, check the account status by invoking the auth_getAuthAccount endpoint.
{
   "nonce": "1",
   "numberOfSignatures": 2,
   "mandatoryKeys": [],
   "optionalKeys": [
      "c61cd862a8b7f73857b248a4358a7b35c29ca273d76ba3819e8c54b62801f16e",
      "e98e8a6325730be6bf2644af83d5a0b004bb31c15858fedbd0ac2c1f89e2eece",
      "fad413df3fe5e7961b81ee8dc168d13d7e1f5cccdd062ed77da77142c7d571f0"
   ]
}
The account is converted into a multi-signature account, and it is possible to create and sign multi-signature transactions.
How to create a multi-signature transaction
This section describes how to create a transaction for a multi-signature account.
The transaction creation is basically analog to normal transactions.
One difference is, that for multi-sig transactions, it will not be possible to send the created transaction right away. First, all required signatures need to be collected, as explained in How to sign a multi-signature transaction. That is why you want the transaction to be returned in JSON format in most cases, so all data to be signed is human-readable and can be reviewed and verified by the respective group members.
For Lisk Desktop, it is important to note that the transaction object can only be created from the multi-signature account itself (not its other members).
In Lisk Desktop, it is only possible to create a multi-signature transaction by the account owner of the multi-sig account, i.e. the person owning the passphrase/private key of the account. Only when you log in to the original multi-sig account, it is possible to create the transaction object as described below.
If you are a member of a multi-sig account, but you don’t personally have the passphrase for the multi-sig account, it is still possible to create transaction objects for the account, that you can sign and share with other group members. For this, please refer to the examples in the "Node CLI" and "Lisk SDK" tabs.
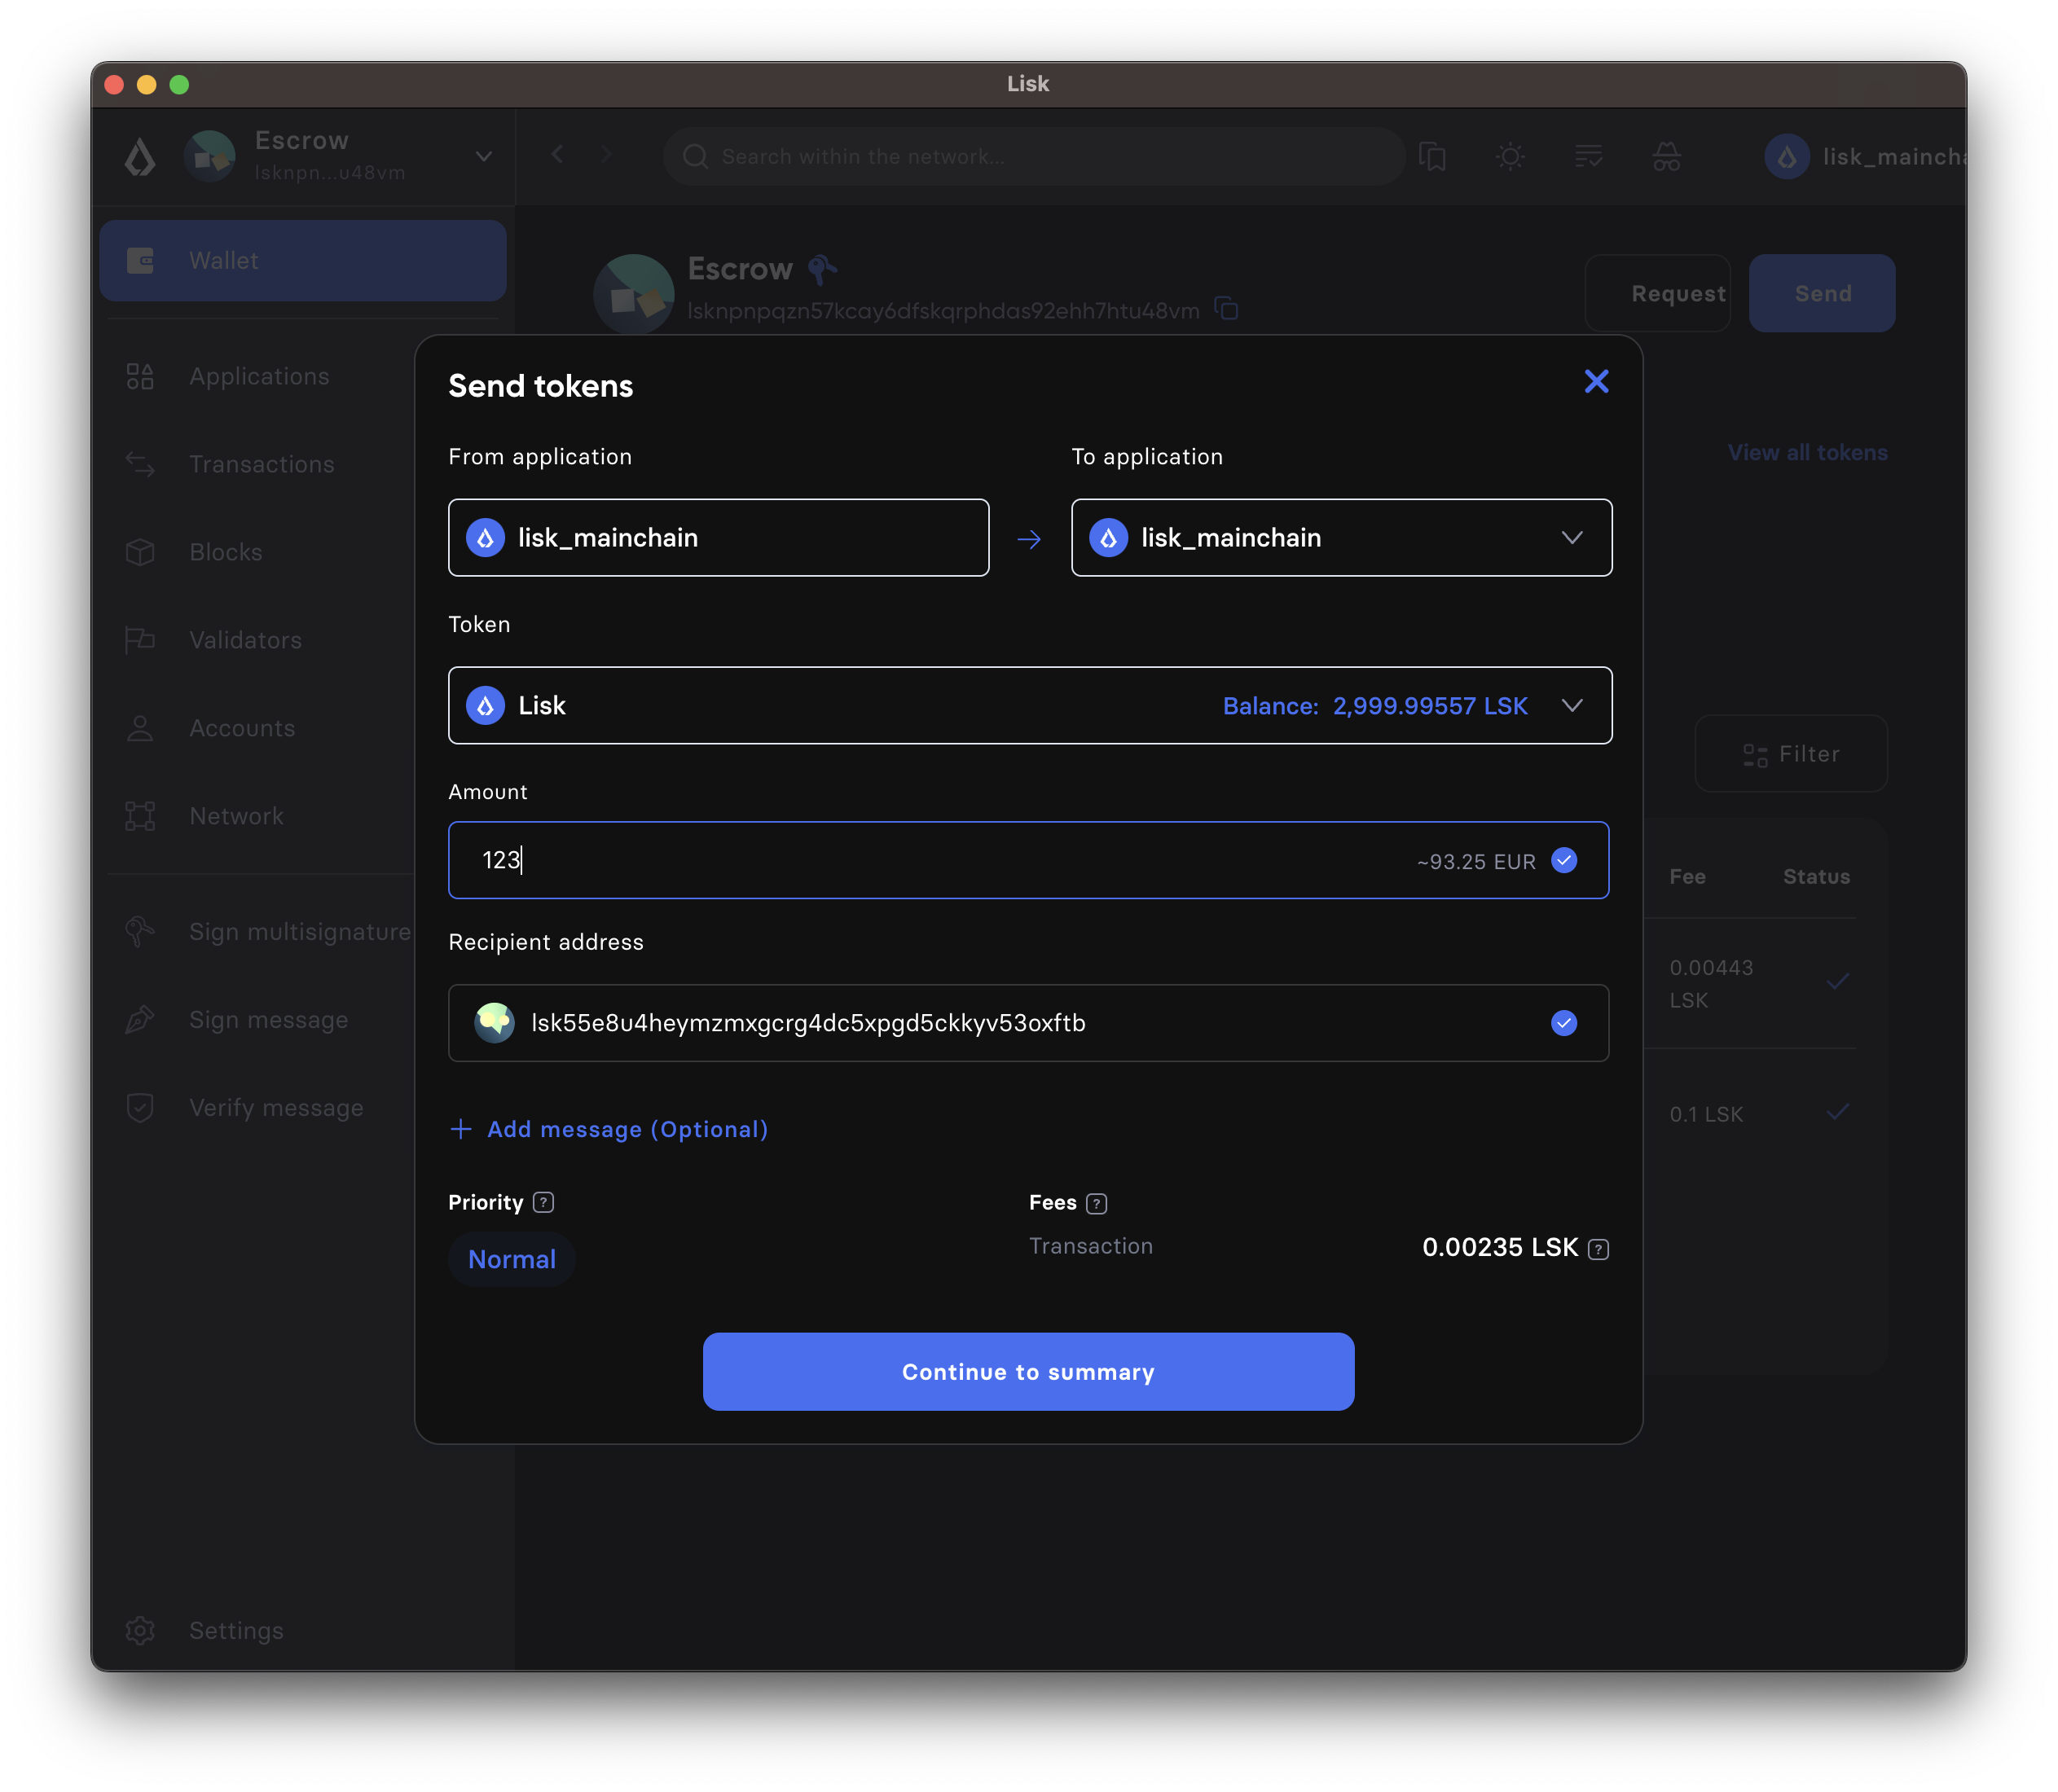
- Prepare a transaction, for example, a token transfer
-
From Lisk Desktop, click on the Send button as you would normally to create a token transfer.
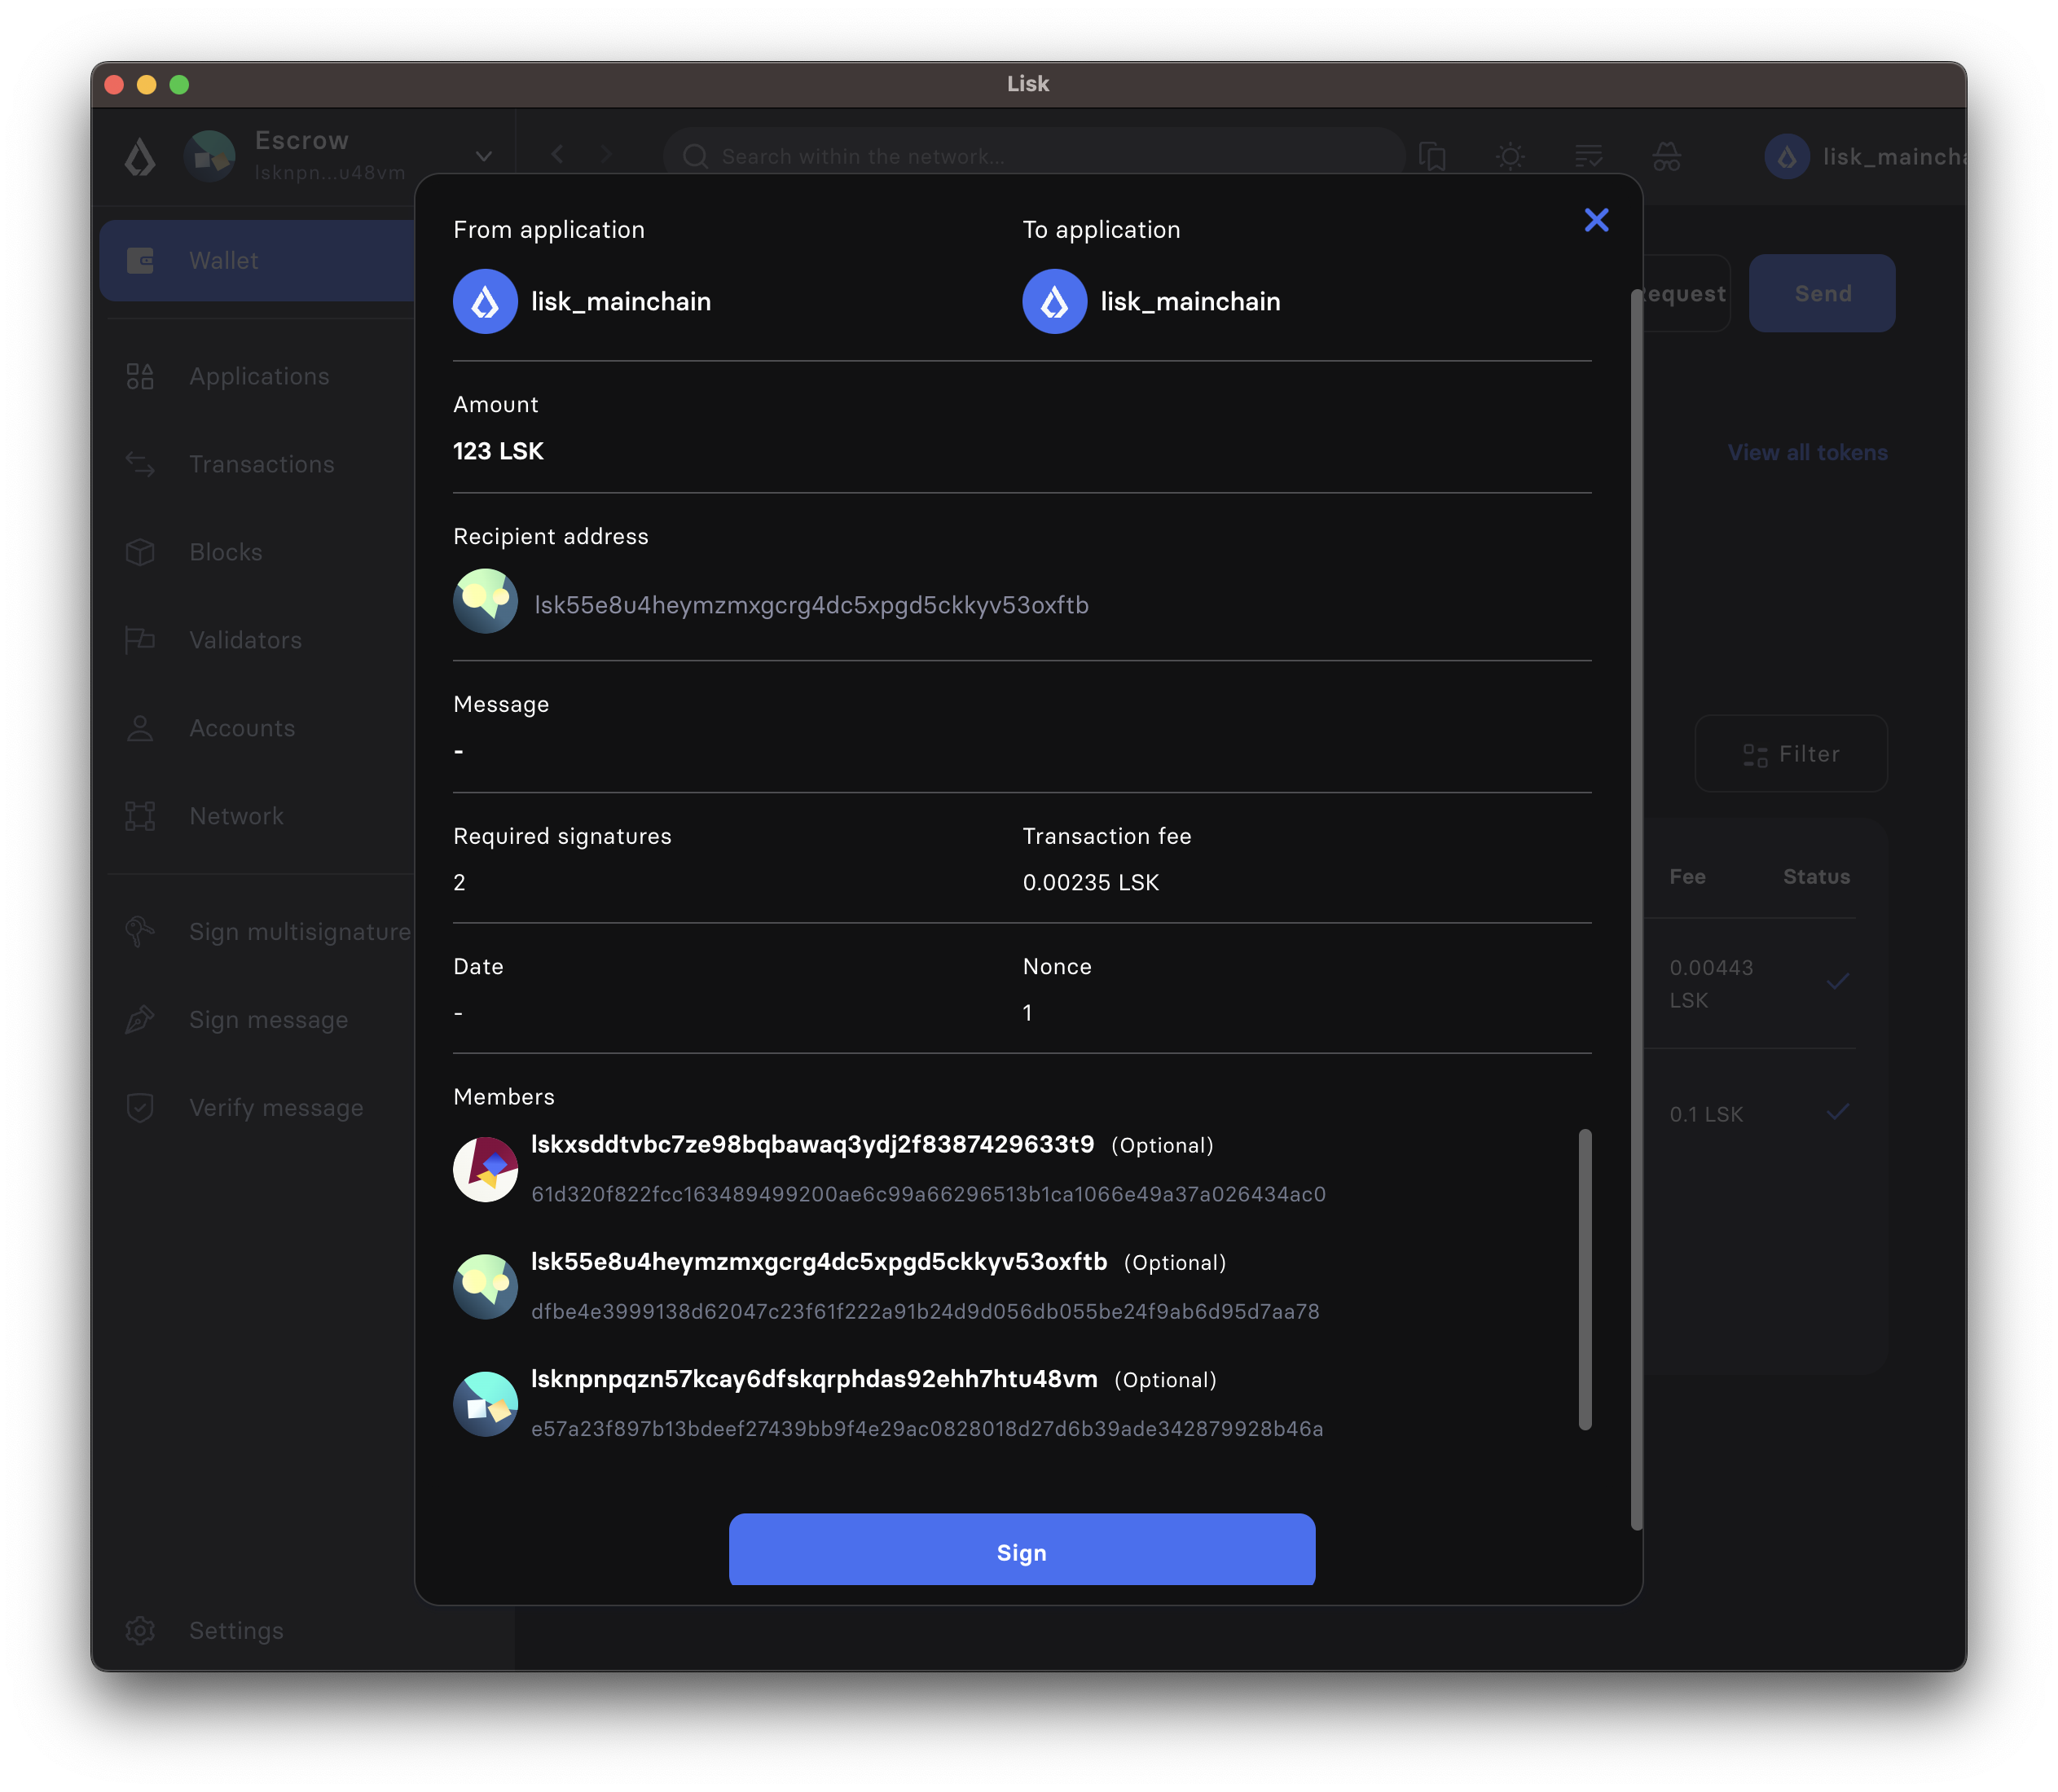
- Confirm the transaction parameters
-
Please note it is not immediately possible to send the transaction. First, the required signatures need to be collected. In this case, the minimum required signatures are two, which is also displayed in the transaction details.
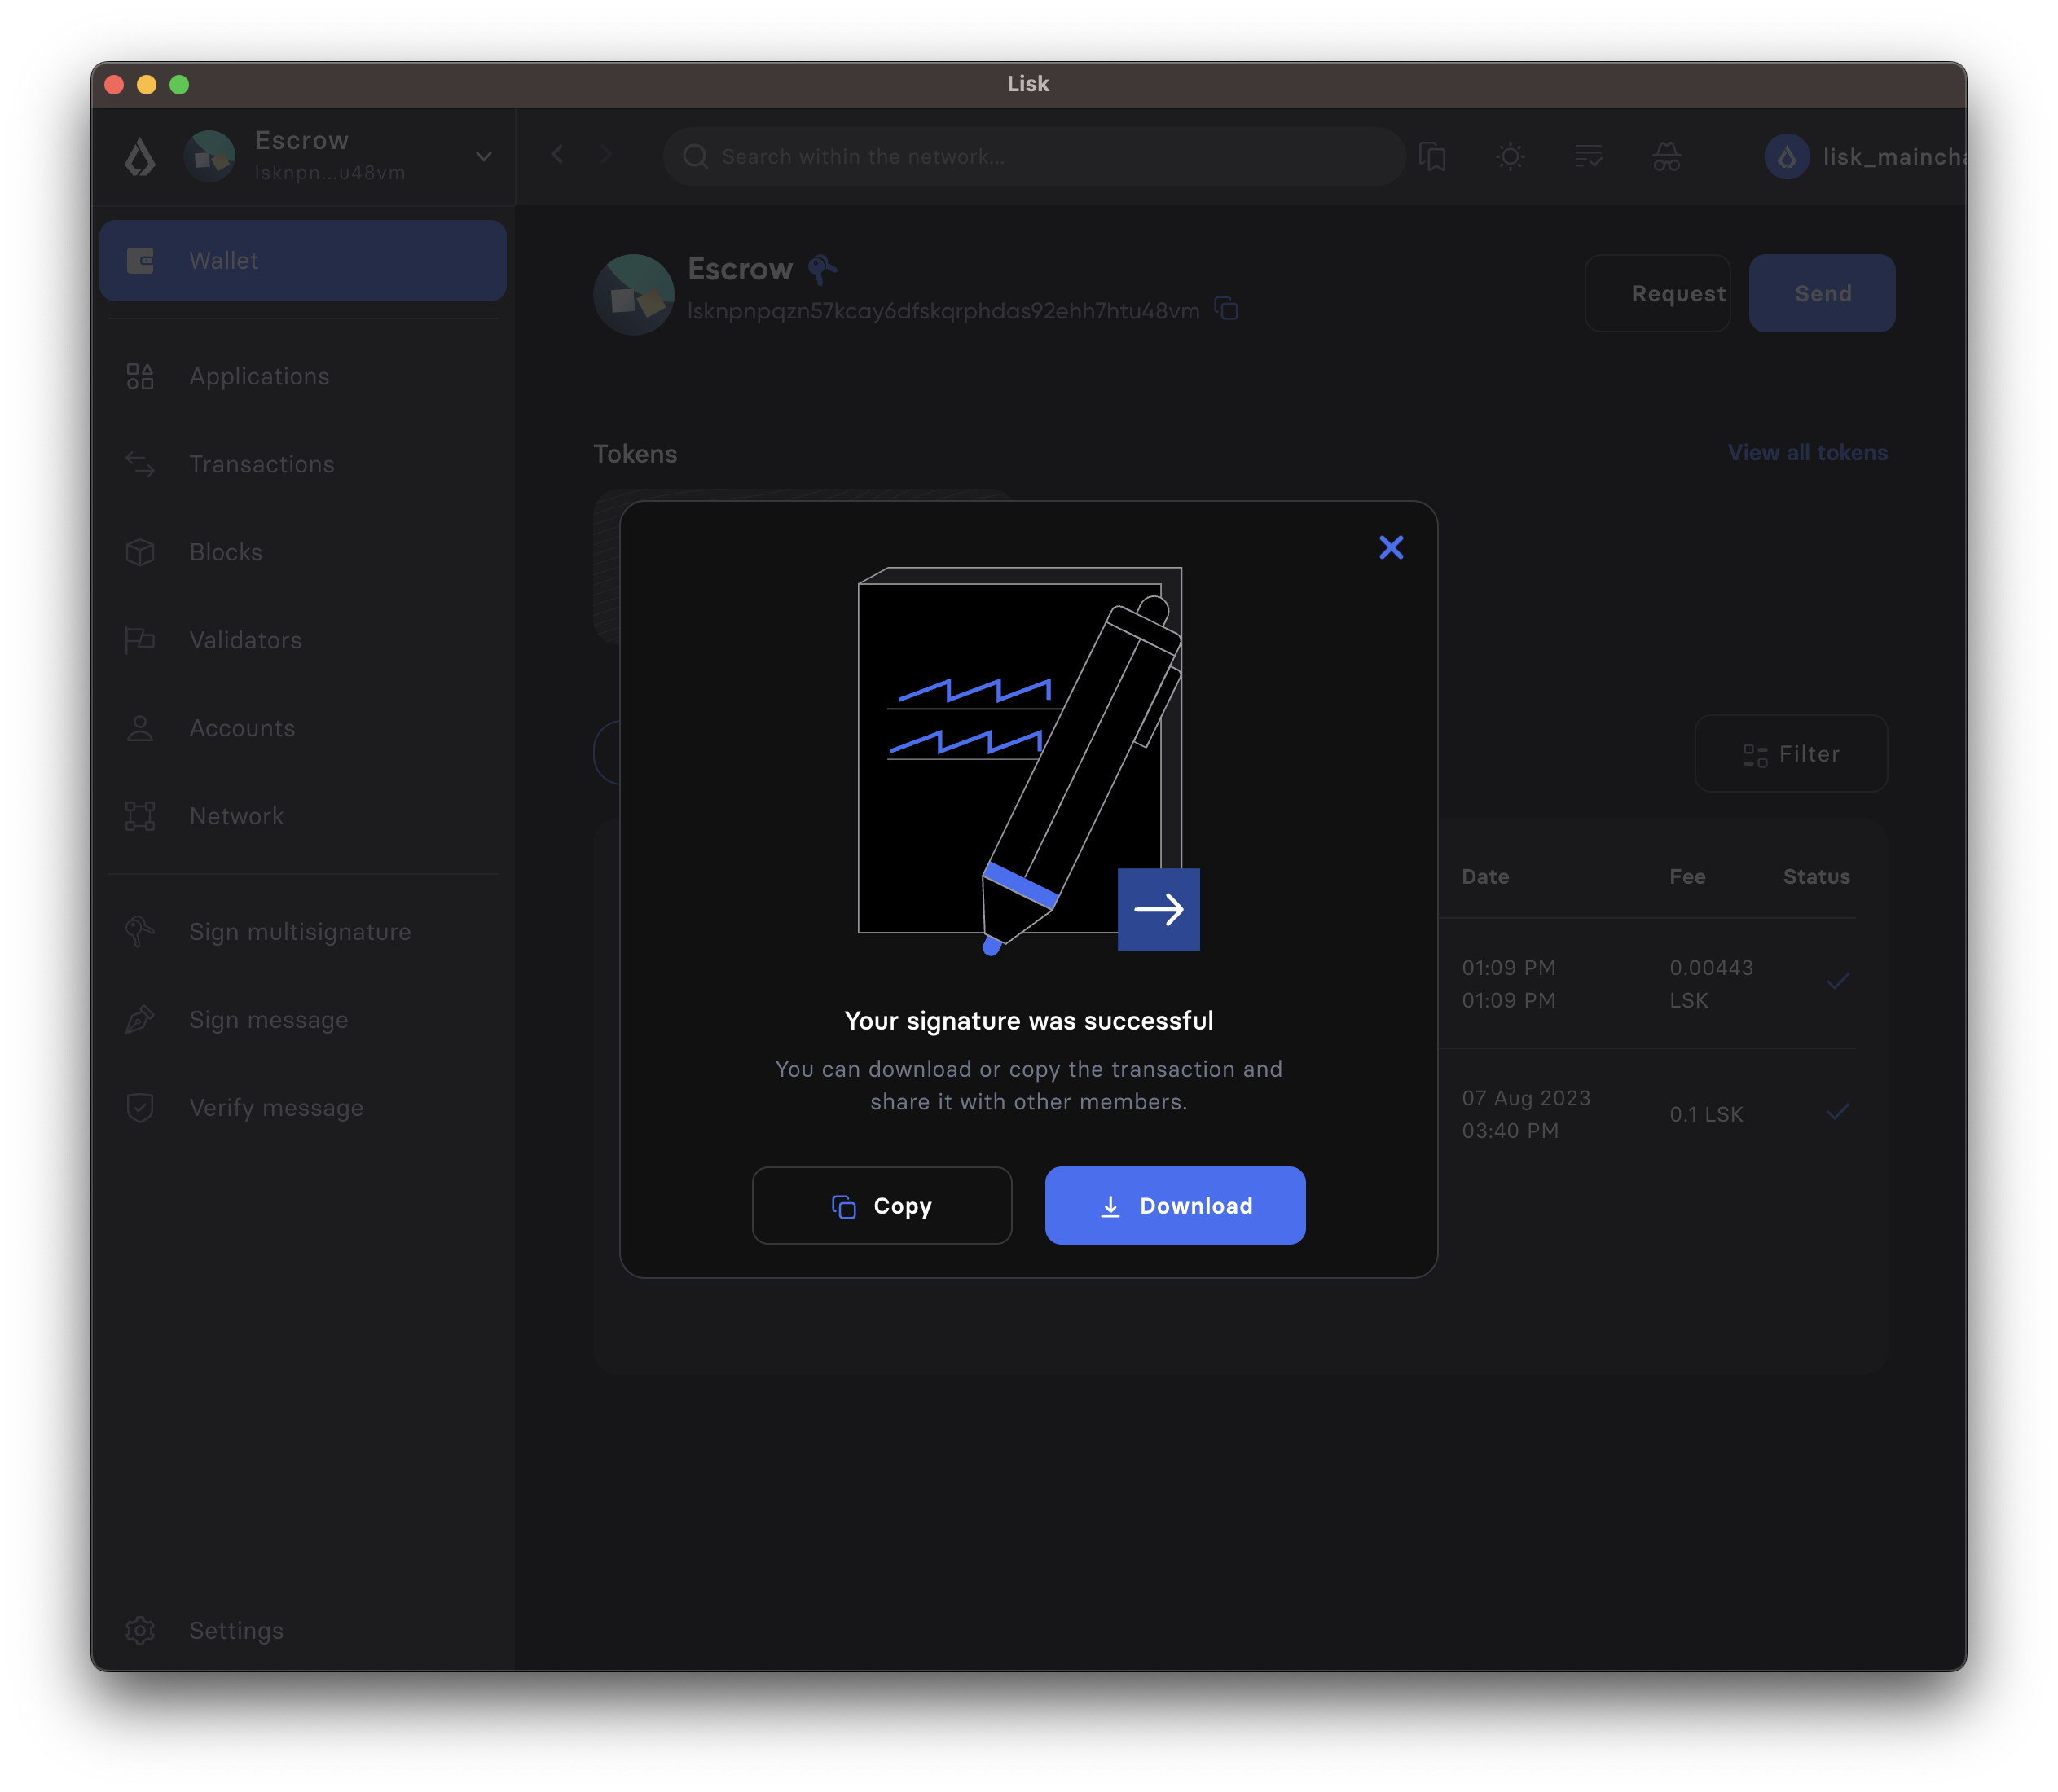
- Download and share the transaction object
-
Sign the transaction object. In this example, three external accounts manage the multi-sig account, so it will only create the JSON with placeholders for the signatures, which can then be shared with the group members in order to add the required signatures. If the multi-sig-account itself is a member of the group, one signature will be appended under signatures, and additionally, there will be two placeholders for the remaining signatures of other members.
Create a transaction via the CLI, and add the --no-signature and the --sender-public-key flag.
A multi-signature transaction requires individual signatures from the owners of the multi-signature account, hence whilst creating such a transaction, the aforementioned flags should be used.
lisk-core transaction:create token transfer 1000000 --no-signature --sender-public-key e98e8a6325730be6bf2644af83d5a0b004bb31c15858fedbd0ac2c1f89e2eeceDefine the transaction params:
? Please enter: tokenID:  0000000100000000
? Please enter: amount:  20000000
? Please enter: recipientAddress:  lskgmmkgyc67n5jrpf2trgtxtc4yjg7bpu992chba
? Please enter: data:
Now copy the transaction hex as it will be used in the signing the multi-signature transaction.
{"transaction":"0a05746f6b656e12087472616e73666572180120c0843d2a20e98e8a6325730be6bf2644af83d5a0b004bb31c15858fedbd0ac2c1f89e2eece32270a0800000001000000001080dac4091a14f94b4fc46a71d7c913d89cbf30cc698f3ee3120d2200"}To create a multi-signature transaction an unsigned transaction object is created first without any signatures, similar to how it is done with the CLI. Then, the transaction is signed individually by the required signatories and later it can be sent to the node for execution. A sample script is available in the lisk-sdk-examples repository where a token transfer transaction is first created and signed by a signatory. This signed transaction can be then passed to the other signatory and a different private key can be used to sign the transaction again. To create a transaction, do the following steps:
-
Create an
accounts.jsonfile and add the following accounts into it. The accounts are the same ones that we have used earlier in the registration of a multi-signature account.accounts.json{ "accounts": [ { "address": "lsk6oqambp2mgqvqxxxm5aohs6s6329sgwftax2rf", "keyPath": "m/44'/134'/0'", "publicKey": "e98e8a6325730be6bf2644af83d5a0b004bb31c15858fedbd0ac2c1f89e2eece" }, { "address": "lskgmmkgyc67n5jrpf2trgtxtc4yjg7bpu992chba", "keyPath": "m/44'/134'/1'", "publicKey": "c61cd862a8b7f73857b248a4358a7b35c29ca273d76ba3819e8c54b62801f16e" }, { "address": "lskrw8gmg6fgdkkgj48q364quzkoqzya479x7rc3d", "keyPath": "m/44'/134'/2'", "publicKey": "fad413df3fe5e7961b81ee8dc168d13d7e1f5cccdd062ed77da77142c7d571f0" } ] }The create-multiSig-transaction.js script can be found in the multiSigtx-creation-signing folder. -
Create a
create-multiSig-transaction.jsfile and import the necessary libraries to it.create-multiSig-transaction.jsconst { apiClient, cryptography, codec, Transaction, transactions } = require('lisk-sdk'); const { transferParamsSchema } = require('lisk-framework/dist-node/modules/token/schemas'); const { accounts } = require('./accounts.json'); const signedTX = require('./signedTx.json'); const readline = require("readline"); const fs = require("fs"); -
Define all the variables such as chain ID, token ID, optional accounts, mandatory accounts, transaction sender, nonce, and the combination of both mandatory and optional keys. The credentials defined below should match the multi-signature account.
// Change these values as per your node. const RPC_ENDPOINT = 'ws://127.0.0.1:7887/rpc-ws'; const chainID = Buffer.from('00000001', 'hex'); const tokenID = Buffer.from('0000000100000000', 'hex'); let privateKeyStr; let existingSignedTx; const optionalAccount1 = accounts[0]; const optionalAccount2 = accounts[1]; const optionalAccount3 = accounts[2]; const sortedOptionalKeys = [Buffer.from(optionalAccount1.publicKey, 'hex'), Buffer.from(optionalAccount2.publicKey, 'hex'), Buffer.from(optionalAccount3.publicKey, 'hex')].sort((a, b) => a.compare(b)); const sortedMandatoryKeys = []; const senderKeyInfo = accounts[0]; const latestNonce = BigInt(3); const keys = { mandatoryKeys: sortedMandatoryKeys, optionalKeys: sortedOptionalKeys, }; -
Prepare a tokenTransferParams object and encode it using the
transferParamsSchema.const tokenTransferParams = { tokenID: tokenID, recipientAddress: cryptography.address.getAddressFromLisk32Address(accounts[1].address), amount: BigInt(20000000), data: 'Hello!', }; const encodedTransferParams = codec.encode(transferParamsSchema, tokenTransferParams); -
Create an un-signed transaction by mentioning the values of all the fields except for the
signaturesproperty. For now, assign an empty array to it.const unSignedTx = new Transaction({ module: 'token', command: 'transfer', nonce: latestNonce, senderPublicKey: Buffer.from(senderKeyInfo.publicKey, 'hex'), fee: BigInt(1000000), params: tokenTransferParams, signatures: [], }); -
Create a
readlineinterface to input private keys from the signatories.const rl = readline.createInterface({ input: process.stdin, output: process.stdout }); if (process.argv.length < 3) { console.log("Please provide all the required parameter when executing the script:"); console.log("node create-multiSig-transaction-offline.js PRIVATEKEY"); process.exit(1); } -
Create a separate file:
signedTx.jsonand add two curly brackets{}in it to signify that it is an empty JSON file. Now, come back to thecreate-multiSig-transaction.jsfile. -
We would like the user to be asked to confirm the private key that they will enter whilst running the script so let’s add a
readlinequestion.rl.question("Do you want to sign the transaction? 'yes'", function (confirmed) { confirmed = confirmed.toLowerCase(); if (confirmed == "yes" || confirmed == "y") { privateKeyStr = process.argv[2]; -
Since our
signedTx.jsonfile is empty at this moment, we want the following logic to only run when there are no signatures for a transaction.if (Object.keys(signedTX).length === 0) { // Take all the variables defined earlier and sign the transaction with the provided private key let txWithOneSig = transactions.signMultiSignatureTransaction(unSignedTx, chainID, Buffer.from(privateKeyStr, 'hex'), keys, transferParamsSchema); // Convert the signed transaction object into a JSON object txWithOneSig['senderPublicKey'] = unSignedTx.senderPublicKey.toString('hex'); txWithOneSig['signatures'][0] = unSignedTx.signatures[0].toString('hex'); txWithOneSig['signatures'][1] = unSignedTx.signatures[1].toString('hex'); txWithOneSig['signatures'][2] = unSignedTx.signatures[2].toString('hex'); txWithOneSig['id'] = txWithOneSig.id.toString('hex'); txWithOneSig['params']['tokenID'] = tokenTransferParams.tokenID.toString('hex'); txWithOneSig['params']['recipientAddress'] = tokenTransferParams.recipientAddress.toString('hex'); try { // Write the JSON object to the 'signedTx.json' file so that it can be shared with the other signatory. fs.writeFileSync('signedTx.json', JSON.stringify(txWithOneSig, (_, v) => typeof v === 'bigint' ? v.toString() : v)); console.log('The file is written successfully'); console.log("Please now sign the transaction with a different Private Key!") } catch (err) { console.error('Error writing the file:', err); } process.exit(0); } -
The logic for retrieving the first signature is complete. Let’s add the code for the second signatory.
else { // Convert the JSON object read on the 7th step back to the Lisk accepted format, for the signing process. signedTX['nonce'] = BigInt(signedTX.nonce); signedTX['fee'] = BigInt(signedTX.fee); signedTX['senderPublicKey'] = Buffer.from(signedTX.senderPublicKey, 'hex'); signedTX['signatures'][0] = Buffer.from(signedTX.signatures[0], 'hex'); signedTX['signatures'][1] = Buffer.from(signedTX.signatures[1], 'hex'); signedTX['signatures'][2] = Buffer.from(signedTX.signatures[2], 'hex'); signedTX['params']['tokenID'] = unSignedTx.params['tokenID']; signedTX['params']['recipientAddress'] = unSignedTx.params['recipientAddress']; signedTX['params']['amount'] = unSignedTx.params['amount']; signedTX['id'] = Buffer.from(signedTX.id, 'hex'); // Sign the transaction using the second signatory's private key transactions.signMultiSignatureTransaction(signedTX, chainID, Buffer.from(privateKeyStr, 'hex'), keys, transferParamsSchema); const fullySignedTx = new Transaction(signedTX) fullySignedTx.params = encodedTransferParams // Get the hex string of the transaction which will be used in either dry running or sending the transaction to the node const fullySignedTxHex = fullySignedTx.getBytes().toString('hex'); console.log(fullySignedTxHex); // Un-comment the following lines when in online mode and connected to a node to dry-run or post a transaction. // dryRun(fullySignedTxHex); // postTransaction(fullySignedTxHex); process.exit(0); } -
Define the functions for dry running or posting the transaction:
create-multiSig-transaction.jsasync function dryRun(fullySignedTxHex) { const appClient = await apiClient.createWSClient(RPC_ENDPOINT); const result = await appClient.invoke('txpool_dryRunTransaction', { transaction: fullySignedTxHex, }); console.log('Result from dry running the transaction is: ', result); } async function postTransaction(fullySignedTxHex) { const appClient = await apiClient.createWSClient(RPC_ENDPOINT); const result = await appClient.invoke('txpool_postTransaction', { transaction: fullySignedTxHex, }); console.log('Result from posting the transaction is: ', result); process.exit(0); }
The script is ready and it can be used to either dry run or send the transaction to the node after properly signing the token transfer transaction.
How to sign a multi-signature transaction
As the name suggests, a multi-signature transaction requires signatures from multiple accounts to be valid.
Therefore, it is necessary that the group collects all necessary signatures offline, for example by sharing the respective transaction object as JSON with all members. They can then consecutively add their signatures if they approve the transaction.
Once the required signatures are reached for a transaction, it is possible to send it to the network, like a normal transaction.
- Import the transaction
-
In Lisk Desktop, click on the Sign multisignature button in the left menu. This will open a new window, where it is possible to paste the JSON of the multi-sig transaction that the account intends to sign.
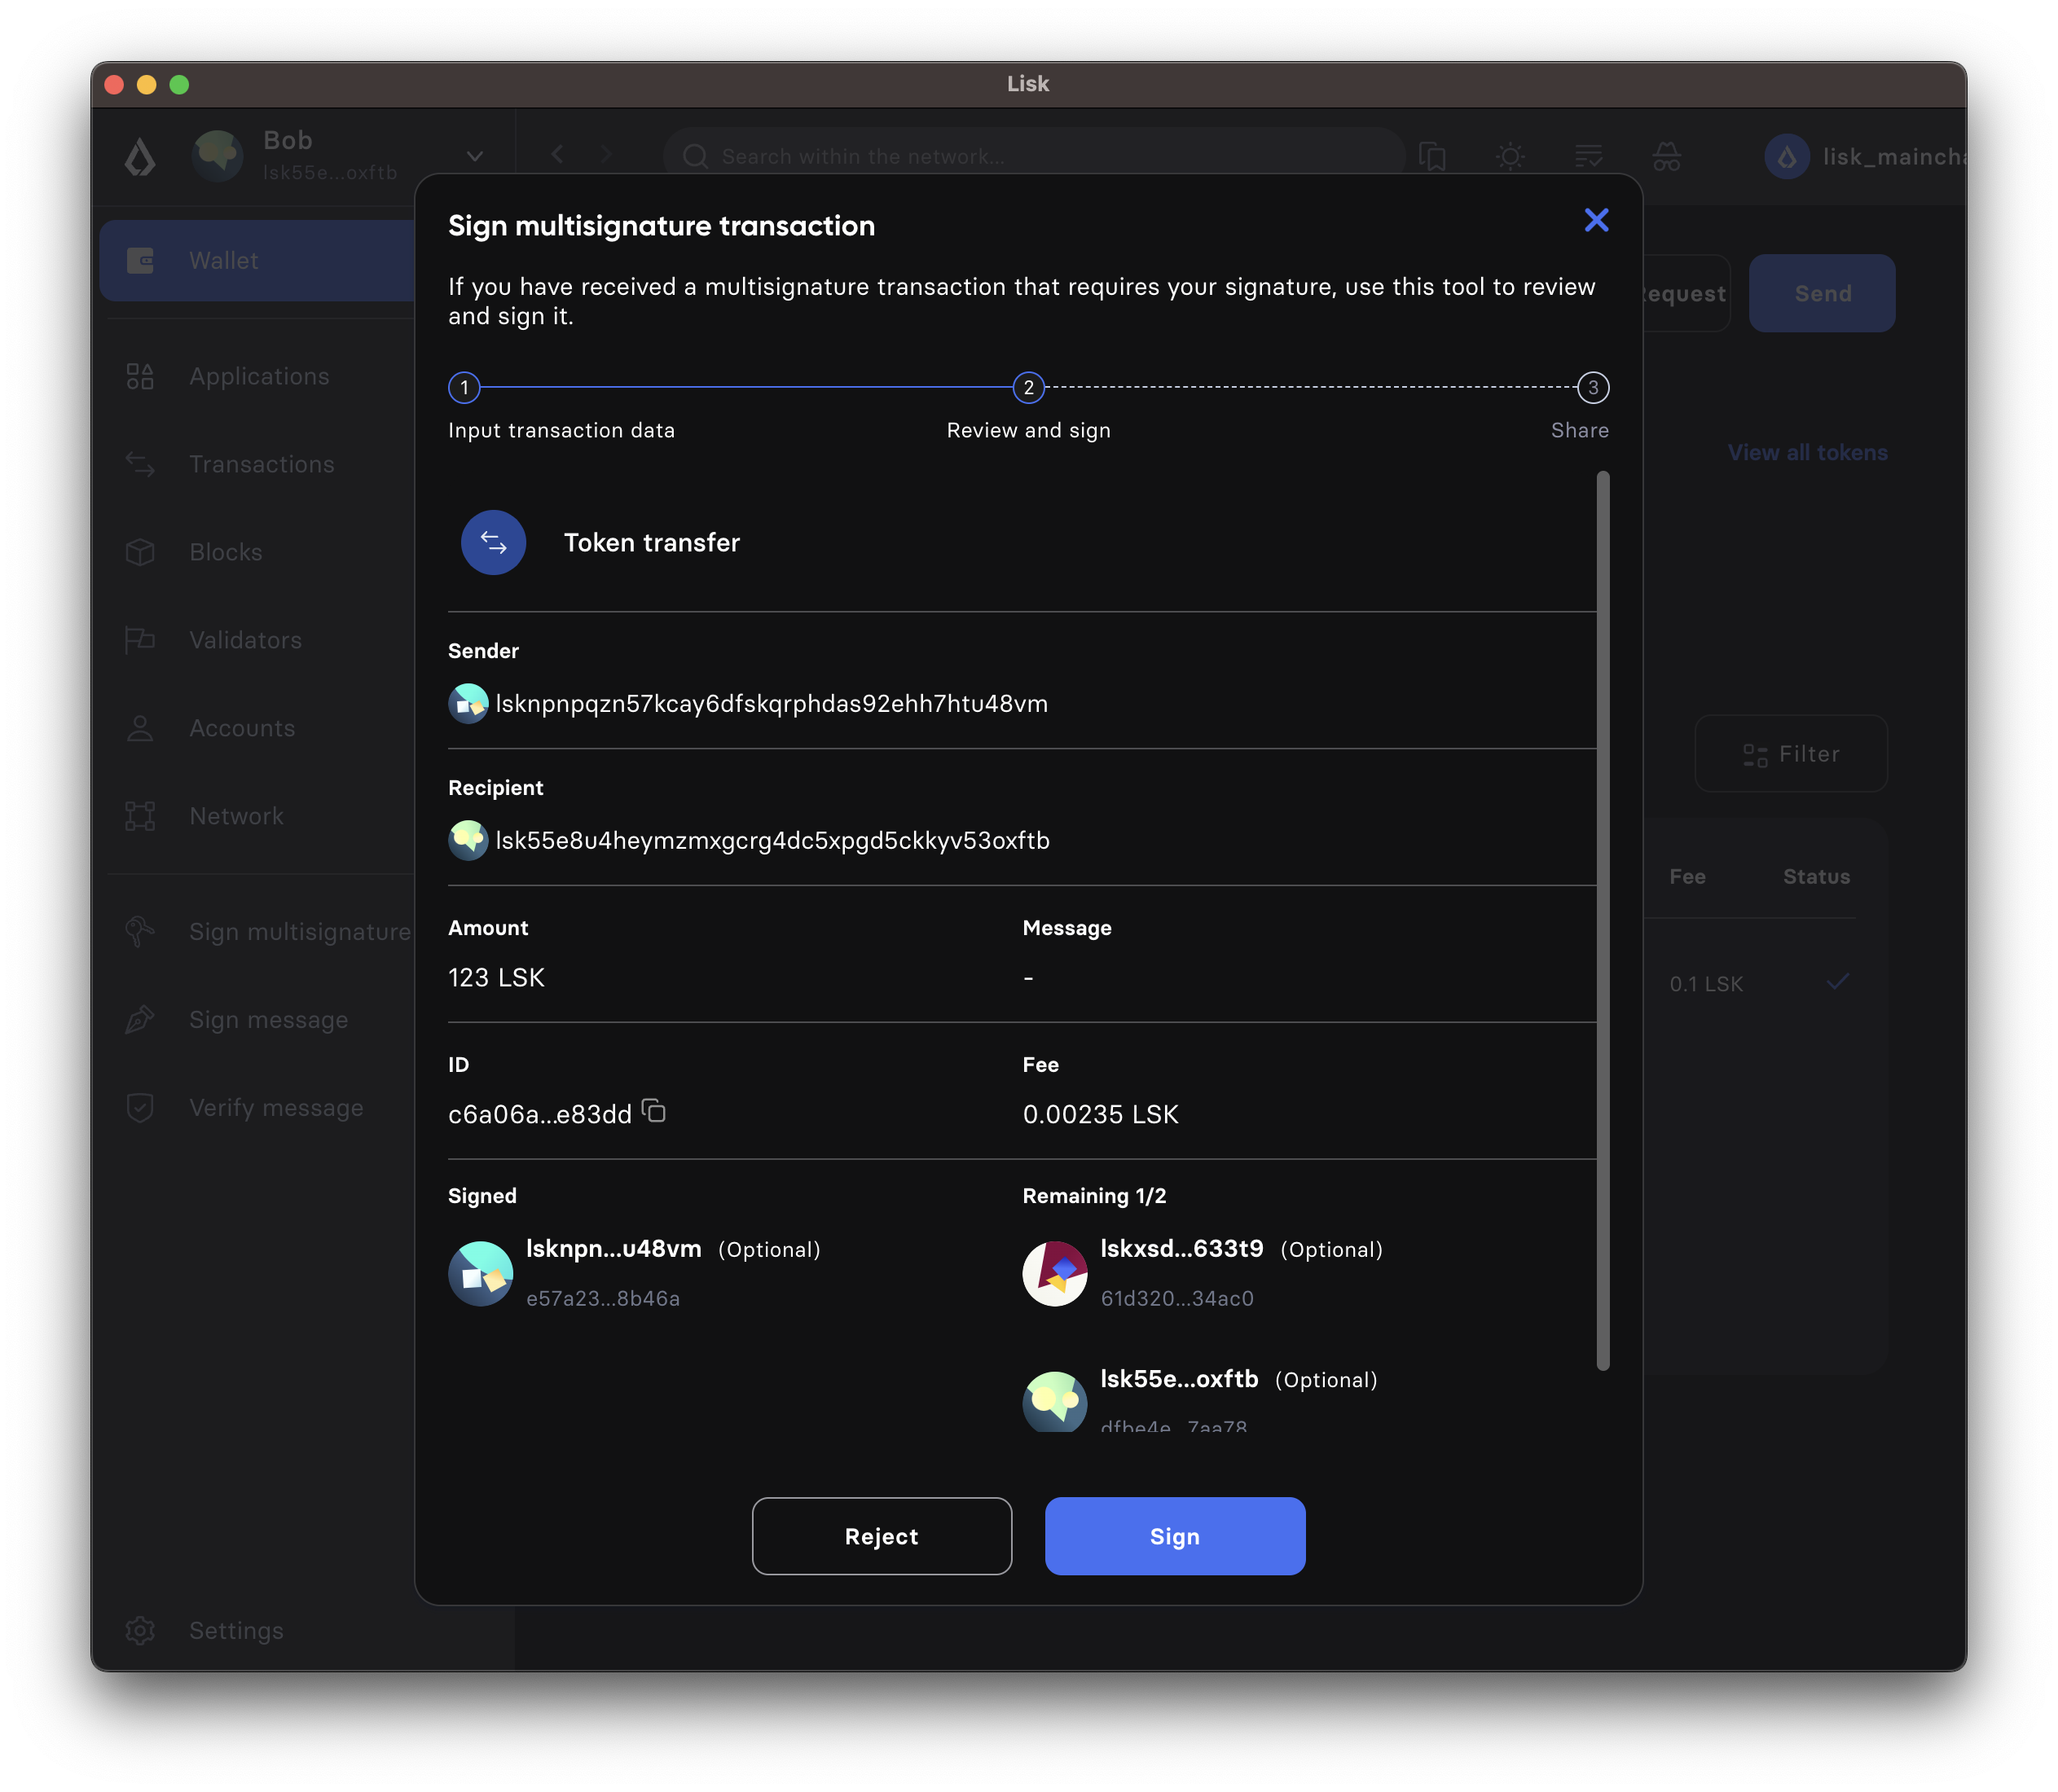
- Confirm the transaction parameters
-
Review the parameters of the transaction, and confirm the correctness with your signature by clicking on Sign, or reject the transaction by clicking on Reject.
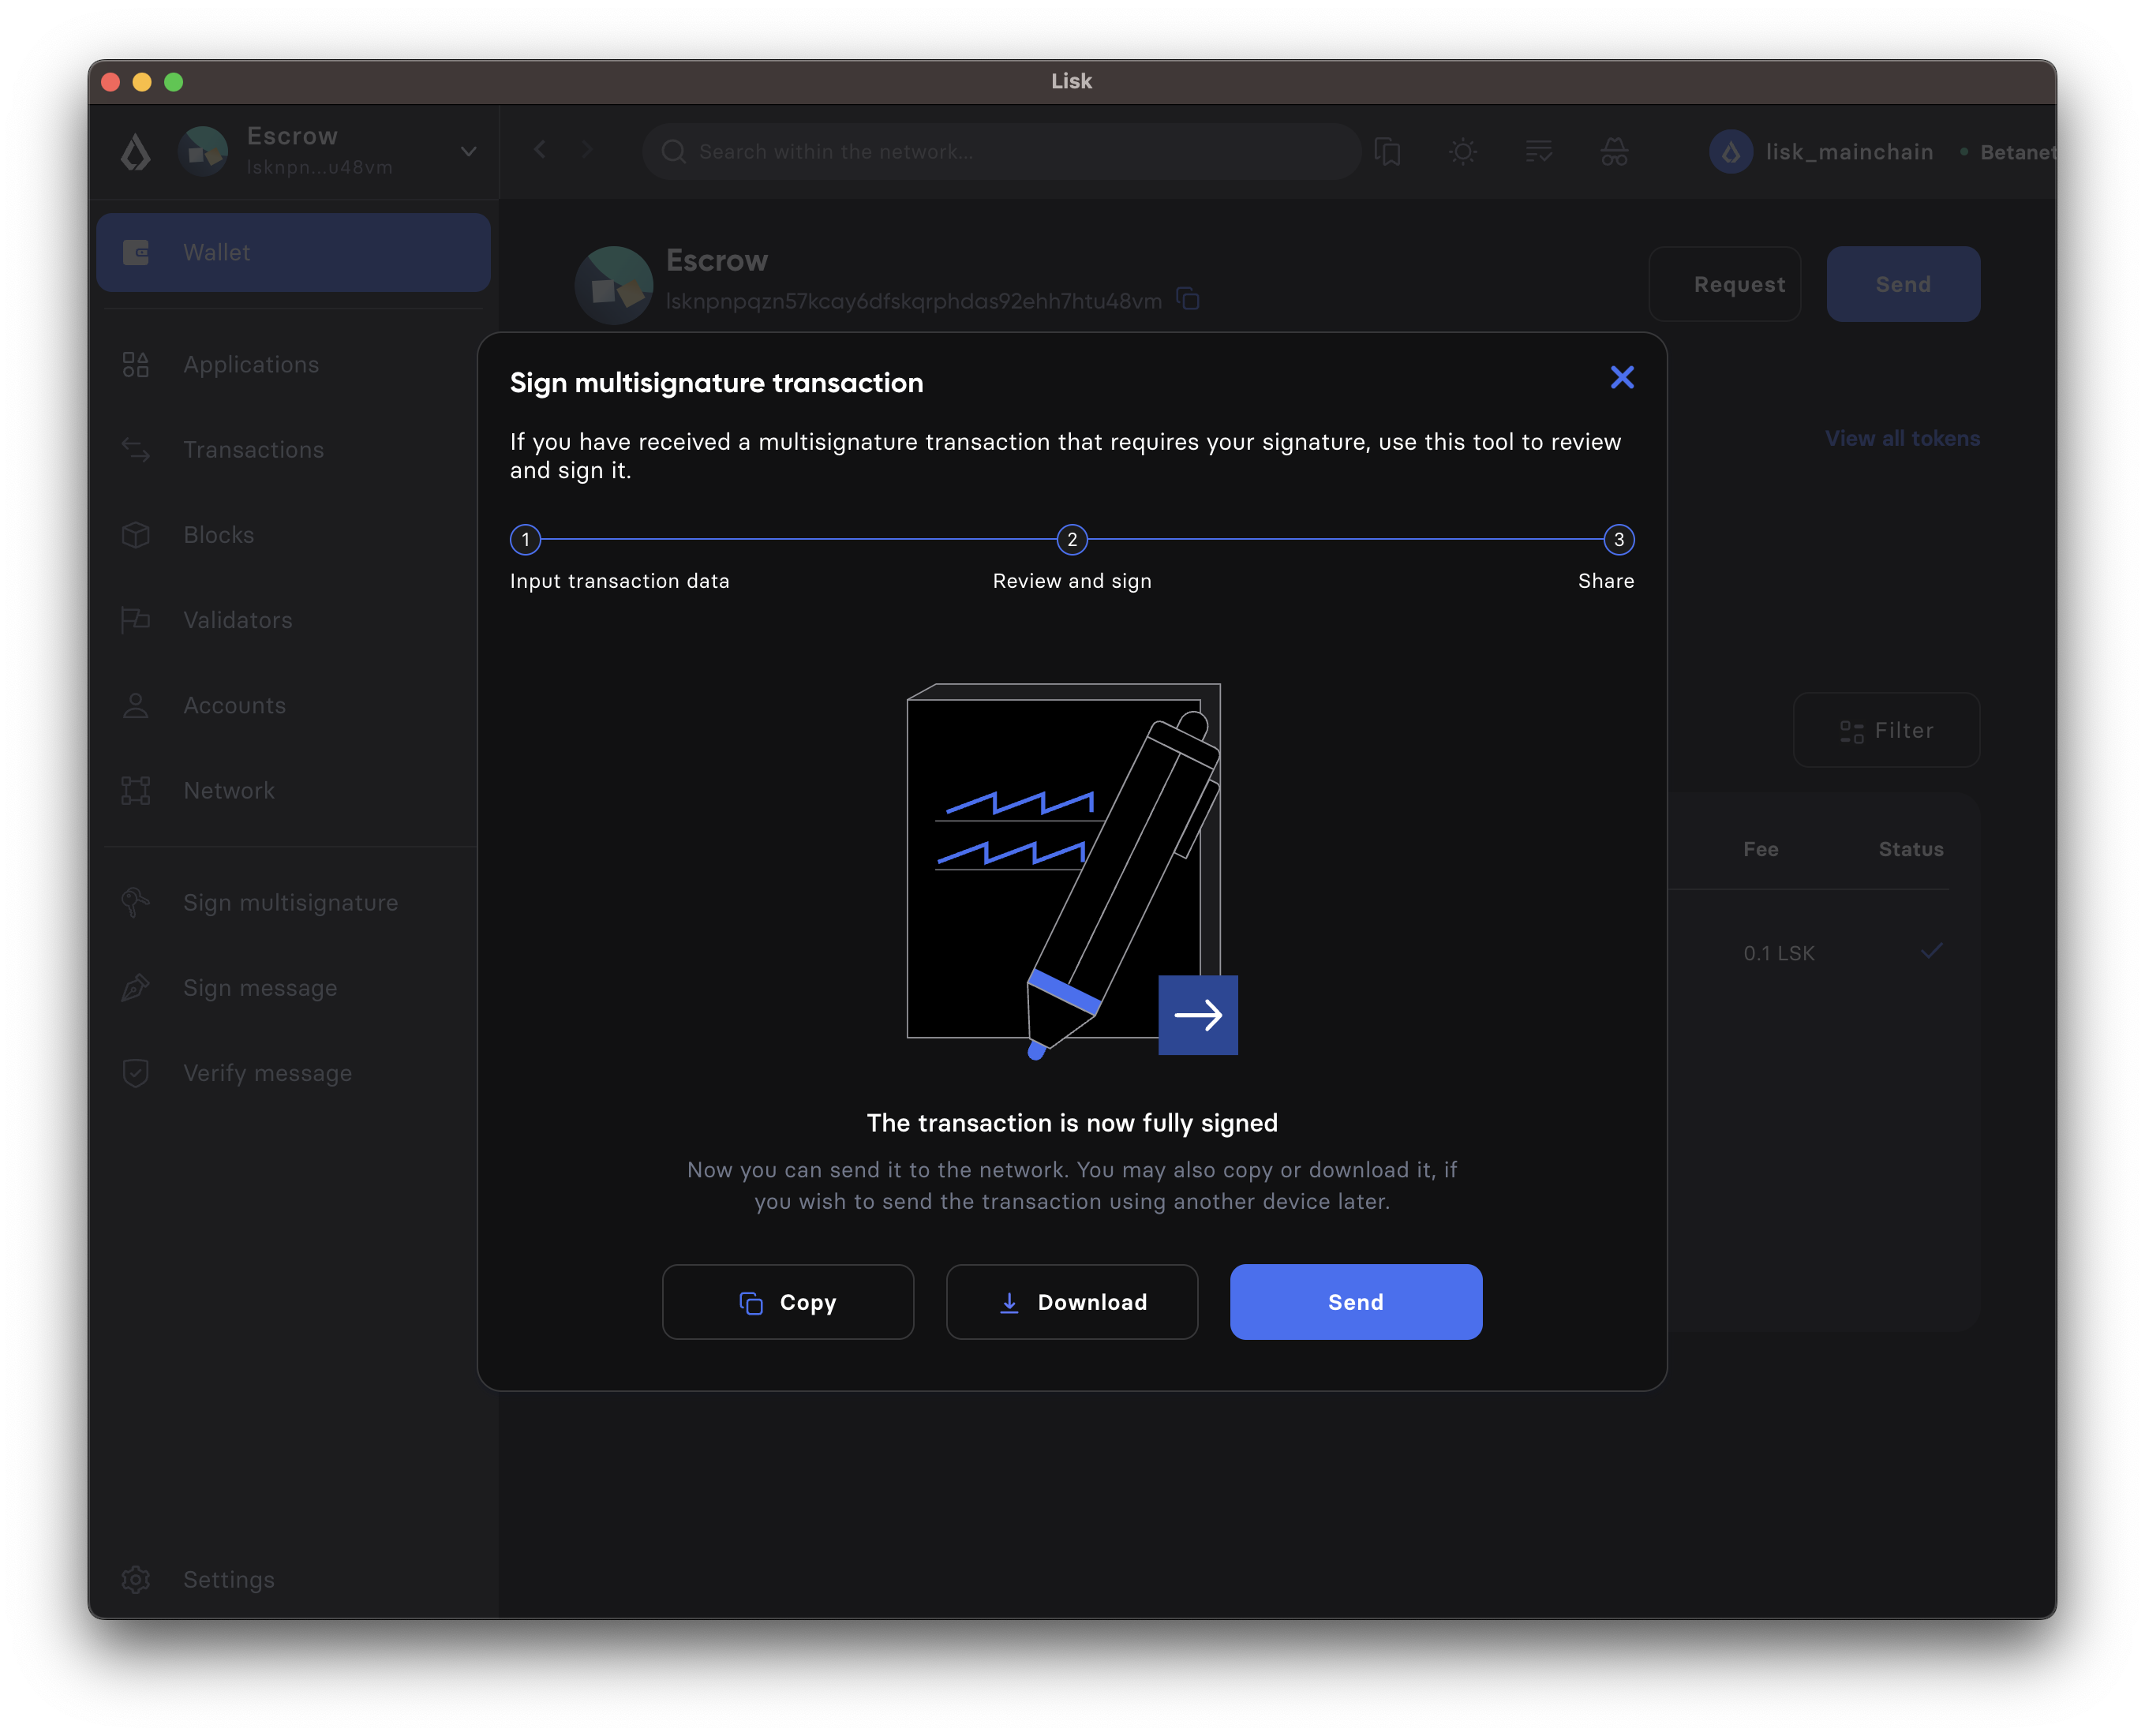
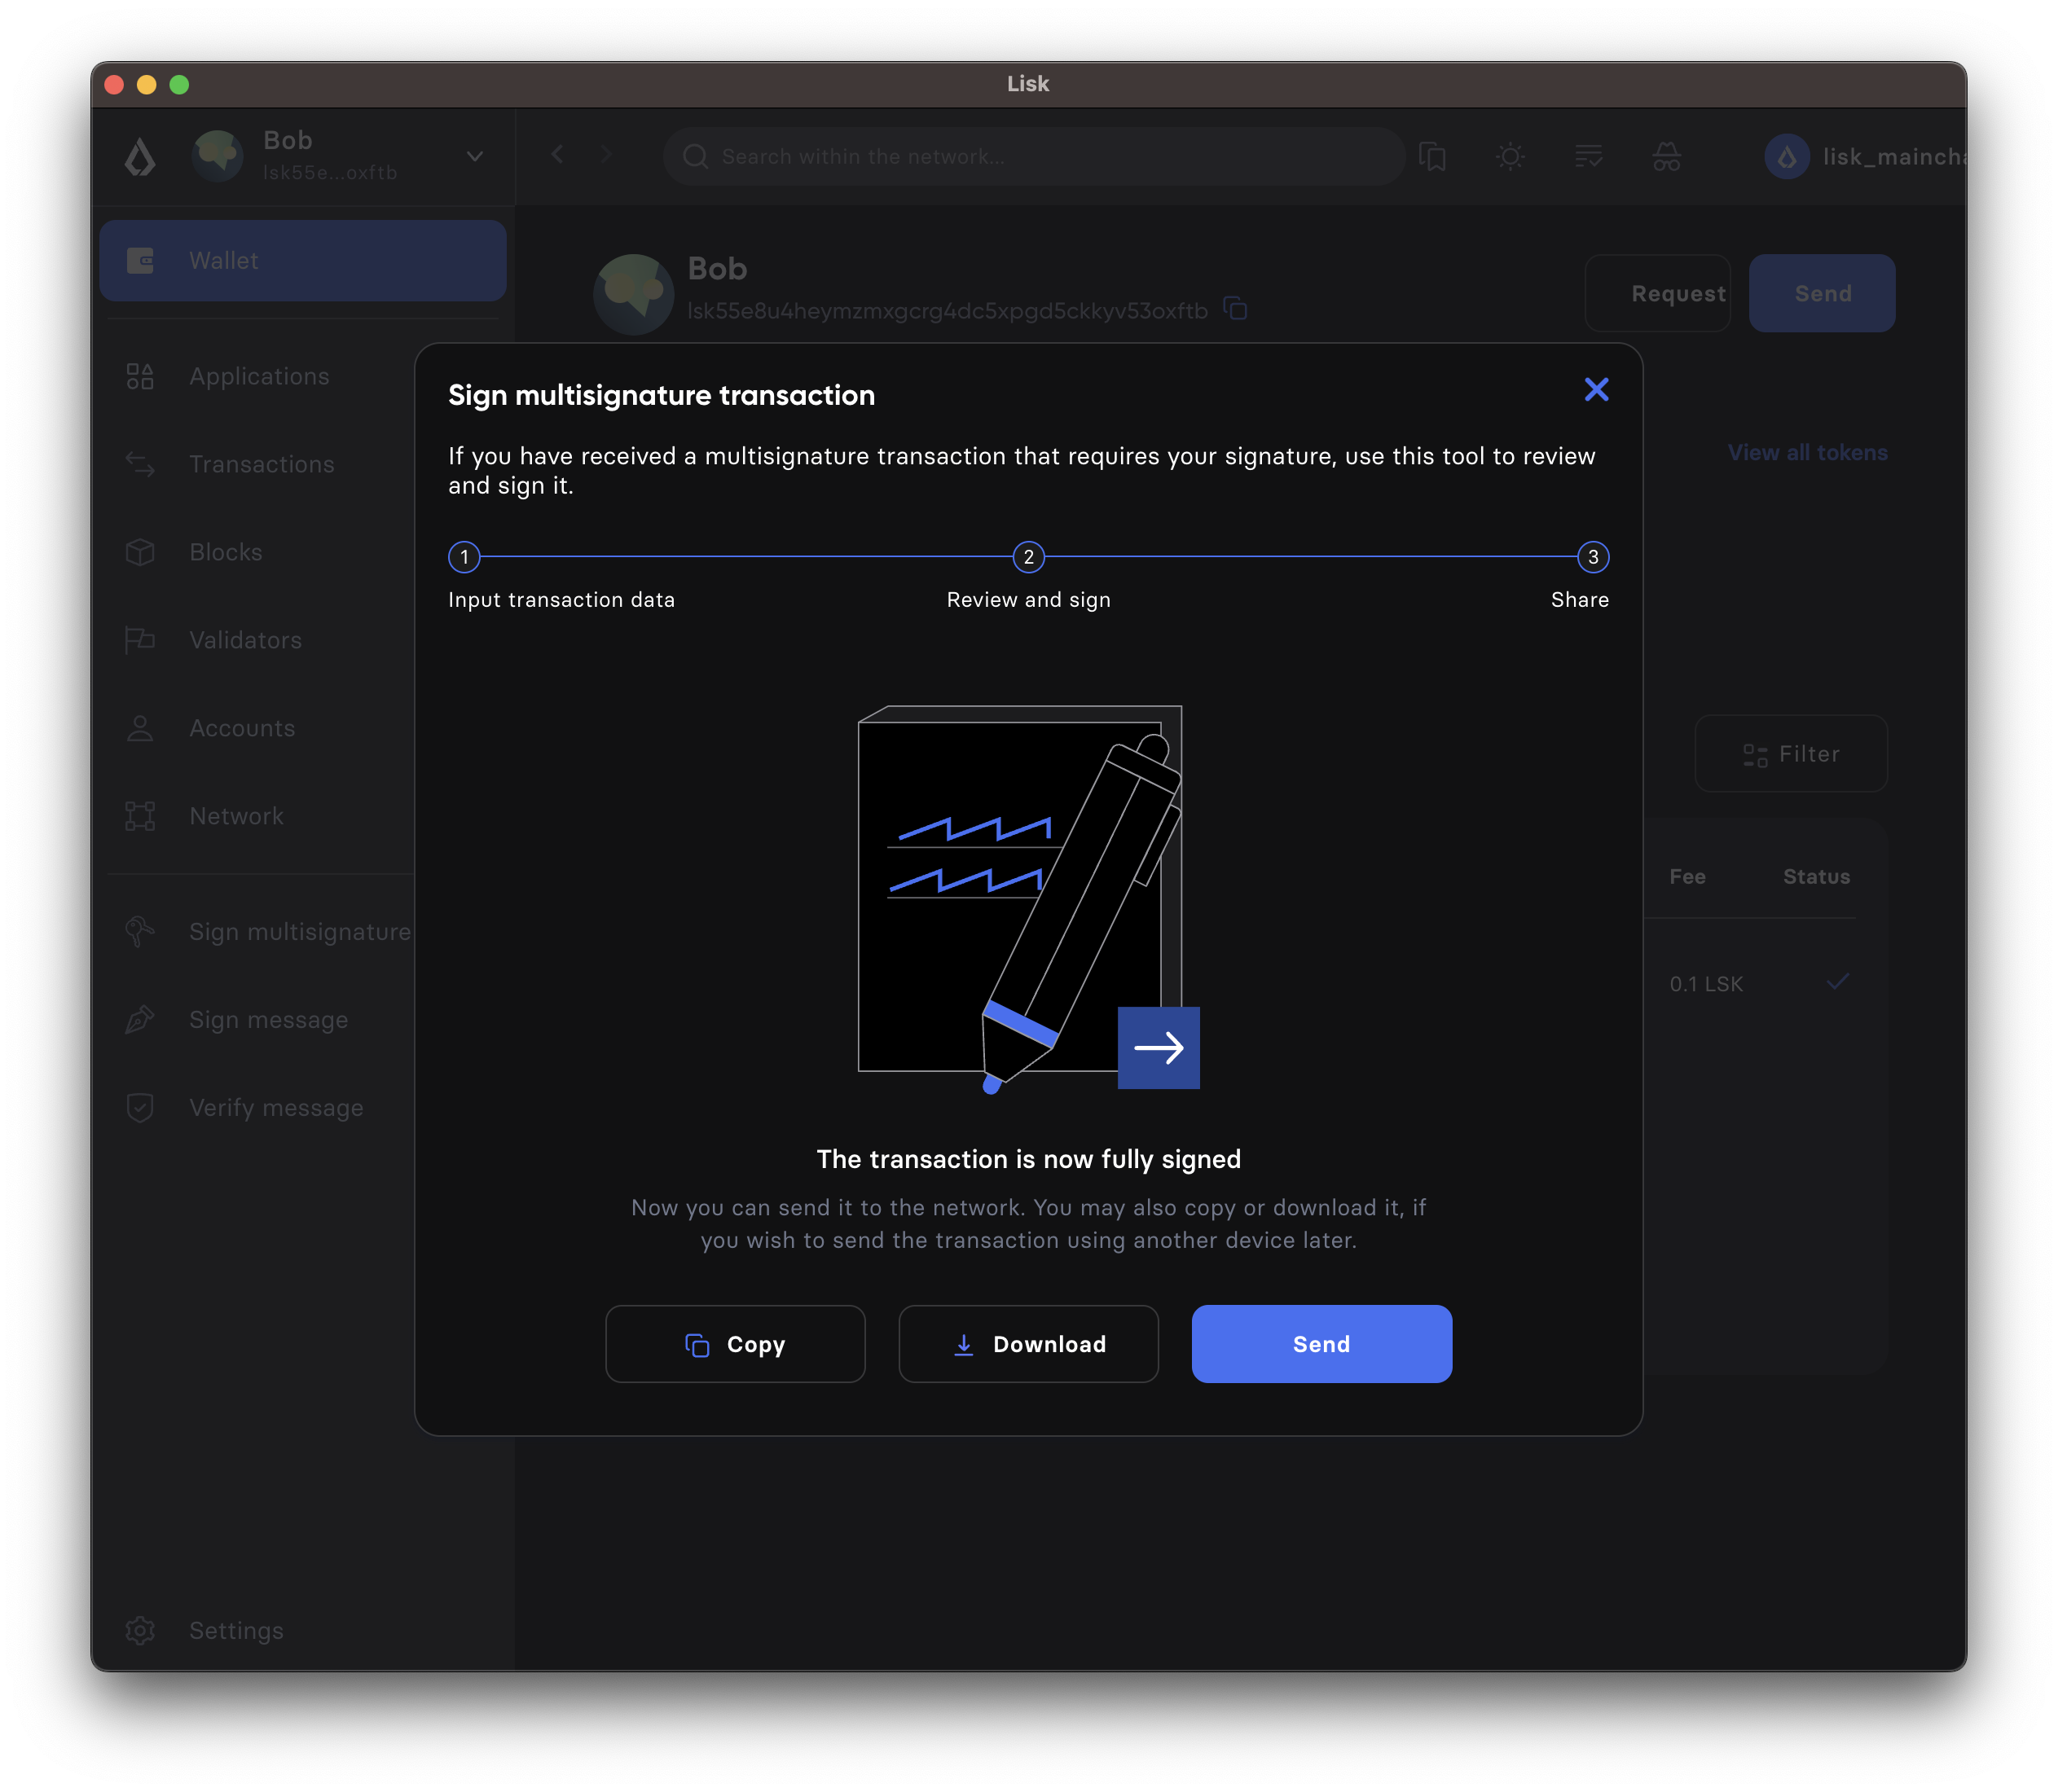
- Send the transaction
-
When the minimum required signatures for a multi-signature transaction are reached, it is possible to directly post the transaction by hitting the Send button. Otherwise, you can download the new JSON with your signature appended, and pass it to the next member of the multi-signature group.
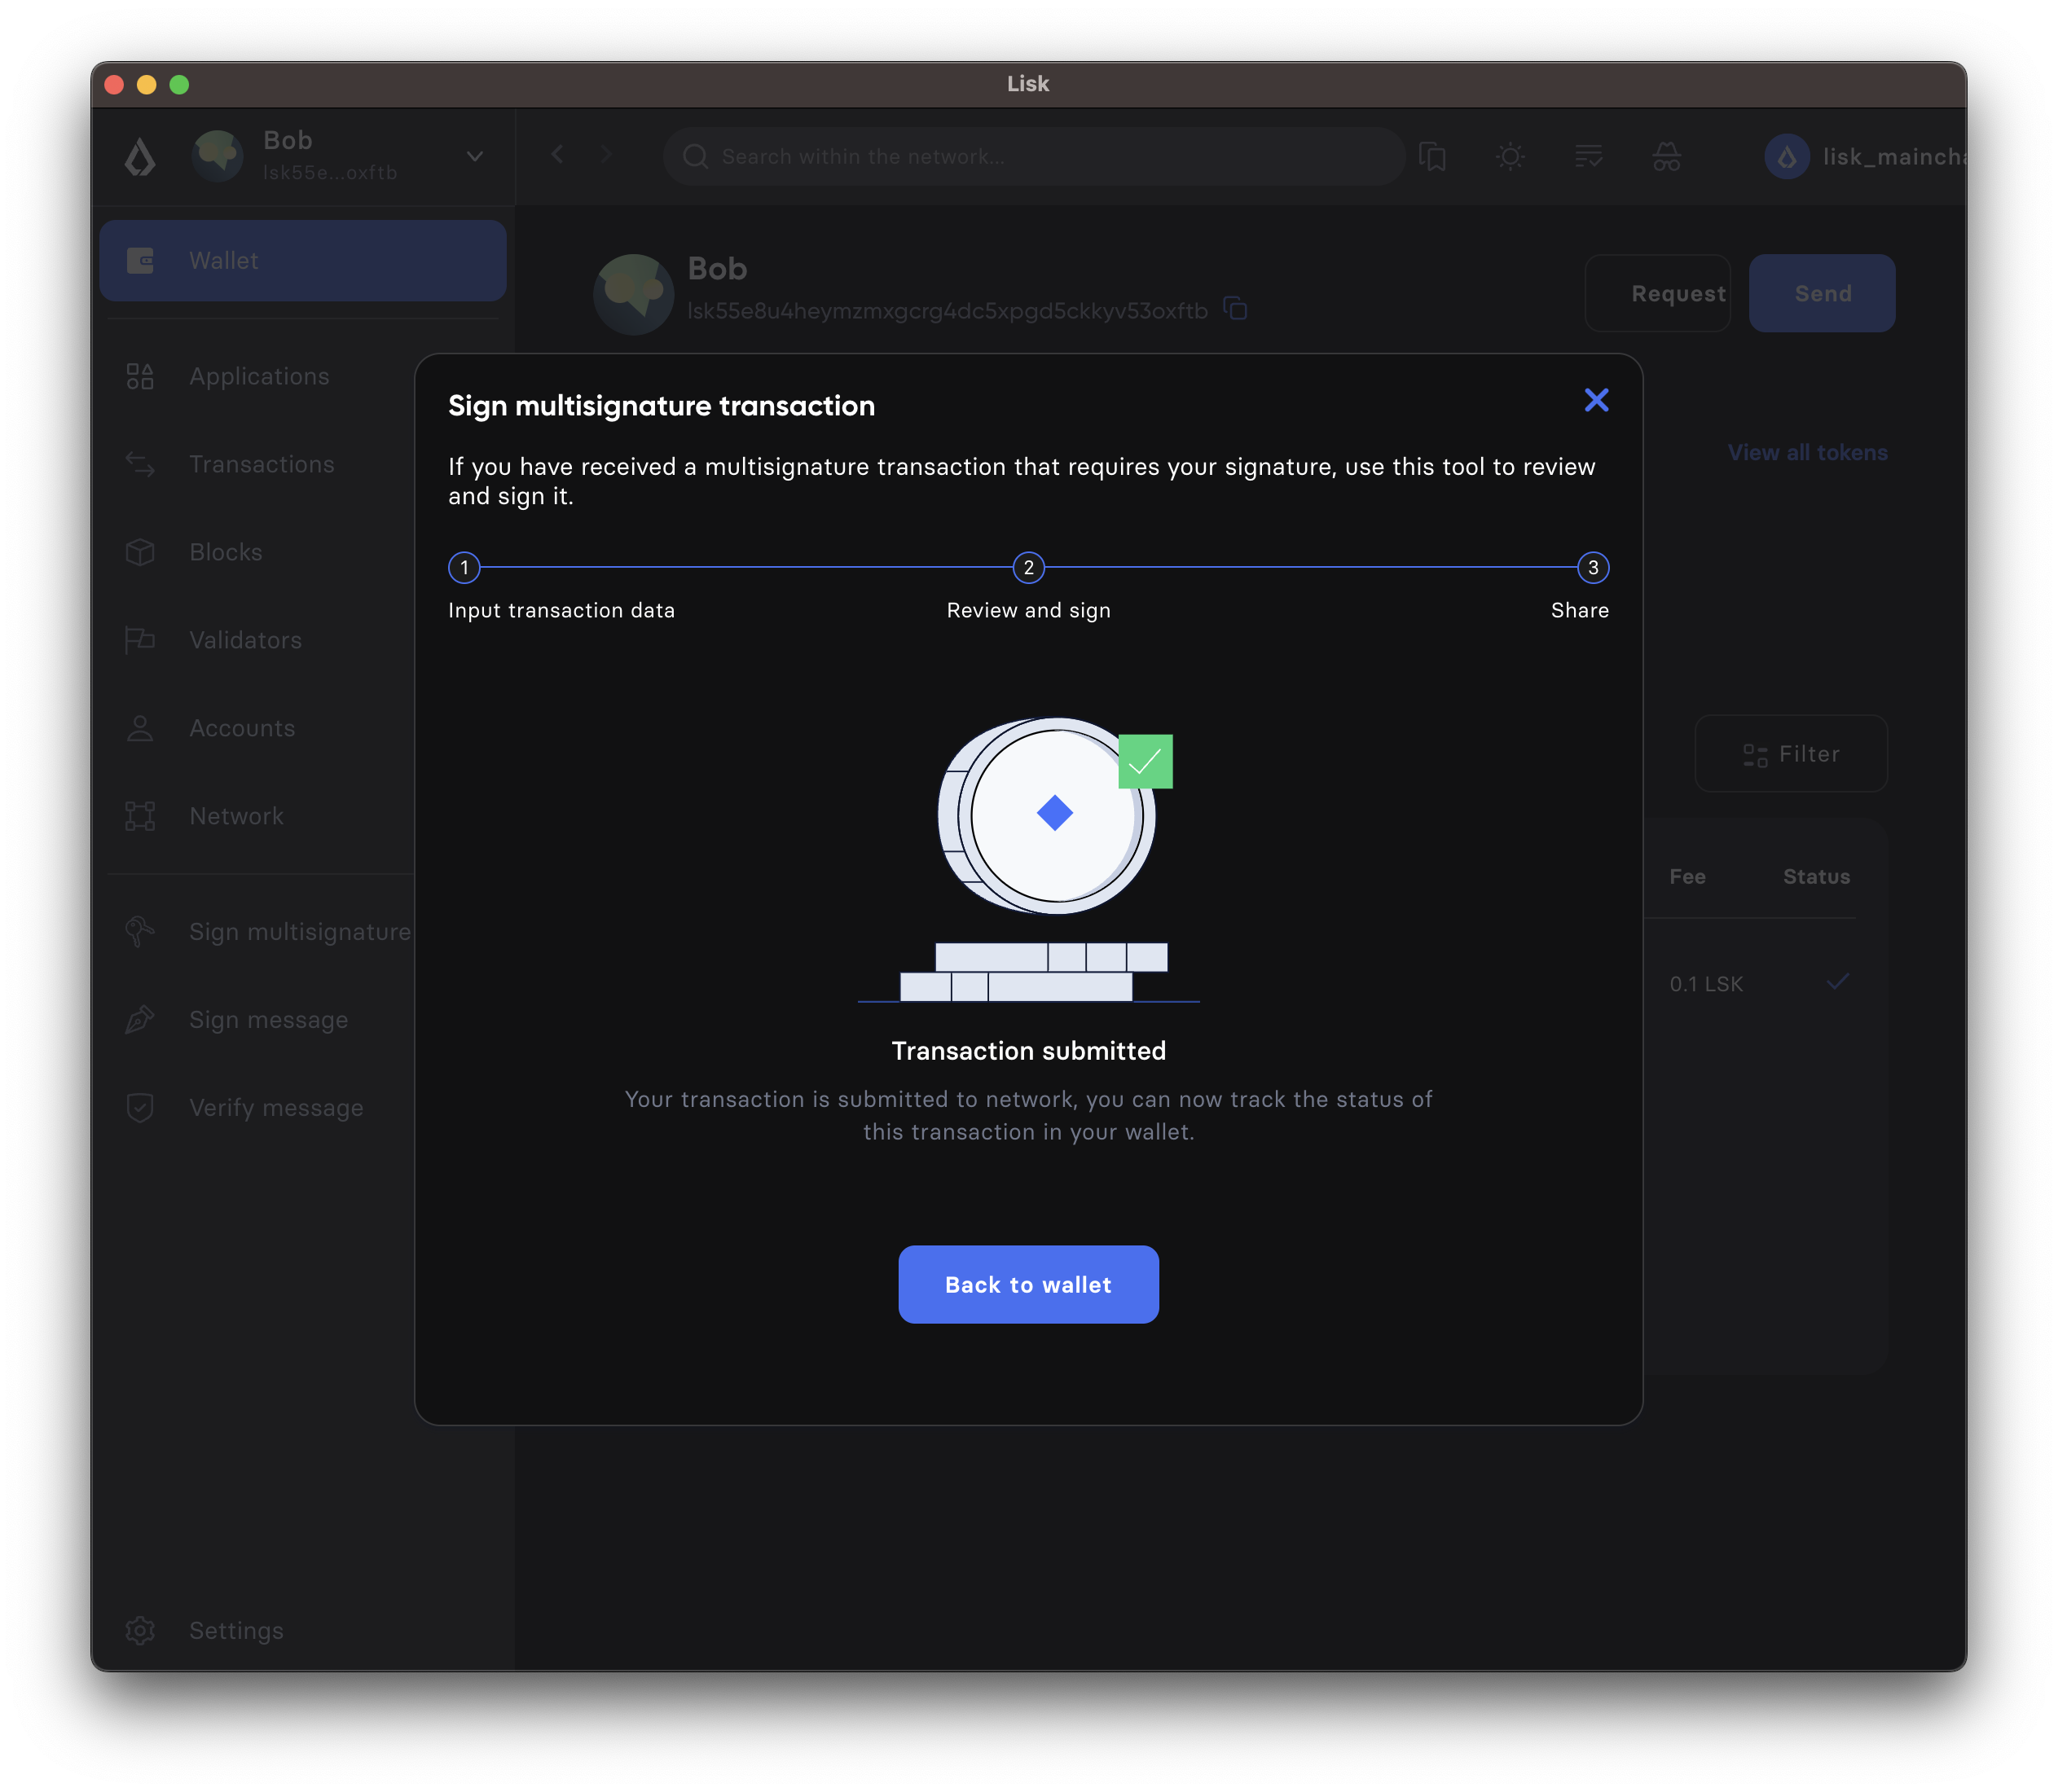
When the transaction is accepted, the following confirmation message will be displayed.
The transaction:sign command is used to sign a multi-signature transaction.
Paste the transaction hash retrieved in the previous step.
Since the multi-signature account set up in this guide requires two signatures, two public keys should be mentioned after the --optional-keys flag.
lisk-core transaction:sign 0a05746f6b656e12087472616e73666572180120c0843d2a20e98e8a6325730be6bf2644af83d5a0b004bb31c15858fedbd0ac2c1f89e2eece32270a0800000001000000001080dac4091a14f94b4fc46a71d7c913d89cbf30cc698f3ee3120d2200 --optional-keys c61cd862a8b7f73857b248a4358a7b35c29ca273d76ba3819e8c54b62801f16e e98e8a6325730be6bf2644af83d5a0b004bb31c15858fedbd0ac2c1f89e2eece --json --prettyEnter the account’s passphrase:
? Please enter passphrase: [hidden]The node will respond with an updated transaction hash string and the same transaction in JSON format as well.
Notice the signatures array in the JSON formatted transaction, it contains placeholders for three signatures.
The aforementioned sign transaction adds a single signature as per the lexicographical order of the public keys.
{
  "transaction": "0a05746f6b656e12087472616e73666572180120c0843d2a20e98e8a6325730be6bf2644af83d5a0b004bb31c15858fedbd0ac2c1f89e2eece32270a0800000001000000001080dac4091a14f94b4fc46a71d7c913d89cbf30cc698f3ee3120d22003a003a405470fa9d437fe8e8e2936ed527d269e91f256ca0b5d2a62f863276c2329d02ad69309f3f6b29648a627577ebc8234cd61fb6e4fae757c98dcd2928ea7eec5f053a00"
}
{
  "transaction": {
    "module": "token",
    "command": "transfer",
    "nonce": "1",
    "fee": "1000000",
    "senderPublicKey": "e98e8a6325730be6bf2644af83d5a0b004bb31c15858fedbd0ac2c1f89e2eece",
    "params": {
      "tokenID": "0000000100000000",
      "amount": "20000000",
      "recipientAddress": "lskgmmkgyc67n5jrpf2trgtxtc4yjg7bpu992chba",
      "data": ""
    },
    "signatures": [
      "",
      "5470fa9d437fe8e8e2936ed527d269e91f256ca0b5d2a62f863276c2329d02ad69309f3f6b29648a627577ebc8234cd61fb6e4fae757c98dcd2928ea7eec5f05",
      ""
    ],
    "id": "2d90fe6566f551a63f11861f7a70d3e0b6ee473f4d4c04364783fb3193bdbd2a"
  }
}
Use the transaction hash above and send it to the second signatory. The second signatory should repeat the same process with one change, update the transaction hash with the recently signed transaction, like this:
lisk-core transaction:sign 0a05746f6b656e12087472616e73666572180120c0843d2a20e98e8a6325730be6bf2644af83d5a0b004bb31c15858fedbd0ac2c1f89e2eece32270a0800000001000000001080dac4091a14f94b4fc46a71d7c913d89cbf30cc698f3ee3120d22003a003a405470fa9d437fe8e8e2936ed527d269e91f256ca0b5d2a62f863276c2329d02ad69309f3f6b29648a627577ebc8234cd61fb6e4fae757c98dcd2928ea7eec5f053a00 --optional-keys c61cd862a8b7f73857b248a4358a7b35c29ca273d76ba3819e8c54b62801f16e e98e8a6325730be6bf2644af83d5a0b004bb31c15858fedbd0ac2c1f89e2eece --json --prettyEnter the account’s passphrase:
? Please enter passphrase: [hidden]{
"transaction": "0a05746f6b656e12087472616e73666572180120c0843d2a20e98e8a6325730be6bf2644af83d5a0b004bb31c15858fedbd0ac2c1f89e2eece32270a0800000001000000001080dac4091a14f94b4fc46a71d7c913d89cbf30cc698f3ee3120d22003a40422c376f6d1542e14c1f6fb993af1d6b1dd56506ce5da16835bf1194922d1aeaaa9424ae4fe39f2683a9f4eba297337b083e76d96293b1191ca4ee956f6f23033a405470fa9d437fe8e8e2936ed527d269e91f256ca0b5d2a62f863276c2329d02ad69309f3f6b29648a627577ebc8234cd61fb6e4fae757c98dcd2928ea7eec5f053a00"
}
{
"transaction": {
"module": "token",
"command": "transfer",
"nonce": "1",
"fee": "1000000",
"senderPublicKey": "e98e8a6325730be6bf2644af83d5a0b004bb31c15858fedbd0ac2c1f89e2eece",
"params": {
"tokenID": "0000000100000000",
"amount": "20000000",
"recipientAddress": "lskgmmkgyc67n5jrpf2trgtxtc4yjg7bpu992chba",
"data": ""
},
"signatures": [
"422c376f6d1542e14c1f6fb993af1d6b1dd56506ce5da16835bf1194922d1aeaaa9424ae4fe39f2683a9f4eba297337b083e76d96293b1191ca4ee956f6f2303",
"5470fa9d437fe8e8e2936ed527d269e91f256ca0b5d2a62f863276c2329d02ad69309f3f6b29648a627577ebc8234cd61fb6e4fae757c98dcd2928ea7eec5f05",
""
],
"id": "9ce9fc9c1bd8ba72f611ad7e8282586e18f495a760add24097187f4e405b532e"
}
}Post the transaction to the node by either using the transaction:send command or txpool_postTransaction endpoint.
Once the transaction is executed, check the account balance of the sender (the multi-signature account) and the receiver. The balance of both accounts should have changed.
-
To collect the signature for a multi-signature transaction, the first signatory should run the
create-multiSig-transaction.jsfile by passing their private key:node create-multiSig-transaction.js df4f52c787f9cb993384c42c2c146bd1d4d433790d1e175baa03c484543bf760c61cd862a8b7f73857b248a4358a7b35c29ca273d76ba3819e8c54b62801f16ey -
Confirm signing the transaction by passing
yesory.Do you want to sign the transaction? 'yes' -
Transaction signed successfully by the first signatory. The CLI will display the following message:
The file is written successfully Please now sign the transaction with a different Private Key! -
Check the
signedTx.jsonfile now, it will have a transaction object with a single signature.signedTx.json{"module":"token","command":"transfer","params":{"tokenID":"0000000100000000","recipientAddress":"f94b4fc46a71d7c913d89cbf30cc698f3ee3120d","amount":"20000000","data":"Hello!"},"nonce":"3","fee":"1000000","senderPublicKey":"e98e8a6325730be6bf2644af83d5a0b004bb31c15858fedbd0ac2c1f89e2eece","signatures":["","2db446f6d9e0d0dfb07fc8fd4e3fc433c6daff5245fe56af35528cb8efc05db0fd9c0f7cec324fc28e067850ea8eda13b96cb27398a24484ed639b8c5fdb0d08",""],"id":"697696fd2b4369deb859efcc3b4ab9eaf63651f8726f48ca3005451f28ebcf05"} -
Pass the multiSigtx-creation-signing folder to the other signatory so that they can use the same script and transaction with a single signature to sign the transaction.
-
The second signatory will repeat the same process by passing their private key whilst running the script.
node create-multiSig-transaction.js 5f6b8fab4419d78e7e5620c03dd4c54dbf82e14f7b18e68b983c1c1884252dd8e98e8a6325730be6bf2644af83d5a0b004bb31c15858fedbd0ac2c1f89e2eecey -
Confirm signing the transaction by passing
yesory.Do you want to sign the transaction? 'yes' -
After signing the transaction again, the script will output the signed transaction hash, which can be used to dry run or post the transaction to the node.
Signed transaction HEX string, ready to be dry-run or sent to the node0a05746f6b656e12087472616e73666572180320c0843d2a20e98e8a6325730be6bf2644af83d5a0b004bb31c15858fedbd0ac2c1f89e2eece322d0a0800000001000000001080dac4091a14f94b4fc46a71d7c913d89cbf30cc698f3ee3120d220648656c6c6f213a40ab75da7fd2259685f612fdb2524857ab41e41b72ba12d3261ff8d0f6869ee07c658455c68a791b71fefa5699e19c986cce3c87e752fc4271c3fe9c62071e9c0d3a402db446f6d9e0d0dfb07fc8fd4e3fc433c6daff5245fe56af35528cb8efc05db0fd9c0f7cec324fc28e067850ea8eda13b96cb27398a24484ed639b8c5fdb0d083a00 -
You can simple uncomment the
dryRun()or thepostTransaction()function calls in the create-multiSig-transaction.js script to dry run the signed transaction or to post it to the node, respectively. Alternatively, you can also post the transaction to the node by either using the transaction:send command or txpool_postTransaction endpoint.-
Once the transaction is executed, check the account balance of the sender (the multi-signature account) and the receiver. The balance of both accounts should have changed.
-